Sewing Vloggers

Showing posts with label lining. Show all posts

Sunday, July 21, 2019

The Periwinkle Linen Dress


The Dandelion Dress served as the muslin for the Periwinkle Linen Dress. I love them both and they  are really both quite different as you will soon see. They are both made from New Look 6866 with original alterations  to change the silhouette and hem finish. I was inspired by the garment you see here. With the Periwinkle dress I went for simple, letting the fabric shine.


Pattern:

New Look 6866 is a flowy, summery maxi dress that the pattern describes as  "five styles with length and neckline variations." They are all sleeveless and the necklines are all lovely. I went for the high front neckline and the V back. This is a fabulous basic pattern with lots of design ease but it fit me well in the upper chest/shoulders so I am very happy with that. I flat pattern measured and there was no need to do an FBA for my C cup. I will get on my high horse and say once again, this is design ease, that extra room, not a mistake in drafting the pattern.  You want big and flow-y, you get bigger and flowier than the basic pattern block.  Design ease..........


Fabric:


The computer does not do this fabric justice. It leans toward lavender and I used lavender thread to sew it. It is a yarn dyed linen/cotton blend, a fabric I have used many times and think is one of the best values out there. However, I am stymied. I want more of this periwinkle but did I look at the bolt end for info? Just quickly to discern that it was Essex linen from Kaufmann. Now, when I go to the color charts, I can't find this color. I can find Cadet but that is blue and I have some of that. This has a green selvage. I am going back to the quilt store where I bought it to see if they can help and hopefully order some more. You can never have too much linen. It is the fabric that will be in style forever.
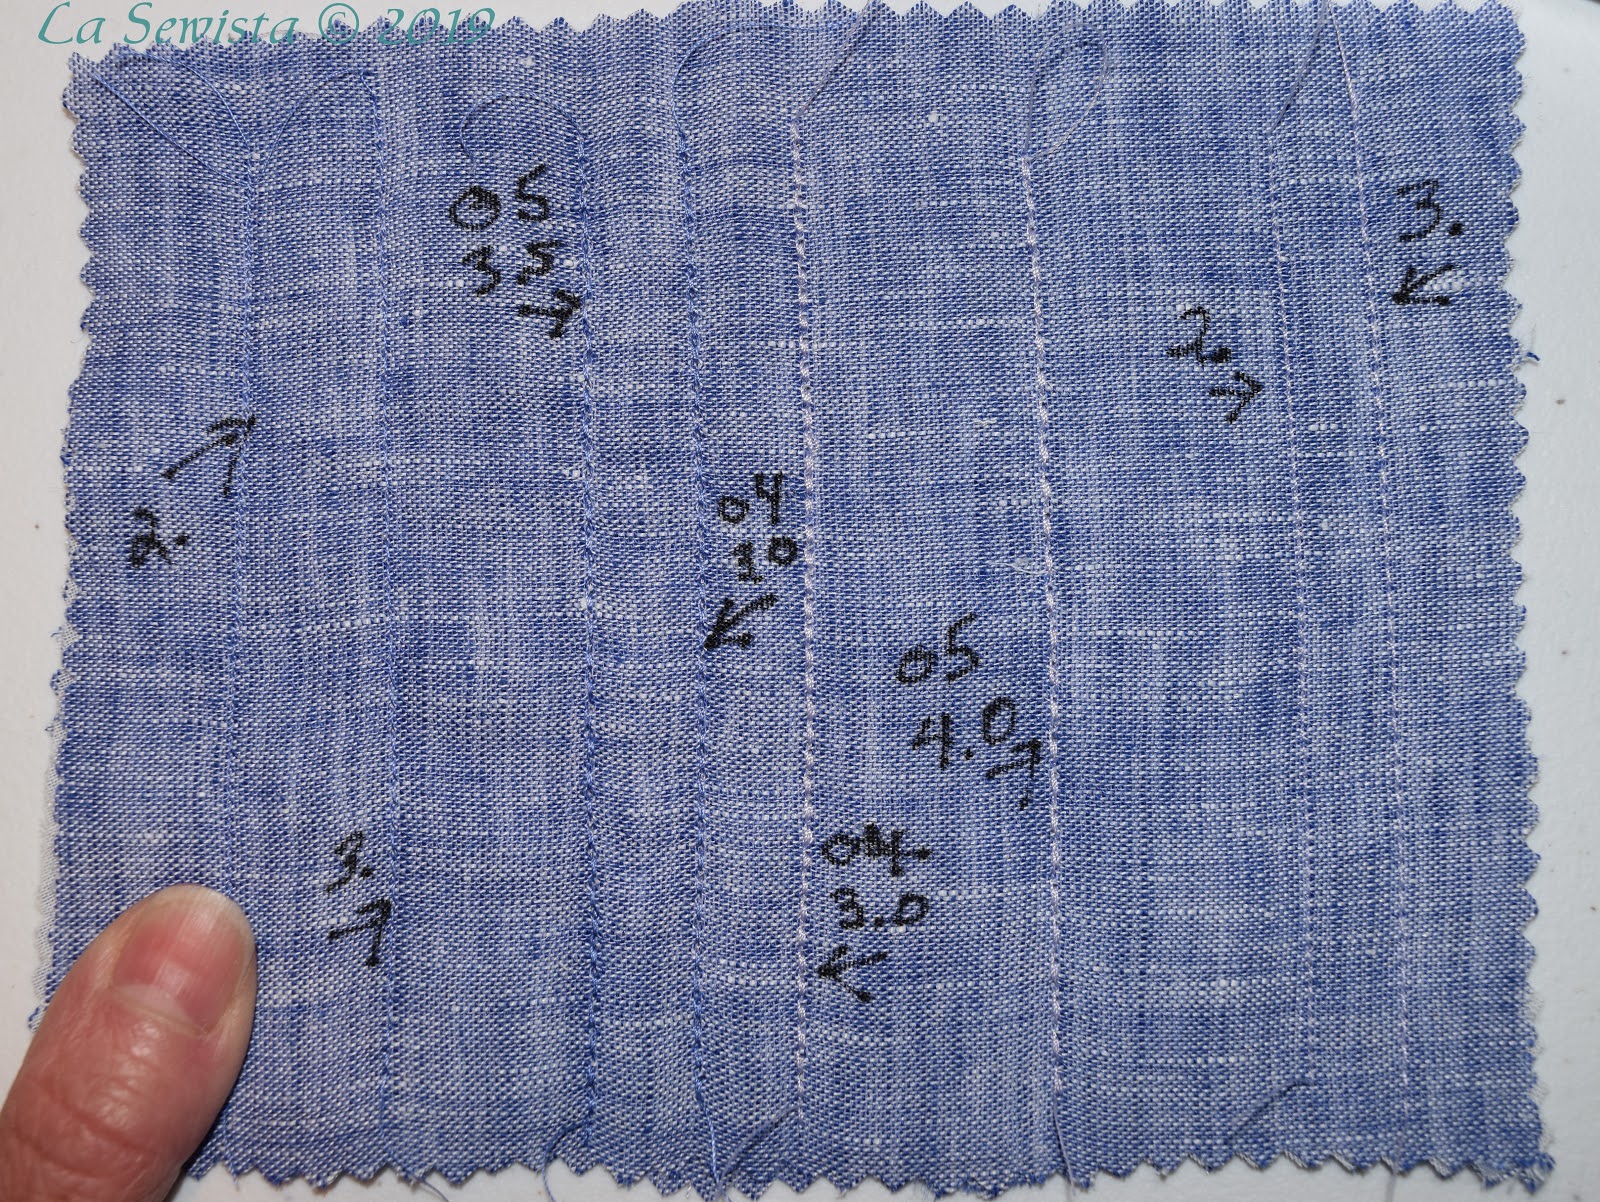

Another issue with yard dyed fabrics, well let me stop right here! Just in case you don't know what a yarn dyed fabric is here is an explanation: Yarn dyed fabrics have the yarns/threads dyed before they are woven into fabric. This allows you to have all of your weft threads one color and your warp threads another color. It gives a lot of character and depth to the fabric. If you've seen iridescent silk dupioni, you have seen a yarn dyed. Kaufmann's Essex blends are often  a colored linen thread and a white or black cotton thread going the other way. Back to the issue---I wanted to topstitch this dress, all over. It is hard to make prominent topstitching on yarn dyeds. Which thread do you match up to? Doesn't  matter the match will disappear and the non match will sort of look yucky. Either way, they just don't stand out. Above you can see some samples I did. On the right is the thread I was using for the construction, a lavender periwinkle color. You can see it just disappears in a regular stitch. In the middle, same thread with a triple stitch. I don't think it looks that good and my machine does a great triple stitch on other fabrics. On the left I tried a darker thread, really no improvement. I made the executive decision to not topstitch this dress anywhere. I liked it's soft look and was going to go with that. 

I also used a white  100% cotton voile to underline this dress. I did a "flat lining" in the method you see here. It worked out perfectly. This made the dress very  comfortable. I wore it today in 100 degree heat to a "backyard" wedding. The dress kept it's looks all afternoon and was spot on for the occasion. 

The facings were fused to cotton woven fusible interfacing. 


Construction:

Here are the changes I did for this dress, some of which were not done in the Dandelion dress. I wanted to reduce the volume a bit. You will see the difference:

* My usual petite shortening in the upper chest. 
* Raised the armhole 3/8ths of an inch at the side seam tapering to nothing at the notches to hide my bra. 
* Reduced the front width at center front by a half inch. 
* Reduced the back width at center back by two inches. 
* Reduced the "bumpouts" one inch from the Dandelion dress bumpouts. 
* Flat lined the garment which meant all vertical seams, really only 3, were able to get a Hong Kong finish. This was nice. The HK finish was on the hem edge at the top, the facing edges and all of the sides seams as well.  By flat lining I was able to catchstitch my hem and facings to the voile underlining. 


Another thing I did was to do a diagonal basting of the underlining to the dress, front and back,  after it was flat lined. I also basted diagonally on the  area where the upper hem edge would be. I let my dress hang out on the dress form for a couple days before doing this basting and trimmed as needed, not much. 

 The darts in the dress were made to include the flat lining. A line of basting was done down the center of the dart on the lining to hold the two layers together while the dart was being sewn into the dress. The hem band is just the linen layer so no special treatment on the hem darts. Just mark those top and bottom edges of the hem band.


The picture above shows where the seam gets ditch stitched to secure the hem band to the dress. This is done on the right side of the dress.  I think failure to do this will cause the wide hem to billow and this holds it flat. It also sort of bolsters the shape of that side seam bumpout.

I did have a screw up, totally my fault. In my unbridled enthusiasm I did not read my pattern instructions. Heck, I just made one of these although it wasn't lined. After the dress was flat lined, hung out, and the lining hand basted diagonally to the fashion fabric, I stitched together the shoulder seams. I bound the edges of the facings with the voile, stitched them together and attached them to the neckline. Next was my favorite, understitching the facing with the triple stitch a la Nancy Zieman, all well and good. Nope. Seems now I can't stitch the armholes and turn them. I looked on line for some sort of magic I knew nothing about to solve this. There is none. I was too late for magic.  I slept on it. What to do?  I refused to rip out triple zigzagging on this lightweight fabric. 


Luckily, this fabric and lining are quite lightweight. I did a wide bias binding, understitched with the triple zigzag, turned and pressed, pinked the edges so no bulk, and catch stitched down to the facing. I think it will pass. It doesn't add bulk and is neatly finished. 


Another issue that came up was the refusal of the side seams to lay flat in the curved bumpout area. I decided to catch stitch them down. I so love to catch stitch.  This actually helped reinforce the shape.


Here they are, all catch stitched, tamed and tidied. Now it was on to catch stitching down the facings but only under the arms. The rest of the facing is free floating.  I also catch stitched the upper hem edge. I just can't stop catch stitching once I get started!


The inside is all finished and pretty! No topstitching in sight, volume brought down as desired, fit is spot on, life is good. The dress is fitting snug on my form as I am a size or two  smaller now than I was when I made the form. 


In Conclusion:

Once again, I am really happy with this pattern and the changes I've made to it. I look forward to making it also as it is designed, as a long flowy maxi dress maybe in the view with bow in front and in a softer fabric, perhaps a cotton lawn print. I will be on the lookout for that. In the meantime I think I am putting aside my beloved skirts that are my  summer staples and joining Team Dress! It's just such a comfortable, cool way to go. I highly recommend this pattern and love the way the dress is draped from the bust and shoulders. Flat pattern measure first and make a muslin. Do not assume the pattern is too big. You decide if you want the design ease that has been put into it. I like it either way. I love the full volume of the Dandelion Dress and also the more conservative look of the Periwinkle Dress. I will say that whenever I wear the Dandelion Dress in public people stop and compliment left and right and ask where I bought it. We will see what happens with the Periwinkle dress. I like that the  Periwinkle look is a great foil for my jewelry too. 


And just in case you missed the last post here is another pic of our recent house guest:

Happy sewing!......Bunny

Wednesday, September 10, 2014

Challenging Pockets!

What's so challenging about a couple of big ole patch pockets? Matching them the way I wanted to! It was a bear.


First, I deviated from the pattern in that I wanted a slanted cuff on the pocket. I also wanted the pockets on the diagonal, bias pockets, so they would need an on grain lining to keep them from stretching out. Then the cuff needed to be bias as well but in the other direction. If I put it all going in the same direction you won't notice the cuff. So the cuff had to go the other way, That was the rub!

This is not as easy as it sounds. It took a lot of head scratching, flipping of fabric and pattern pieces to finally get it right. There are two pockets and they mirror image their bias design. I need to line the pocket and for the top 2 1/2 inches there would be ikat fabric that when folded down would go in the opposite and bias direction of the pocket, basically a faced edge to the lining. Then I had to do the reverse for the cuff on the other side. Confused?  Trust me, it took many tries to finally get it right. If anyone ever tries this the trick is to put wrong sides together and make sure the pattern flows continuously. You can see that with the green arrow above. If I cut that piece in this direction, it will work. I had to cut them wrong side up to make sure I got it right. I'm exhausted already.

Here the pieces are trimmed for a trial run and ready to get their lining. Don't want to mix anything up!

I got them sewn together tonight and they are ready for topstitching. I need to sample that out first. I've decided to topstitch in the darkest shade of the blue,  a trick I learned from smocking. An expert told me to pick out either the darkest color in the print or the lightest color when choosing smocking thread colors. We'll see how that works with this jacket! I may also use that triple stitch once again. I really like the look and this jacket could use some heavy topstitching to casual it up. So next stop is samples and then get those pockets on the front of the jacket. Till then..........    Bunny

******************************************


We woke up to this the other morning. Seems Rocky Raccoon thought the pickings inside our house were even better than what was outside and literally chewed through the screen and weather stripping. Nasty, huh? Do you know how many times on a hot summer day I leave this window open when I am not in this part of the house or out busy in the garden? Not any more!  I would have died if I woke up to a raccoon in the house in the middle of the night! At this point hubby and his Have a Heart trap have dealt with the issue and now we just need the window fixed! Rocky can go chew through someone else's kitchen window! Oh, he climbed up the porch rails, onto the grill and over to the window..,,life in the boonies!.....Bunny

Thursday, July 31, 2014

Help! I need help with a project

I mentioned in a previous post that I am making  a full length dress for a friend for a wedding. She will be a bridesmaid and has been instructed to wear whatever she wants but it must be "baby blue". Since she was having no luck at all with local retailers and neither of us saw anything appropriate on line  for a 52 year old bridesmaid , albeit a very attractive one, I offered to make her dress.


We will be making McCalls 6612, View B (the pink one) with a flutter sleeve and floor length skirt. The cowl is less pronounced on this view. The fabric is a sky blue (much more flattering color) rayon knit. Since it is a bit thin  and could use some beefing up, it will be lined. I also think the lining will fall a bit more gracefully in the cowl area if it is lined.  I wanted to buy lining in person so I could make sure it didn't "stick" to the fashion knit. I hit my only option, Joanns,  and actually did really well with a "swimsuit lining knit". It didn't stick, had the same stretch factor and we are good to go. Here's my dilemma - do I do this as an underlining, treat both pieces as one or do I do it as a lining, connected only at the neck and armscye?

The dress is floor length, has a slit to the knee on one side, a cowl neckline, and I think flutter sleeves at this point. I am very worried that if I treat it as a single unit, the fabrics will shift and show wrinkles or pull at the seams somehow, although it hasn't done that with my sampling with it. The biggest issue is the slit. The lining is white. I don't want it flipping out when legs are crossed, etc. I am thinking of a blue stretch lace along the lining edges of the slit which I'll cut back, that is if I use a free hanging lining.  What do you think? Any and all suggestions are welcome.

We've been through two muslins and the fit is looking lovely. I have to say the neckline is really really pretty on her and we are both so pleased with that. It was a pisser to get the fit right and adjust the cowl.  So this weekend I will cut apart the muslin and get sewing. I just need some voices of experience with knit linings. The stretch factors and weights are the same.  You all know my knit experience is not deep so thanks for any help offered............Bunny

ETA: I just thought if I do as an underlining I can do a blue lace strip, mitered at the top, all around the slit on the lining. So if  anything peeks out it will be the pretty blue lace. Hmmmm,,,,,, just thinking but hope to hear your thoughts. Thanks,,,,,Bunny


Wednesday, December 25, 2013

Sewing a Kasha Lining

Today I easily managed to sew the lining up for my winter coat. It is Christmas day and my husband and I have had a wonderful day connecting with family both far and close. Since all the hustle bustle has settled down I was able to play with my new tablet, thank you Santa, and hit the sewing studio as well. The design of this coat is simple and the lining is simple but as promised, I am adding a few touches that will make it more tailored, more couture, if you will.

First, let's discuss Kasha. I love Kasha. I think it is warm. I think it is luxurious. It is for dry clean only garments as the piece I picked up from Vogue fabrics is 52% acetate and 48% cotton. It is a shiny satin weave on the public side and a thick flannel on the private side. It ravels like crazy. It sews up beautifully.

I've made changes from the pattern, Butterick 5960. First, the only yardage given for the lining is 45 inches. Kasha is 57 inches wide. I have almost a yard leftover so keep that in mind. I find at Vogue fabrics there is the biggest color selection available online although I wanted an ivory all along so that didn't quite matter. It retails for 14.99 a yard and got to my house in two days, perfectly cut and folded. . It is yummy stuff, IMO. NAYY.

The pattern has rather simple, albeit at times confusing, directions. I kicked them up a bit.

I stayed the shoulder seam with selvedge. This is not mentioned in the directions. I also did all the stay stitching up front before much handling of the fabric was done. The pattern specifies otherwise.

This fabric, like all satins, will telegraph to the public side when pressing. So if you don't want to see the ridges of your seam allowances either use a seam roll of some sort or use manila folders/oaktag to slip under the SAs before pressing.


The pattern has you baste a 3/4 inch hem in the lining and then stopstitch. I chose to serge the edge (so ravelly) and then do a catchstitch by hand for the hem. I love those even little pick stitches, don't you?

Above is a highly corrected pic of the serged and catch stitched hem. While working on the hem the side seams became more and more ravelly. To late to serge, sooooooo....


The edges got hand overcast, a sweet touch. Normally, if the lining were enclosed I wouldn't have bothered but in this pattern the lining hangs freely from the coat, two separate hems. I didn't want straggling threads to rear their ugly heads further on up the road.

Another hint for Kasha: This is the place to use those fine silk pins. Big pins just push through too hard and can leave marks. 

So the lining is complete now and next will be steaming the wool. I seam to have lint-y towels so I hesitate to do the quick pretreatment of throwing the wool in the dryer with damp hot towels. Black and white? I don't think so, untrusting laundress that I am. And the London shrink method isn't quite appealing to me either. So an hour or so of heavy steam pressing and I will be good to cut out this cashmere wool blend. The fabric is lovely with that low glow that only fine woolens have. I have a few trade-ups on the construction for that too!
*******************************

I sincerely hope your holidays find you spending it with those you love and the blessings of  the season bring you much joy. You all mean so much to me and I wish you the best of Christmas cheer and Spirit......Bunny

Sunday, December 22, 2013

Back to Sewing with Butterick 5960


Finally I am back to sewing and blogging. It's pretty interesting how intertwined the two are for me. We have had lots of visitors and the holiday has been priority for the past few weeks but I am ready to roar. I am finally excited about my new coat project. It is Katherine Tilton's Butt 5960.
It is rather bath robe-y, isn't it? But that's OK. I wanted something classic, waist defining but roomy and this fits the bill. My version won't be a stunning print like this one but an equally gorgeous wool/cashmere blend in black, ALL BLACK. Yes, much tweeking of the photos will happen so you can see the details as we progress. I have made my muslin and I will share that with you in a moment. I am using this, other than one tiny tweak, straight out of the envelope in the Extra Small size. I love saying that, "extra small size". Pattern land seems to be the only place I get to mouth those words! But an extra small has 46 inch hips and a 42 inch bust, all the better to fit my warm winter clothes beneath. I love the sleeves and they are very comfy.

The area on the upper chest at the join of the front and the side front has a bit of a bubble. I am always narrow there so I will push that over a bit when I sew up the fashion fabric. 

Above you  can see how I caught the fabric up when topstitching on the facing inside. I will be extra careful about that with the wool.


There are some interesting issues with this design but I still love it. First, the collar is having an identity crisis. It doesn't quite know it if is folded back all the way down as in some photos on Butterick or is it more a wrap style. The center front is also the facing and you can see the distinction with it being white muslin and the back, sides and sleeves being pale yellow. This is OOOooold soft sheeting and my wool will definitely work differently but I think I gleaned enough about the fit from this to proceed.
I have narrow, sloping shoulders. Shoulder pads are a given for me in any tailored garment. None are specified on the pattern. It looks pretty clear to me that the model is definitely sporting shoulder pads in her lovely version. The back is cut wide and the armholes low but not crazy low. The other day I wore a tunic to work that did not fit in the armholes of my coat. That won't happen with this coat. I like the cut.
Something odd about the pattern you can see above. The front armhole is way shorter than the back armhole. You can see how the sideseam is toward the front and the shoulder seam is toward the back. This is exaggerated on Miss Dumdum. On me everything hung right and looked OK. I realized this was intentional when the directions said to line up the underarm seam of the sleeve with a square that is set back a fair amount beyond the frontal side seam. Of course I realized this after the sleeve was installed.
Speaking of sleeves, that should be OK too. The sleeve has a two inch fold back cuff. You can see the correct length for me here, two inches beyond the hem fold, perfect. So I can make the sleeve as is and fold it up the two inches. I like that retro type of sleeve.

So I think I am ready to go. I am going to do the lining first. This simple looking pattern really needs you to read through the directions at least twice. Took me three times to get the pockets understood. I will save you some time and tell you that there are neat topstitched slot type pockets on the outside. But there are also big pockets in the lining on the inside, four pockets total. But  that isn't real clear in the pattern till the third reading, at least for me, and I found it very confusing. Anyway, now I get it and don't plan on any issues. Read this pattern if you plan on making it. BTW, there are no reviews yet on PR so I will make sure I get this up on there.

I am going to make and complete the lining first. It hangs separately from the coat. That can be easily changed but I think I will just go with the pattern as is at this point. I will be adding a few tailoring details that are lacking here and will post those as I go along. The fabrics in the very first picture are a cashmere/ wool blend, mostly cashmere but I forget the ratio. Sorry for the overcorrected lintladen pic. The wool  is lovely. The lining is Kasha, a flannel backed heavy satin. It makes a really warm lining. I've used it numerous times and love it. It is the same lining you usually see in fur coats.


And what is that bright colored business? That splashy shiny goody? That I am hoping will be my piping between the coat and the lining. Off white lining, black coat in the style of a bathrobe, gosh, I need something to jazz it up so that's what that fabric is bringing to the party. Hope to have more to share soon.
*************************************
It has been difficult being just too busy to blog and sew but the trade off is quality time with my family who are usually quite distant. I'll take that any day. I did re-discover, as has happened before, that when I don't have my creative outlet, I am not too happy. Just sort of a gray funk sets in. But get me to imagine making piping out of some extremely gaudy polyester and the rainbow sparkles and the sun sits high. I know you all understand.

Hopefully I will have more posting before Christmas so I will save my merry wishes until then. I will have a bit of a sewcation this week for a few days as I will not be seeing family until the second week of January when I have to travel for completion of some dental implant work. I am hoping to finish this coat during that time. It's great to be back!....Bunny


Monday, September 30, 2013

Chanel Jumper??? Simp 1723


Sophie's jumper, Simplicity  1723, is a done deal! I put a bit of extra effort into this child's garment but that boucle made me do it!

Pattern: Simplicity 1723, jumper, jacket, skirt and headband, all with a slight nod to Coco Chanel. Amazing how her classic designs filter down to children even all these years later. It was not difficult.It does not require a lining but I did one. I recommend. My grandaughter loves any sort of jumper or long top to wear with her tees and leggings. 

Fabric:   It is made with an acrylic and cotton boucle and I pray it doesn't pill. It hasn't yet so that bodes well. I have machine washed and dried all fabrics used so expect no probs other than a lack of desire to press clothing on the part of my daughter. She will  more than likely send it to the cleaners. That's her MO for anything not knit. 

The lining fabric is a 100% poly, a charmeuse wannabe. It was "springy" as many older polies are. It was given to me by a friend when she cleaned out her stash. 

I used a poly grosgrain ribbon for the belt and some little lace flowers picked up at Fabric Place in Mass. I found the garment a bit too serious for an eight year old and had to fun it up a bit. Sophie loves polka dots.

Construction: After my last positive experience I decided to flatline the jumper much as I did my crinkle jacket.  It took a lot of "pre-sewing" but once done the process of putting the jumper together whipped right along. The facings, hem, and waistline are bound with the same lining fabric. The boucle really needed the structure of the lining and bound seams to keep it from unravelling, something it wanted to do with a vengeance.

If I had to do it again I would not face the jumper with self fabric. I would use a thin lining instead. It is far too bulky in the button area for my taste but I will just move on from that observation. It won't bug anyone but me. I did not make real buttonholes and just stitched the straps shut with the buttons. The zipper is plenty long so I don't think Sophie will have a problem getting it on. I used an invisible zip and machined stitched the facing ends into the zip, no handwork.
Facings were understitched as much as possible and the edges bound with bias lining fabric. I used my clapper and tons of steam to get those edges as flat as I could.

As far as fit, I did have to alter the pattern. Sophie is very tall and slender so this was made in a size 8 with an inch added to the bodice and another to the skirt. I think dresses look cutest on little girls when the waistline is a bit elevated and this does that  on her. Her back waist measurement is 2 inches longer than the pattern measurements and I only added that one. 

All in all, this pattern is simple, cute and could be whipped right out if you don't  flatline, line or bind those seams. This would be great for the serger. But my fabric required the additional fuss. I must admit, it does feel lush and yummy in the way a Chanel jacket does. Maybe next time I would do an edge to edge lining as she did. I hope Sophie likes it. She did pick out the pattern and pink fabric.

********************************************************************************
I just have to comment that we have had the most incredible Indian Summer weather. It has been in the high seventies for days with clear blue skies and leaves on the trees flaming with color. Will winter want payback?......Bunny

ETA: Why does my text publish in different sizes when I don't change the size?I've notice this on only certain computers, not all. Are you seeing my text in different sizes, other than the headings? Thanks...Bunny

Sunday, September 22, 2013

Simplicity 1723 Begins!

Any notions I had about whipping out a simple little jumper for Sophie have left the building. First the fabric: It's acrylic and cotton pink boucle, cute, and it FRAYS! Oy, does it fray! That was dealt with  as you'c expect. It stretches out. I ended up taping the neckline and armholes. I had to cut the tape to fit  the pattern and steam the fabric back into the proper length and stay stitch the tape on. The tape is selvedge from other projects that I save up in a jar.

I also chose to flatline this garment, so that all took time. My entire sewing yesterday was all prepping the pattern pieces before actually starting to make darts and stitching the jumper together. Now that all of that is done I can just put the thing together today. This will have a facing because of the shoulder tabs and that will be bound as well as the waistline seam. I am also putting in an invisible zip so the sequence of construction in the pattern directions will not work but that's OK.  The flatlining and topstitching all those bound seams should really strengthen the boucle weave and prevent seams from popping apart. Sophie is an active little girl who loves to dress up, a girl after my own heart, and I know  she will love this.
***************************

I have just discovered ground cherries at our Amish neighbor's farm stand. They are wonderful and today I hope to make a coffee cake with them. I am going to get lots more and freeze them up for the winter. Plan right now is to make a ground cherry pie at Thanksgiving. We will be having a houseful this year and I want to have a memorable feast. Have you ever cooked ground cherries?....Bunny

Sunday, September 15, 2013

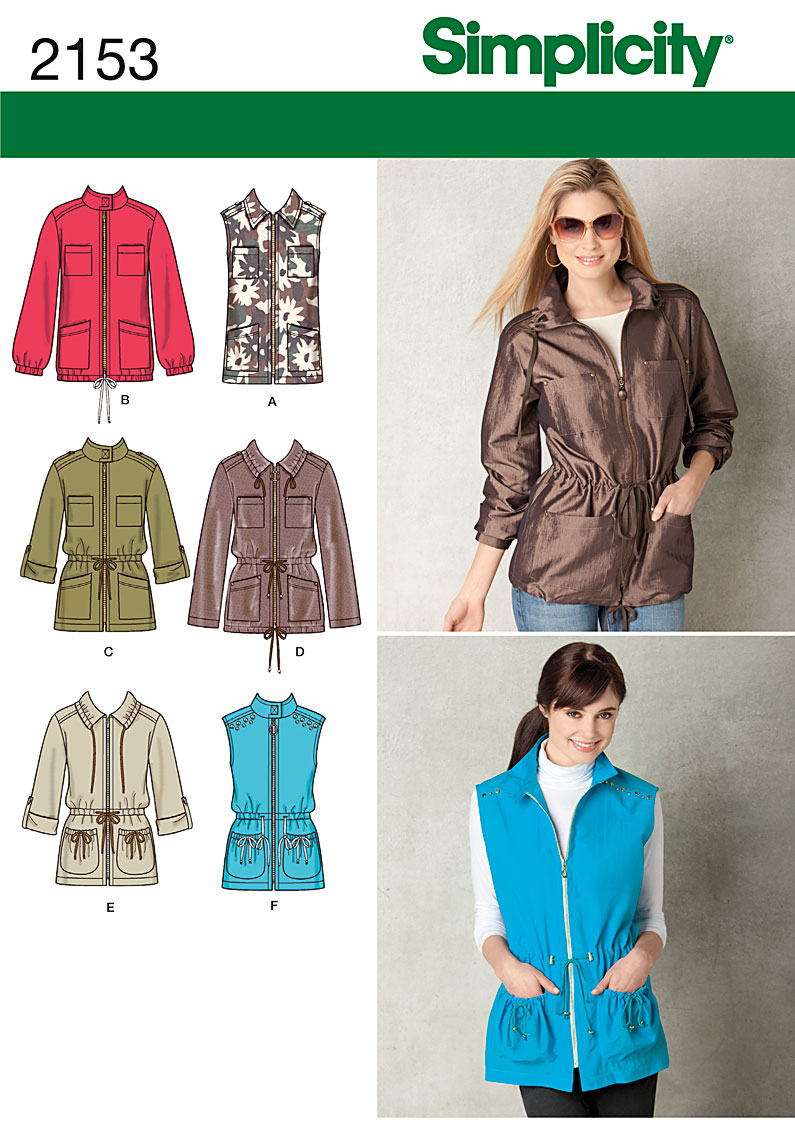
The Deets on Simplicity 2153


Love this jacket!  Isn't it just perfect for a slightly cool Adirondack fall day? Here's all the deets:

Pattern:  Simplicity 2153, a basic anorak with collar and sleeve variations.I found the final results pleasing but it took a couple of muslins to get the fit right. The sleeves fit the armhole perfectly both before and after my alterations so the draft is essentially there. But the armscye area was very weird looking and until I followed my gut (you'd think I'd learn to do that right off at this point) and scooped out the front of the sleeve it just did not work. This pattern was petited, the shoulders narrowed, the sleeves shortened a lot and it had a small FBA to elminate some wrinkles. I didn't do my normal FBA as I felt the 40 /2 inches of bust was enough. The small FBA definitely helped. I also took in the side seam from the armpit to the waist a full inch on each side. So I guess that removed some of that ease. Lots of alterations but in the end I think I got it. It is a jacket and therefore will have ease and I think it is fine at this point. Just watch out for that armscye area if you make this.

I did not follow the sequence of construction in the pattern. The techniques I used required things to be done differently and needed some head time before moving from one process to the next. I did not use the epaulettes in the pattern as I thought that was too much and wanted the crinkle to be the star.

Fabric: The fashion fabric is a 100% poly crinkle. It was washed and dried before using and came out of the dryer with all wrinkles and crinkles in tact. Be careful with an iron as that can remove the wrinkles but they came back with a bit of water. The fabric is a cross woven with weft a copper-ish color and the warp a light turquoise blue. It has beautiful selvedges which I kept. When two colors are cross woven like that you get an irridescence to the fabric which is lovely. You will often see silk dupioni like this. I found this fabric in the clearance section at Joann's and got it for 2.50 a yard. I had been eying it a long time but didn't know what to make till I decided after trying on a six hundred dollar jacket in Lake Placid that a similar jacket would be just the ticket.

The lining is 100% cotton batik. It is fine and tightly woven and is easy to slip on and off over clothes. It made a great lining. It was the part of the 4 yard piece meant for Marcy Tilton's mullet dress that I decided I didn't want to make friends with.  Adhering to my oft repeated philosophy of "Just Cut It", I did, and am glad. It worked with the crinkle really well and was a delight to sew. Lets just say that was six times the cost of the crinkle.


Construction: This jacket is totally enclosed and finished on the inside. This happened by using a technique called "flat lining" which you can read about here as well as in tutes in the right sidebar. Sometimes when we don't use a technique for a while we forget how great it can be. This was just that sort of situtation. My next project will be flat lined as well. It just provides such a lovely finish.

The yoke was constructed "burrito" style which you can see here. If you've ever made a pillowcase you have probably used this method. I added a faux leather label to the facing which I painted with my initials and date, gold sharpie paint marker, not a regular marker. I love their "paint" markers. 

The sleeves used a Nancy Zieman technique which also totally finished them off and you can learn about that in the link. It is really easy. Then armscye ends up being bound with bias and nicely finished, so not a raw edge in sight on this project!

One of the fun things to do was decide how to deal with the cord going through the neckline and the waist. Did I even want to use cord? Or did I want to finger knit some sort of fiber or even use a ribbon? I found just the right color cord right when I was about to give up on the idea. Walmart to the rescue. They also had the bronze colored grommets which I couldn't find at JA's. I forget where I got the beads I used but they are cheapy "Pandora" knockoffs that I've seen in numerous craft departments. They worked great. I soaked the cord with  Fray check for about an inch and a half, put the bead on, tied the knot on the wet area and when dry cut the cord. This cord frays like an old sweater hole so be aware.
There was a lot of topstitching on this project. For the entire project I used a new size 12 Microtex needle, my go to. It worked just fine. The zip is a separating jacket zipper from Coats. I looked into ordering but felt the color of this worked perfectly. The facing is interfaced and you can see that it almost  removed the crinkle from the fabric but that was fine for the inside. Here you can see what the jacket looks like zipped up.
Well, I have worn this once already, to town to do my shopping. It feels wonderful, the way any well fitting and constructed garment does. There is just no comparison in  retail I can afford but it sure was fun trying on that six hundred dollar version! I highly recommend this pattern. Get past the arm fit and you have a winner. I am already thinking of making a denim or twill version for spring. As always, more sewing to come!.....Bunny

Sunday, September 1, 2013

Flat Lining Simp 2153

When I decided to do this pattern I knew there was no lining. Did I want to do a bagged lining, a hand stitched lining, or no lining and Hong Kong seams? After thinking it over a bit I reached back into my tool box and decided to flat line the garment. This is a technique, one of many, that I learned from Threads magazine probably 15 years ago or so. I always love the result but it isn't proper for every pattern. Here's a basic explanation. 

Doing this jacket with the techniques I will show you as I go along is quite different from the pattern directions and has required a different sequence of tasks. For this pattern I will have a bound facing made of the fashion fabric. The facing provided in the pattern only went to natural shoulder seam area which landed it in the middle of the yoke shoulder. There was no back facing. I folded back the front facing to meet the yoke seam in front and then made a facing from the yoke pattern so now I will have a facing all around, much preferred and necessary with the flat lining treatment.


Once the facings were cut the public fashion fabric is cut out. The lining fabric  for the bodice is then cut using the same pattern but each vertical seam that will be enclosed will be cut one half inch wider than the public fabric. Flat lining is done on vertical seams only. As we go along you will see that I have handled the yoke and sleeves differently. What you see above is the back bodice lining, no yoke yet, placed on the fold as required and the vertical side seam only is cut one half inch wider. I cannot tell you how many times over the years I just subconsciously started cutting out the lining exactly like the bodice so pay really close attention and be present in this moment of cutting. One way not to forget is to run a line of pins through the extra half inch before cutting so you don't make that mistake like I have done. I did it this time but was able to use the wrong cut piece for the yoke and pockets, no wasteno problem. I am not always so lucky. The front bodice pieces for the lining were also cut with half inch larger side seams only. The CF edges will be enclosed in the facing so they do not change.  Below you see the back bodice.


The bodice lining and the fashion fabric are placed right sides together. I like to do one seam at a time for ironing ease but you can do both sides at once if you like. Pin the side seam edges together. This will leave you with a mismatched looking bodice with one piece larger than the other. Just ignore that. With this wrinkly fabric pinning was really important.  Stitch the side seam with a 1/4 inch seam. Press as sewn. I now  like to shave off between 1/16th and 1/8th with my rotary cutter. This makes up for the turn of cloth when you do the next step. Press your seam toward the lining. Then wrap the lining around the seam a hair under a 1/4 inch and press and pin. Now let's get to the presser foot.
This technique is helped greatly by a 1/4 inch foot and an edge stitching foot, the one with the blade in the middle. You can do this fine without them but they will give you a bit more accuracy. 
Here you have a good pic of the lining fabric wrapped and pressed over the seam allowance. Now you have a decision to make, either one is no better than the other, just personal preference. You need to decide if you want to stitch your wrapped seam allowance "in the ditch" or topstitch. For this garment I went with the topstitching, clicking two times to the right of center on my Pfaff. The blade runs down the edge of the bound SA and the stitching is a tad to the right.Before actually stitching I did lay my lined bodice on the pattern tissue to check fit. It came out perfect. You haven't changed the width of the seam allowance. You've only wrapped and bound it. On a bulkier fabric half inch seams may be required instead o 5/8ths. It is important to check your garment against the pattern pieces before you stitch any seams together so the fit is maintained. Measure twice, sew once! Can you also see how critical it is to get a good fit on your pattern before starting? That really should be worked out before attempting this technique as there is little opportunity to adjust for fit with this method, some but not much. 
Proceed with this wrapping and stitching until all your vertical seams are sewn. With this pattern that is only the side seams. All other vertical seams will be enclosed with the facing. Once the bodice pieces are flat lined you proceed like any underlined garment. Except.... the yoke will be done a bit differently and more on that in the next post. I am also going to add the zipper in the front bodice before it is connected to the yoke. It's just easier that way but a different sequence than the pattern instructions give. Also coming are the sleeves where I use a Nancy Zieman technique from her early days of TV and one that I have used many times. More lata'....Ooo..I also have a flat lining tute for pants over in the side bar.
*********************************************


Today most of the available sewing time was spent working on the pockets. I could not find tiny rivets to put in the corners so did my usual triangle treatment with a tiny zigzag across the top. .....Bunny


The Ray Pinafore, 2025's Epic Fail

  Happy New Year and welcome to my epic fail of 2026. I guess you have to have one, right? This is the Ray Pinafore from Paper Theory Patter...