Sewing Vloggers

Monday, March 30, 2009

Sophie's Toile


I had to push that racing car jacket down a post! My, it just glares at me.

The decorative smocking is done on Sophie's dress. What remains are three more rows of backsmocking and then starting all those bullions. There are small bullion roses in the diagonal rows of diamonds between the diagonal rows of flowerettes. Then, in between the two bottom rows will be a trailing vine with larger bullion roses. Gotta start practicing those roses!

Generally, once the smocking is done, the pleating rows are removed minus the holding rows. Then the piece is blocked again and after that the embroidery begins.
************************************************************************************

For my current machine project I have started working on Jacks Camo Jammies. They are cut out of a heavy flannel. It is a really nice quality but still shrunk hugely on the cross. I lost about 4 inches in width. Luckily the pattern still fit. I am using my go to jammie pattern, New Look 6421. an OOP.
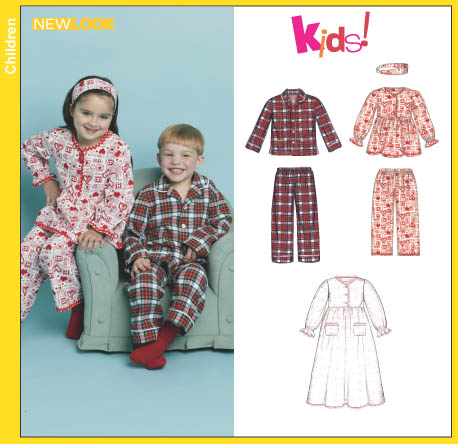
I have traced this off so many times but this time used the largest size so got to actually cut out the pattern. This is just such a classic looking little jammy for boys. It kind of has that retro look. My grandsons love them and wear them till the hems are embarrasingly far from their ankles. Usually I pipe the edges but this time I am going to pass, just too much time pressure right now and DGS will love them piping or not.
***********************

I just want to thank everyone for the lovely comments and encouragement regarding the twin's sailor outfits. They really were fun to make and I can't wait to see them on the babes.

I would also like to welcome the many new posters to the blog. Your visits are really appreciated and your comments too! Don't be afraid to offer some constructive criticism. I'm always up for it. Your lovely comments feel really good too! Thanks.....Bunny

Friday, March 27, 2009


My husband and I will have been married 39 years in a couple of weeks. To maintain such a relationship requires a lot of compromise, negotiation, and growth. We have been thru phases, as all married couples have. One of our more interesting phases was about a three year period when we followed Formula One racing. I know, I know. But such things maintain interest and keep you together. That racing phase is long gone but it did not go without leaving behind my racing attire. I made this jacket to wear to the first Formula One race at NHIS in NH. To say it turned a few heads that day is an understatement. I worked hard on it using woven patchwork and machine applique. The car design was inspired by a one inch picture I saw in a racing magazine ad. This has seen a lot of wear, is probably one of the strangest things I have ever made, and will be left for the ages to decide what the heck was I thinking. It's been tucked in the back of the closet for a long time and I thought in the spirit of my weekly throwback, I'd give it a press and share.


**********************

Smocking continues on Sophie's Toile. I am about a third of the way thru. Then it will be on to the bullions. There are roughly 40 bullion roses to do. I will save the most prominent area for the end for obvious reasons. I find I always have to do a LOT of practice bullions before starting on the garment.

******************************************************************************************

I apologize for this last picture. Just consider it a test. At 6:30 this morning, daybreak, I looked out the dining room window and saw 4 deer in the back yard on the edge of the river. They hung a round for quite some time, nibbling here and there. Once was lame in one leg and did not look well. I had to take this pic in twilight thru the closed window. See if you can click to make it larger and find the four deer.....Bunny

Wednesday, March 25, 2009

Sophie's Toile


That's it. It's a toile. I kept looking at the two piles of fabric DD and I put together for her Easter outfit and nothing rang my bell. Then I went stash diving and came up with this toile. It's a heavy cotton. Truth be told, it's a home dec print. I washed it and it softened up nicely . I bought this with intentions for it to be a garment from the start. The colors are soft yellow and a very greyish blue. It looks faded, sort of. So for my threads I chose dusty colors. I followed my sewing friend Lexie's lesson of picking the darkest and/or the lightest colors in the fabric and go two shades darker/lighter for the smocking. So I picked the blues and yellow first and then the remainding threads had to work with those.

You can see I have the skirt pleated. With prints you never quite know what you are going to get once the pleating starts, kind of like the box of chocolates. There will be a lot of smocking in this area so I think the final texture will be lovely and complimentary.

The dress will be a knockoff of Pretty Poppet from AS&E. If time allows I may even make the little jacket to go with this. I am using a part of a McCall pattern for the neckline and the rest is pretty much an upgraded version of the magazine pattern. The mag pattern only goes up to size 3 and I need a five. I think the smocking is pretty involved on this one, lots of bullion roses. But the dress is fairly simple and should move right along. I hope to start smocking tomorrow......Bunny

Sailor Dress Completed for Miss C.


Carly's dress is c'est finis, c'est tout! She and Zack will be little nautical babes and I think cute as plastic sailboats floating on the edge of a pond on a spring day. I used Simplicity 4711 pretty much as it came from the envelope in a size two. This was very easy to make. The sleeves are installed in the flat and are not puffed like the bottom of the sleeve. They fit beautifully with no fussing at all. The skirt was very full, the kind of fullness you usually only see in heirloom patterns. The linen for this dress is a heavier weight than Zack's handkerchief linen. It has been washed twice. By doing this and NOT starching, you can really prevent wrinkles.

Where the collar meets in the front are three little stars. On the back of the collar is a star in each corner. For the blue strip I used the same hanky linen I used for Zack's outfit cut on the bias. It's lighter weight is more appropriate for the binding. On the skirt this was placed on top of a bias strip of the same hanky linen used for the collar. Steam a Seam is invaluable for this type of application.
First I cut a two inch strip of the white hanky linen on the bias the length of the skirt width. This was stitched to make a tube with a 1/8th inch seam. The tube WAS NOT turned. The seam was centered on the back of the strip and ironed to the side. The bias blue linen strip was then topstitched to the white strip. The white strip was topstitched to the skirt securing and completing the hem on the inside of the skirt. No hemming that big hem! In the pictures the strip looks wonky, but it is perfectly straight. I measured and chalk marked a line to lay the strip on. It had more Steam A Seam on the back and was held in place beautifully for topstitching. This little dress was just so simple to make and with a premade bias or ribbon could easily be done in one day. So now my twins will coordinate. Grandmas have to make sure of these things!

I have some work for DH to complete but hope to get started on Miss Sophie's dress for Easter. I really need to go play with my fabrics for that one as I am still not settled on dress and fabric. It's just not hitting me. Usually an afternoon of folding stash brings on a solution, so that is the plan............Bunny

Monday, March 23, 2009

A Good Egg

Miss Carly's dress is done. All that remains is sewing on the buttons and the stars. I am out of stars so no pics till I do a run into town. I did my usual cleaning of the sewing room that I do whenever I finish a garment, or two in the case of the sailor outfits. I'm talking on the hands and knees cleaning and some organizing. For some reason I find I have to do this before moving on to the next garment. I try to work on only two projects at a time, one machine, and one handwork. My brain has to mentally put away the completed project and have a clean spot ready to concentrate on the new one. I know, its anal. Its also not the way most creative people work but it works for me. When I am in the throws of garment construction the fabric and thread is flying and it is rather chaotic in my little studio. But before I start a new project I just have to have a clean slate, just my quirk.

But I was far from the only one working hard around here today. One of my chickens outdid herself, poor baby. All I can say is this must have taken some serious effort. Kind of reminds me of one of those sewing projects we feel like we "give birth" to. I will have to remember this poor chicken next time I get intensely involved in a difficult sewing project. Just remember the egg......Bunny

Saturday, March 21, 2009

Little Admiral Completed!


(The past two days I have had difficulty cutting and pasting on blogger so excuse the two pics. I will remove as I am able.)

This is done and it has been a long strange ride as Jerry Garcia said. When the garment was completed I gave it a wash, 10 minutes in a barely warm soak with a tiny bit of Dawn. Not good. Some, just some, of the blue ran. I got out a toothbrush and Dawn and scrubbed away, Nope. Then I tried peroxide, Nope again. Then I put it out in the sun, nuther Nope. Then I got out a small paintbrush, a diluted cup of bleach, and prayed. Hooray! That did it. Now it took away that tea dyed look, but it is still creamy and DH and I have decided we like this color better. DH absolutely loves this. You have to be careful with heirloom sewing for boys, at least in the Great Northeast. DD told me when I visited not to make him anything to foo foo. I think this will be fine and so does DH. Now it is on to Carly's little sailor dress to match. That is all cut out and I will start stitching when I am done posting here.

What is wrong with this picture? I'll tell you. This outfit is featured in Sew Beautiful magazine's most recent issue. Inside the pullout are a patterns for the collar. I chose size two to use with my size two Simp 2907 shirt. I redrafted the neckline and it fit just fine so no probs there. After the Madeira hem treatment was done it was time to mark for the notch and cut that out. I followed the placement on the collar pattern form the mag. Once done, it looked to me like the notch and the placement of the embroidery were not graded down for the sizes properly. So what really infuriates me is that I embroidered, as in the magazine, a seahorse above the notch. You can see how it sits on the shoulder seam and gets lost on the back of the collar. It's just a tiny thing, too. So if you make this collar move your strips and your notch down. It killed me to rip out that hand done embroidery. It was far nicer than what was shown in the magazine, machine emb. I believe. So I ripped it out and put the little stars on instead.

I did follow the instructions in the magazine or I should say read them over and over. First, no grain line is used on these collars. OK, its obvious for me, but for a new sewist, there needs to be a grainline. Many heirloom sewists only sew heirloom clothing for their children without other garment experience and this is unfair to them. Be watchful of the sequencing on the neckline. Again, I had no problem but could be difficult for a newbie. I misplaced my mag so apologize for not being more specific. Clean finishing the edges of the cut on facing is never mentioned. Is it to be left raw? There were other details that I didn't care for in the instructions and made the notes in my mag but suffice it to say be careful if you make this from the SB mag, go slowly, and follow your gut for a logical sequencing.

I have a thing about our craft of sewing-----we need all the newbies we can get and they need to succeed at this craft. I have read many back stories that mention the horrid skirt they made in Home Ec never to touch sewing again until many years later. Patterns, magazines, websites, etc. all need to be conscious of the new sewist and make sure they get the right information in the right sequence and that basic info is not left out. Off my soap box.............

So next is Miss Carly's Sailor Dress. I am using the same fabrics and therefore will have to slightly bleach the tea dyed linen back to the color of Mr. Z's outfit. Mr. Z's out fit primarily used french seams. Carly's will be serged and/or possibly HK seams, not quite sure yet. I really think her getup will go together much more quickly. Then the twins will be ready for Easter and it will be on to Sophie's dress. Lots of children's sewing coming up for me......................Bunny

Friday, March 20, 2009

Madeira Hem Technique


This is an easy technique to get you a perfectly curved applique or hem. The navy linen you see here is a band applied to the edge of an off white linen collar. You will need Wash A Way thread in the top of your machine and regular thread in the bottom. Truth be told I use the wash away in the bobbin as well as it makes it even easier to pull apart. The band is folded right sides together with the fold at the CB. It is then stitched with the required 1/4 inch seam. Press in place with a DRY iron. Clip if needed and turn. Press with a dry iron again. Now turn on the steam, heavy, and press and press. The idea is to get the moisture into the pressed edge. The steam will melt the thread. When cool, pull the collar apart. It will be perfectly turned and ready to lay against the base fabric.
My introduction to this technique is from my friend and sewing mentor, Betty. Her wonderful instructions can be seen here on the Everything Sewing site. She is the most amazing fountain of sewing knowledge.

For this weeks Thursday Throwback, now late, I will leave you with a couple of pics of a dress I made a couple of years ago for DGD's Easter dress. It employs the same technique just described on the collar and hem. In my nautical outfit the madeira band is topstitched. On this dress it is pinstitched.


Tuesday, March 17, 2009

The Admiral's Outfit Continues!

Zackie's suit continues. I have had a day full of business issues for DH. I am his bookkeeper and mistress. Today was a bookkeeper day. So I just got in about a half hour to sew before dinner prep and I got the cuffs attached to the sleeves. If my sleeves look like they will walk out of the room on their own, they will. They are well starched, something I find really helps when working with linen in an heirloom garment. I starch the linen well before cutting. It helps the linen keep from fraying as you can see and also makes it easier to handle. When the shirt is all done I will give it a hand wash, something else I always do to my little heirloom garments. There always seem to be residual soil and marks somewhere.

I have had some issues with the instructions in the Sew Beautiful magazine and will get into those when the garment is complete. These are not big issues but a series of small ones that could certainly turn a newbie sewist around and heading for the door.

There is a uniqueness to heirloom sewing and those who do it. In my opinion there are two camps. There are the crusty old seamsters who do incredible work and can make fabric look like marshmallows. They are an independent, experienced bunch who can handle almost anything they come up against. Then there are the newbies. There are many young moms, bless their hearts, who take up sewing, heirloom sewing, when they are waiting for or have little ones. Often they have never sewn before. Heirloom shops cater to them, offering classes and instruction, often of the first caliber. This second group generally has not sewn before. They are of the Home Ecless generation and they gleefully dive into heirloom sewing and smocking. I personally think it is wonderful. But, let's not forget the basics. So the issues I have encountered in the magazine kind of gloss over a few things that really shouldn't be glossed over. I think a new sewist needs all the positive reinforcement they can get and it is critical that they succeed at their effort to keep this sewing world alive. I am talking the world we love with fabrics, patterns, and stores. So, mag editors, lets give our newbies all the info and basic instruction they need. No one should learn about wadders early in their sewing careers. I pray that comes later, when a clear knowledge of high standards sets in and it is all you settle for. That is when you learn to make wadders.......Bunny

Monday, March 16, 2009

Mr. Z's Outfit

Here are Mr. Z's shorts, the bottom half of the cute little nautical number in the previous post. Missing is the brass buckle which I have already scouted out at JA's but need to go into town for. They are lined and have slanted real pockets. The same navy linen is used in the shirt as an accent and I have started that.

I am using the pattern shown in the previous post for the shirt as well. There will be no pockets. The shirt will be further extended over from the CF to make a side buttoned opening. I will also change to a shawl collar.

You can see how I redrew the pattern to make the new neckline and front. This was greatly facilitated by my flexible ruler. I found this baby some time back in the dollar bin at Office Max. It has really earned its spot in my notion cup. I needed 6 inches from the shoulder seam to the end of the front and it was easy to figure with the flexibility of this ruler.
The facing is cut on. So now all pieces are cut out and I hope to get started on the sleeves and collar tonight. The collar is a Madeira and will be embroidered with a little seahorse in gold and ecru. Some MOP buttons will need to be searched out but I will check the stash first. I must have something in there. Hopefully tomorrow I will have more for you on the Madeira applique.
**************************************************************************************
Thank you to my wonderful daughter for shipping my camera out immediately to her needy Mom. She understands..........
*************************************************************************************
If you need any further inspiration for sewing summer garments for your little ones you must check out this contest held on the Everything Sewing board. The creativity is just over the top. I think that one shouldered dress is unbelievable. Fabulous, Betty!...........Bunny

Saturday, March 14, 2009

Misc.!


Just in case some of you haven't checked this out, Dress A Day, has the funniest posts going right now. If you would like to see what imaginary stories can arise from the pictures on the front of vintage patterns as well as laugh check it out. It makes for delightful reading.
*

I just finished my classic navy blue linen trouser shorts for Mr. Z., half of the twin squad. I started with this totally unrelated pattern from Simplicity, 2907, shown above. Those over pocketed casual little khaki shorts have morphed into classic, slant pocket, lined, belted with loops, pressed pleat little short with all the features of a good trouser. Next is the shirt. I am copying an outfit in Sew Beautiful. The shirt will be a tea dyed linen and I think I will do the sea horse embroidery, not sure yet on that. The linen is soaking and I will start cutting the shirt as soon as
the fabric is cooked. In the mag it specs two patterns to achieve this look, "Eric" and "Michael" from Children's Corner. Not one to buy a pattern I can develop myself and also being under the gun with Easter, I decided to just morph out my own pattern from what I had in the stash. So far so good. The shirt will require me to move the edge of the shirt off center and change to a shawl collar with a notch cut in. I think I can do it and am egged on by the success of the pants. Keep ya posted............Bunny

Thursday, March 12, 2009

Throwback Thursday

in
Once again it is Throwback Thursday. This jacket is circa 1994 or pretty close to it. It was the time of still some shoulder pads and boxy full jackets. I would tape Sewing With Nancy while I was at work and then come home and watch and rewatch my tapes. She did an entire heirloom sewing series, batiste, laces, and all. One technique she showed was Shark's Teeth. I became very intrigued with the technique but sure didn't need a lace and batiste top in my climate. That didn't stop me and I started to think out of the box. As I often do with a new technique, I experimented and extrapolated to the point of being quite different from the original intent. I made sample after sample , some being embroidered on the points, some running ribbons thru, etc. I still have all those samples. Then I honed in on a garment when I found the gradated fabric. It shades from the light blue to a midnight blue. The jacket is made of a really nice wool flannel with a midnight blue silk jacquard lining. I wore this A LOT, usually with slim black or navy pants. Now it is spending time in one of my totes of past garments. This is not perfect but my skills were not then what they are now. I really love how we can grow in this craft and again, it is great to keep the garments to see that growth. Hope you like, or at the least find it interesting.

***************************************************************************************

I haven't posted for a bit. My trip down South was extended a week as DSIL became v. ill and the emergency room sent him home with percosets for his kidney stone and said, "Drink", water that is. DD was leaving on business a few states south Sunday evening and he was in no condition to watch twins and a five year old. So Bunbun spent the week until DD came back. DSIL is doing better and life is now returning to normal. To say I am bushed after chasing twin 1 1/2 yr olds and a five year old is an understatement. But I must say I am very inspired to get going on some summer sewing for my babes.

************************************************************************************

In all the excitement I left my camera at DD's but she says she will ship it to me. I am very nervous about that and will have it fully insured. My hubby spent way way too much on that gift and I would just die if something happened to it.

*************************************************************************************

Cissie, in the last post had a question about pattern sizing and how to get the right size. It seems she can wear a retail size 6 perfectly but is lost with patterns. Here's the deal Cissie: You have to put any notions of size or measurements regarding what you wear in RTW away, A BIG AWAY. There is absolutely no corresponding between RTW sizing and pattern sizing and many get caught up in thinking they are the same and end up producing unwearable, ill fitting garments. So let's start from zero here. Measure yourself carefully as the back of the pattern books instruct. Armed with those measurements pick out your pattern size. Give consideration to your build. I am petite, narrow shouldered, C cup, so I buy any top patterns by my upper chest measurement and then do an alteration for the larger cup size. This gets me a better fit around my neck and shoulders. Patterns are made to fit a B cup but Simplicity has now come out with a few that have the other cup sizes and I really like what I have made from one of those. So if you are other than a B cup, you will likely need to alter.

For pants I buy by my fullest hip measurement and then adjust for my smaller waist, an easy alteration. Again, Simplicity has "Amazing Fit" patterns that are made for slim, average, or curvy figures and these patterns actually give you instructions on how to measure for the pants.

Next, and most important of all, these measurements you are taking are just a number. The retail size is just a number. THEY DO NOT CORRELATE. Don't let your vanity get in the way of buying the correct pattern. I take a size 6 petite when I buy slacks. In the Amazing Fit pattern I took a size 14 curvy. When she was alive Marilyn Monroe wore a size 14 dress. The retail world has "vanity sized" their clothes and once again, I repeat, there is no correlation.

I hope this helps you Cissie and if you have any more questions just email me. The address is on the right. For years I sewed patterns as they came out of the envelope and I can't tell you how many wadders I had. Then I started doing my own interpretation of adjustments. That was a little better but a long way off. Then about ten years or so ago I decided I needed to really learn how to fit. I got the books, studied them, and my garments improved tremendously. Now with the internet and our inspiring blog sisters I have learned even more tweaks on improving fit. And just when I think I have it down my body changes again! So it is ongoing quest, this fit thing, and I wish you the best of luck with it. I highly recommend Nancy Zieman's "Fitting Finess". I do think she has re issued it under a new name but any of her fit books are great. Good luck. ...Bunny

Wednesday, March 4, 2009

Lots of Thanks!

First I would like to thank all who commented on the Collaged Bag for their wonderful comments. Your imput is really special to me.

A special thanks goes out to Lindsay T of Lindsay T Sews for her nomination for the Sisterhood Award. We are a sisterhood. Our sister bloggers inspire us, make us better at what we do, and become our friends. Thank you so much, Lindsay.

Here are the rules of the award:
1. Put the logo on your blog or post
2. Nominate at least 10 blogs which show great Attitude and/or Gratitude!
3. Be sure to link to your nominees within your post.
4. Let them know that they have received this award by commenting on their blog.
5. Share the love and link to the person from whom you received your award.


I would like to nominate the following for the Sisterhood Award as well.
* Sigrid of Bubblegum 4 Breakfast
* Sara of Rufflebunnies
* Sherril of Sherril's Sewing Saga
* Laurie of SewNSo*
* Maria Elena of El Baul de las Costureras
* Sharon of Pin Tangle
* Kristine of Just Keep Sewing
* Ana of Ana's Closet

These are all tremendously inspirational sewists, each with their own niche and expertise. Please take a moment to visit their wonderful blogs.

I also want to echo a recent post of Carolyn's. Every blogger should get this award. If you are blogging about sewing it is because you love sewing and it is a big part of your life. If you are blogging about sewing it is because you are generous and want to share your knowledge with your sisters. If you are blogging about sewing it is because you care about and art form, no matter what level of your expertise. And last but not least, if you are blogging about sewing, know that I wished you lived next door and that my daily visits to your world bring me almost that close. I really appreciate all of you and your visits...Bunny

Monday, March 2, 2009

A New Challenge


I always like to keep challenging myself with my sewing. I love hats. I wear them to all the weddings I go to. I have a wedding scheduled for the Memorial Day weekend and have been thinking about the hat I would wear. My top will be the one shown in this post. With it I will wear a chiffon-y type skirt and hopefully some peep toes. I have a two different gradated fabrics to go with the top. I wanted a small retro hat to wear with this outfit. I am leaning toward view B, the lavender number. However, I will make it with pale green hydrangea blooms.


I got my pattern yesterday when the Vogues were on sale at Joanns. Tonight I sat down with a glass of chardonnay and my pattern. I was very intrigued. The pattern requires you to make your own form, covering, cording, and shaping different layers of wires. It is much more involved than the photos indicate. I love this. I want to make the hat just to make the hat. Who cares if I wear it or not? I will put it in a place of honor in the cave it comes out halfway decent. There are buckram forms out there to be had but I really like the idea of doing the whole thing from scratch. So this is now in the queue.

And while we are on the subject of queues, that is another one of those mispelled terms. I nearly did it myself. When I committed cue to my post it just did not sit right with me. I had the feeling that it began with a Q. After a trip to Websters, I was corrected and changed my post to have the proper spelling. I then checked CUE to see if there was possibly an Americanized spelling to the word indicating a waiting line. Nope. Oh, my mom would be so proud.....................Bunny

Test Post

I am having probs with Blogger since last night. My page comes up but no posts. This is a test.

Bunny

Sunday, March 1, 2009

Collaged Tote Bag

I still can't get over the fact that I sewed up that little cutting board inside the bag between the lining and the cover! It was a stressful week in a fun sort of way but that was the result. This pattern is McCalls 4400. The fabrics are silks, some velvet, assorted cotton laces and even some organza ribbon. The lining is silk dupioni. I interfaced the bag with two layers. First the collaged pieces were fused to a layer of weft insertion interfacing and then all of that was fused to Decor Bond, a stiff craft interfacing that I use a lot for my bags. My bags are often two layers of fusible. Sometimes I fuse the Decor Bond to the shell and then fuse a weft insertion to the lining, all depends.
I ran into an issue with the top edge, again my distraction coming into play. I think it worked out OK in the end. I wanted a wide bias band which would go to the raw edge. Then I was going to topstitch it on the bottom edge. I thought I had enough clearance around the magnet but I didn't, no way. So I ripped out the topstitching and went to bed. Next day I cut another bias strip, applied it to the front, wrapped to the back and basted down. I then cut a third bias strip and hand stitched that, top and bottom edges, to cover the raw edge of the binding. I think it worked out OK. There was a definite way I could have gotten around this whole problem, but again, I didn't think this thru like I normally do. I am going to make a note on the pattern about this situation so I can avoid it next time. I do love this pattern. It is big, easy to make, and has tons of possiblities. Another thing I did differently from the pattern - the corner appliques. They were interfaced and then an organza facing was made to help turn the edges nicely. I then placed the faced corners in position. I used a blindstitch around the edge to secure them. It sunk right into the velvet and looked great.

The inside of the bag has a lot of structure. I find the plastic canvas many use is just not stiff enough for me. But I use it. There is a layer of plastic canvas in the bottom of the bag so that when I poked my bag feet thru there was something to grip on to. On top of that is a layer of foam core. I like foam core. It holds up well and is very stiff. Now does this contribute to the difficulty of maneuvering around the machine? You bet, but I haven't had it been unmanageable yet. Then inside the lining I have an upholstered layer of foam core to add even more stability. So the bottom of this bag is really firm. I like that. I hate it when a bag caves in, unless it is supposed to like a slouch bag.

Not sure what will be next. Business paperwork is now begging for my attention. We shall see.......Bunny

Had to Refurbish This One!

    About  6 or 7 years ago , during the dawn of the Zipper Trend,  I bought one of my rare retail items. It was a blush pink and black bord...