Sewing Vloggers

Monday, July 27, 2015

The Jean Jacket continues....


I managed to get an afternoon of painting in on my jacket and it is near done, so easy. This isn't the Mona Lisa, but soft big splotches of color. I experimented a bit and the Lumiere dyes gave me my best effect. All they will require is a heat setting 24 hours after paining. I may still use some of the Shiva paint sticks. We'll see. The vegetable peeler is what I use to remove the skin from the paint sticks. I have had sticks that are fifteen years old and fresh as daisies once they are peeled. They are supposed to be peelable, not just a drying out factor, and they last forever.  But I am not done.


I also ordered a set of Inktense Pencils which I am soooo excited about.  I want to thank Coco, of Coco's Loft, for introducing me to these via her blog. I can't wait to try them. You use them, sort of crayon like, or any colored pencil. Then you apply a bit of water with a small brush and voila - they turn to permanent inks which need NO heat setting or any other kind of setting to be permanent on fabric. You bet I am tracking this package! 

Wednesday, July 22, 2015

Denim Inspiration

I come from the generation of embroidered, slung low on the hips, bell bottomed jeans. I hated them as  they looked awful on me so I never owned a pair, que lástima! While I don't remember what I did wear for pants in my teens, it wasn't those. But I do remember being intrigued by the embellishment and maybe that's why I am enjoying making this jean jacket today. I have a definite plan: Phase One-piecing, Phase Two - painting and Phase Three - thread embellishment. Phase One is close to complete and I hope I can get some painting in this weekend. I will start with some experimentation before I  commit to the garment. I am really seeing just subtle blotches of color but evolution may kick in and turn it into something else. In the meantime, even though I have a pretty solid idea of what I want to do, I thought some research might be fun and started digging through Pinterest and Google. I saw some really interesting inspiration that fell into just a few categories and thought I would share.

Bleaching:

People seemed to have discovered the Tide Bleach Pen or using stencils and bleach in a spray bottle or even employing tie dye techniques. I really like some of these  effects. I will put a clickable link below each pic. This one uses tie dyeing technique and I like its simplicity.
Simple technique, good tutorial


I would love to see the effect with the arms down. Would it be so "birdlike"?

And for the real artist out there, what could be more awesome than this, painted on jean pockets?
closed Etsy shop, boohoo.....all gone.

\
This is a fairly easy project, good tutorial. 

Denim, once the possession of the hardest working among us, is worn by everyone today. Denim fabric and  garments are so amenable to making your own artistic statement whether you are capable of pockets with classic Greek portraits or simply want to tie dye with rubber bands in a bucket. So many opportunities and much very doable. 

Painting:

I think painting denim is what really appeals to me. It just offers so many possibilities and I've always loved painting.  While I am planning a subtle use of paint, like my inspiration jacket, anything goes as you will see in these jackets. Such fun!

You can commemorate  a favorite pet.


Express your faith.

Remember a place.


Or honor a rock star like Pharrell. 


Painting a jean jacket just knows no bounds and they are just so much fun. 

Embroidering:

Embellishing the surface of your denim with embroidery has been around  for a long time. And, like painting, embroidery has limitless potential.  Many may feel more comfortable with a needle, be it machine or hand, when embellishing denim garments. An odd thing in my search though, embroidered jackets didn't have quite the artistic cache of the painted ones. Many were retail garments with a much smaller percentage being embroidered by the loving hands at home. Here are some  examples:


This little puppy is Dolce Y Gabbana and I know many of you could do this sort of work quite easily. I love how it works with the distressing of the denim. 


I couldn't understand a word on this page so hope this is nothing objectionable. It looks like a combination of paint and embroidery.


This one, above, is just darling and indicative of the the classic embroidered look I found over and over. I like how they used the peak of the yoke. Many self embroidered jackets utilize the back and yokes as the canvas. Embroidery elsewhere is not seen quite so much.

Applique and more:

Fabric appliqued to the jean jacket base is also popular and really a quite easy way to get a bang of a look and I like the effect. They seem to be a bit more contemporary. 

courtesy crux and crow on Etsy, no longer available

This one claims to be vintage seventies. While I think the fabric and trims are, those studded areas on the sleeves don't ring true to me. They are a much more recent trim development, IMO. Either way, pretty creative. 

This one sports machine appliqued flowers and I think its pretty cute and very doable.

Sometimes just a tiny bit of detail is the perfect amount.


Messy sequins and tears , anyone? Awww, come on, it's only 1650.00. Oops, its also sold out.

Hopefully you've enjoyed this tour of the denim jacket universe and the exciting opportunities for creative expression it offers. Each is so individual and such a personal creative expression. I'll be back with more of mine soon...........in between carpenters and gardening, dump and delivery trucks, hammers, nails and trips to the nursery......Bunny

Sunday, July 19, 2015

No grain, bit of pain, upcycled Jean Jacket

The jean jacket continues. With all the construction and work happening around our home I am only getting to sew on the weekends and that's if it rains! That's OK. The Decks are  near done, then there are new doors, a bit of hardscaping and some tree work and hopefully we will be done soon. The goal is August 1st and it looks like we will make it. In the meantime, today being rainy and uncomfortably warm upstairs, I retreated to the cave for Phase one of the jean jacket. My focus today was to get every pattern piece cut out and I almost made it. Here's where I am now. Keep in mind that I basically have three phases going on with this. First there is the cutting of the original jacket and piecing it to work for my particular pattern sections  and that's what you are seeing today.
This front bodice is waiting for the arrival of the zipper for center front. I have left the collar and hem edges on one side undone. This is the side where I am using the waistband for the CF band. I know, its wacky. It will have a silver zip up the CF. I hung the pieces on my dress form and they look better there as you can see where all the oddities end up and if they work or not.

On the back bodice I did that crazy curvy thing like I did on the rust dyed top back bodice. It is part of the original CF band. When this is done there will be closeups as I have done some  cross hatching here and there on the pieces that you can't pick up at this point. But this is no where near the finished product. You can also see here, this was not cut symmetrically and that was intentional. In 3D it works.

The sleeves were fun. I hope that pocket on my upper arm doesn't look to crazy. If it does I can always take off the flap or entire pocket. On the right sleeve you can see a bit of the old CF band. The sleeves look different colors. They are not, a camera thing.

This is phase one, the piecing and fitting phase. Obviously I added details from the old jacket for interest.

Phase two will be painting and there should be a lot.

Phase three will be more stitching in various bright colors. So this is nowhere near done or looking like the final product. Let's just hope it's not an epic fail.

This is all that is left of the XXL men's acid washed jean jacket. Out of this I have to make a LARGE collar. Fingers crossed!
*******************************************

A few years back I worked for a company that went under. The night before the liquidqators were scheduled to come in management gave permission to the sales staff to help themselves to any non sku'ed merchandize and there was plenty. One of the things I took home was this old rusted sewing machine that was used for display in the store. I  use it now to hang my more costume-y jewelry on, much of which I've made. I think it's a fun use of the old Singer................Bunny

Monday, July 13, 2015

The No Grain Jean Jacket Recycle

I think this may turn out to be another epic project and that's OK. I have learned I absolutely love the challenge of a unique cutting layout and this will certainly provide that.


I started with a man's extra large acid washed jean jacket from St. Vinnie's, our local thrift. It had no wear or soil whatsoever and for two dollars, it came home with me. I put it in the washer and dryer to get rid of any strangers and then proceeded to cut each piece apart with my box cutter razor. That took about an hour or so of TV time. Then a good pressing and I was ready to figure out the layout.
I love the intense contrast between the blue and white.  I want to incorporate those dark blue seam allowances in the design so they are pressed open and will somehow be topstitched so they show.

 I spent this afternoon playing with all sorts of layout options to make sure I had enough fabric in this big jacket to pull off my plan. Fingers crossed but I think I do.

Once I decided to actually cut I needed to help my pattern lay flat. This is a tried and true pattern, Simp 2153, the anorak jacket I have made twice already. I cut big Xs where the buttons were and a slit around the pocket. Then it laid flat. I pinned the center front stitching line along the edge of the placket and drew a line around the pattern. Then the pattern was removed and I cut. (For newbies, the red circle with a star inside is the bust point. It is normally printed on the pattern but sometimes needs to be moved like mine. It's a major frame of reference for fitting.) While playing I thought the pocket was too close to the armscye. Then I looked straight down at the retail  denim shirt I happened to have on and the pocket edge was right on the side seam line so I let this one be.


I definitely added pieces of fabric here and there to get what I needed for each pattern piece. It was quite a challenge! I ironed them together with Steam a Seam for now but the additions will all be stitched down. There will be raw edges and felled edges. As I built each section, it was then marked with an outline of the pattern. I used a crayola marker as that washes out really well. Once pieced and outlined, the pattern was cut out. 

If this all looks a bit odd to you, I am using the existing edge of the button placket as center front on one side. On the other side, I will attach the waistband to the center front edge. (Wha?) There are assorted riveted buttons on these facings and waistband but they will not overlap like a traditional placket. I will be running a zipper up the center front instead, with the edges of the "old" button plackets being the edge the zipper is sewn to. Should be fun!
Remember, this is made for a huge man. You cannot imagine how big and deep the pockets were. They were ready for baby kangaroos! The long pocket intruded on the hem edge. So I cut them way shorter to eliminate bulk and will stitch them across where you see the green dotted line, just right for smaller feminine hands.


Above, on the green dashed line is where the zip will go.

This is where I am now. Don't judge till I am done as much will happen to this further up the road, paint, thread play, and color. This will be a very fluid, evolving, fun, artsy project that I hope I get miles of wear from. It should be a lot of fun. It will either be an epic fail or a pretty good win/win between me and the thrift store. Love me a challenge.

*************************************************

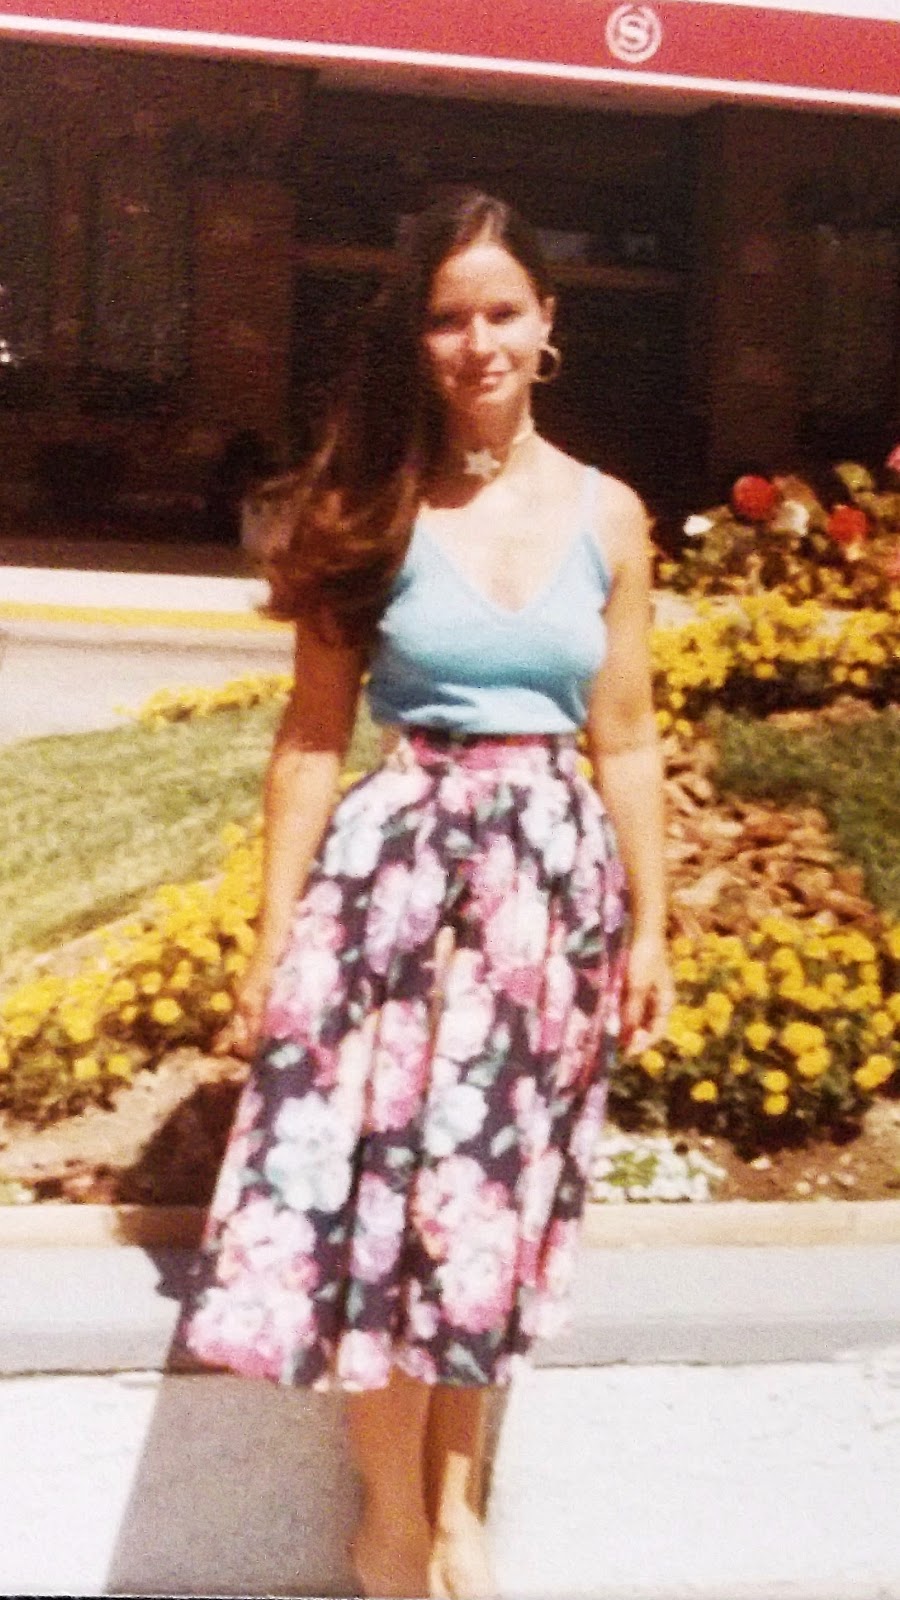
If your husband/partner is like mine he has a small box that he keeps some personal treasures in. My husband's has dog tags (military), military ID cards, a St. Christopher medal his late father gave him and other sorts of very personal items. I never look in this box, well, may three or four times in all of our marriage. It's his and I respect that. I have my own treasure box. We were both searching the house for some foolish thing and he yelled across the house, "look in my little box" and I did. I haven't looked in this thing in years despite it always being on the dresser in the open. There were the expected trinkets but then in the bottom I found this picture that was taken forever ago. It really surprised me. I truly don't remember ever looking like this but I guess I did.  I love knowing he found me beautiful and special enough to keep this in his treasure box all these many years. I felt like a treasure myself. I hope and pray you all have had someone at sometime in your life who thinks you are a treasure because you are. It's a lovely feeling...........Bunny

Saturday, July 11, 2015

Butterick 6172, Rust Dyed Top


Time to put this one to bed. It's been a long, interesting ride that started with dyeing an old linen damask tablecloth with rust. Since nearly every moment the past few weeks has been filled with demanding issues all sewing unrelated, this post is a bit over due and I thank you for your patience. You can see me standing in the corner of our new deck, one of two. It is not completed yet, but close and it made a good back drop. Hubby and I have spent nearly every waking hour totally remaking our shade garden and I will regale you with pics when all is complete. In the meantime....

Butterick 6172

Pattern:
This pattern is a three layered tunic with five different options. I went with View D but elminated the "tail". I still maintained the angles however. I did much different with this pattern than instructed and also reworked it after it was completed. I do love it. It's comfy in the heat and casual. I've gleaned a fair amount of nice feedback too!

Fabric:
This is made from a very old linen damask tablecloth that was in a table shape that I no longer needed. It has probably been washed a hundred times and is soft as can be. It had marvelous hemstitching on the edge which I wanted to bring into the design. I used that feature on the back and sleeves. It was a fun challenge to work in the rust patterns and the hemstitching. 


 This top has those three layers and I feared there would be too much bulk so for the middle layer I used a nude stretch mesh from Joanns. It also went on the sleeve edges. If I did it again I would make the mesh part of the sleeve longer and angled, a la Lady Macbeth. The mesh was an easy sew and I like the effect. 

The linen fabric was rust dyed by moi. I have been collecting odd hunks of rust since last fall, knowing I would eventually dye some hunk of linen someday. It was sooo easy to do with most of the work finding the rusty objects. Old Man Sun put in most of the effort along with his friend Mr. Vinegar. This has been washed and dried in hot hot water since dyeing and if you have ever tried to remove rust, you know it keeps it's stain forevah. I will definitely rust dye again and have my pile of objects hidden in the woods waiting for the next foray. For now, there are some other techniques I am anxious to try. I do love how the rusting changed this snow white tablecloth to a lovely soft peach all over. 

Construction:

This is where it got interesting as I completed the tunic, wore it to work, and by the end of the day felt it needed improvement. It was difficult for me to get on. I have narrow shoulders and a small head so don't quite understand this. When I put it on the first time to take pictures the struggle wrinkled up the top like this:

This pattern is designated for woven fabrics, not knits. You can see the sleeves are snug despite a bicep addition of an inch and a half (thanks, menopause) and by the end of my work day they were uncomfortable. I also didn't like the narrowness of the top in back and the flared hem,not my favorite silhouette. 


I did a narrow hem as the pattern instructed and despite my efforts it just seemed to curl up and I didn't like that. So two things had to be fixed: the snugness in the armscye and that curly hem. 


The snug armscye was corrected with the addition of a gusset cut on the bias, pinned then hand basted and finally topstitched on. 

The hem was handled with interfacing and a deeper hem, one inch. Next time I will interface the hem with the same tricot fusible but before I cut out the pattern to hopefully prevent the flare of the bias edges. You can see them on the pattern as well. That being said, I wish I had the length of the original curly hem not this shorter version. On a five foot tall person, that one inch makes a difference. 

Once these two things were done I was much happier and have worn the top several times and  very comfortably. The better back:

You can see I didn't get any struggle wrinkles getting into it this time and it is much more comfortable and flattering. Next time I make this I will not "petite" the pattern and I think that will solve the issues. 

A few more details:


Also regarding the construction:  I did not use the facings included. Instead I did a wide bias binding  on the neckline and I like that finish. 

Conclusion:
This is a great casual design. It took a bit to get there but I would definitely make this again, maybe in a knit combo of prints. I like the layered assymetrical effect but will do a bit longer hem next time but still no tail. I like the tail, I just find that I sew for the "long term" more than I used to and don't want to hand dye and make all the changes I made to this to make it work and have it be last years news in short time. Then again..........I could always just trim that tail off......hmmmmmm.......Bunny

******************************************


Tuesday, July 7, 2015

My first loom woven necklace!


I've finally finished my first ever loom woven bead necklace. It definitely says "beginner" to anyone who seriously beads, but as for me, I Love It.


I am excited to start my next piece and am not sure if it will be bead woven or fibers. I think it will be a black, pink and grey coloration.

The construction here is reaching its end and we are VERY pleased. Our builder has done a wonderful job of fulfilling our wishes. If I have learned anything over the years working with contractors, whether through my work or personally, it is all about communication. If you can both communicate easily the rest just falls into place for all involved. Egomaniacal builders, and there are many, can be highly skilled but I just can't work with them effectively and reach our goals. Our guy, Shorty Miller, is the best! and such a decent man, too! He and hubby are fast friends.


Is there anything that says summer better than a plate of heirloom tomatoes? This was full and even more gorgeous but they taste so good. They have a flavor and texture far beyond that red mush that ships well and that we find in the supermarket. One of God's greater gifts.......................Bunny

Sunday, July 5, 2015

Normal life returns, almost!


Peace and tranquility have returned to the North Country. One good thing about all the Escapepeepalooza is that it did bring attention to our area. I bring this up because it has a direct effect on my sewing. It is beautiful wilderness up here, peopled with many many Amish and English dairy farmers, and a hunter's paradise. Hunting is a HUGE part of the culture, not so much personally, but it is the way of the North. Families save to buy those forty acres and put up hunting cabins way before they buy a boat, camper or put on a new porch. Its just the way it is. Life is laid back and dressing for success or to impress just really doesn't happen here. That's a trade off for living in such a beautiful wildlife paradise. What's needed up here are good functional casual clothing,  a la LL Bean, a great pair of winter boots, not dress, and an ever present bottle of bug repellant, although this year has not been too bad. I save my more fashionable moments for visits to my daughters near Boston.

I am glad you got to see where I live as it motivates much of my sewing often in a sort of opposite way. You can see how I so enjoy "milestone" sewing, for weddings, christenings, baby showers, all sorts of special events, as that gives the opportunity for my skills to shine. But I am also always challenged for the every day type of wear needed here which is motivating my next project. Over the past year or so I made a jacket for the Fall Jacket Challenge by Threads (won), and made my Ikat jacket. I wear these jackets constantly. Nights are cool here, all summer,  and nearly every morning one of those jackets is on my back on the way to work.  I have learned I can't have enough lightweight jackets. This brings me to my next project,---another jacket!


And since I need everyday wearable jackets (and I love to sew them) the next one won't be couture so much as artistic in its look. What's that mess above? It's five pair of white jeans I got at the thrift shop, St. Vinnie's, for 2 dollars a bag and I didn't fill my bag. But not being 100 % sure of what I will do artistically to this pile of flotsam, other than bleach it to kill cooties, I also bought this jacket last week. It is H U G E.
It's a man's XL and has way more than enough fabric to convert to a jacket for moi. It is in "never worn" condition. OK, who wants an out of date washed out denim look? Well this and/or the white jeans will be the base only. The plan is to cut up the pieces, rearrange them, and paint them beyond recognition but emphasizing the detail. Fessing up, my inspiration is this fabulous jacket by Katherine Tilton.   I will use the same anorak pattern that I did on the Threads and Ikat jackets but with some simplification. It fits.  I know I will get tons of wear from such a garment up here and can't wait to start!

In the meantime I am starting today on window cushions for DD#1's bay window in the family room. I am on a deadline for those so they shouldn't take long.


This debacle is what used to a lovely stone walkway and lush part of the shade garden. Believe me when I tell you it was far worse looking than this and is cleaned up a lot. I will do more yard cleaning, moving of stones and lumber, repositioning plants today. The decks are looking really good and it will be worth all the aggravation and missed sewing time..........Bunny

Had to Refurbish This One!

    About  6 or 7 years ago , during the dawn of the Zipper Trend,  I bought one of my rare retail items. It was a blush pink and black bord...