Sewing Vloggers

Showing posts with label fabrics. Show all posts

Friday, February 16, 2024

Three tops and more to come!


I have three tops to share with you, made between Thanksgiving and New Year's , I think. With the old year behind us, much is blur. These are part of last year and I am now working on this year's projects in earnest. You have seen me make these patterns before. They are tried and trues. I like to think the fabrications are unique and make them worthy of a second look here. I've tried different techniques each time. The first that you will see are two new Eureka tops. I believe they are number 6 and 7.   A search will bring up the others. The Eureka top is a very basic cut on sleeve tee shirt from the Sewing Workshop. It is the simplest of designs, therefore lending itself to all sorts of interpretations and play. It is large, boxy and so forgiving of fit. I highly recommend it. I did a bit of research and found that McCall's 7721, view B,  is nearly exact to my ruffled sleeve version presented here. I think it may just be a bit less boxy. 


I could wear it now with a turtleneck underneath but will save this for warmer weather. The fabric is Lady McElroy and it is called "EPIC Spectacles". Make sure if you order it you ask for Epic as you may get the tiny faces as I did on the first purchase! Stone Mountain and Daughter carry it and were the ones to eventually provide me with the Epic version and were great to do business with. For the ruffles I simply cut a six inch wide strip the length of the sleeve opening and made that double the length of that opening. Next I sewed the short ends together. It was then folded in half, pressed and then gathered and applied to the opening, very simple basic ruffle technique. Seams on here were French seams except for the ruffle attachment which were machine stitched then serged. 


The Eureka pattern has no closure. I wanted one and I also made the neckline opening a bit  wider. 


I made a simple facing for the slit area and backed it with woven interfacing. Because I did not want any bulk to show through, I zigzagged and pinked the edges of the facing. No bulk! I did a simple thread loop by hand for the tiny vintage button and applied a bias binding as I always do.   I think this shirt is great fun and can't wait to wear it in the warmer weather. 


With the second Eureka, the party is all in the back. 


Pardon the photo. For some reason the fabric is really shiny. IRL, it is not. 

On this Eureka I did the sleeves as directed in the pattern, with a simple fold-up cuff. I always cut the extra small size.  This is a big garment and I like it.  


The back got a square cut out and I tied it across at the top  to prevent gaping. I also didn't want it hanging open for viewing to the public as I moved  around. The facing was understitched but also held down with French knots all around. I also ran a strip of boning in a channel across the bottom edge of the square cutout. It fits in very snugly and you don't even know it's there. Its snug fit keeps it in place and I can easily take it out for laundering. The cutout square stays nicely placed on my back with the weight of the bone and no facing rolls out. I gave it a trial wear to make sure.  What type of boning did I use? A white electrical tie, cut on the ends in a curved shape so not to irritate. 


The fabric was the fun part here. It came from a floor length tee shirt dress that also had white ribknit neckline and cuffs, Think golf shirt. I got it at Good Will and  was size XXL. On my first trip there in a long time, I saw it and fell in love with its hand painted water color style. I left it on the rack. I went back a couple weeks later and it was still there so I grabbed it. It was a very cold day and this type of garment would not be moving easily out of the door into the winter's cold right now. I brought it home. The fabric is all poly, I know, yuk, but I felt the lovely print would make up for any issues I might encounter with heat. The design of the top and its  loose demeanor make me think it won't be too hot. I really like it. 

On to top #3!


Oh, how I love the Imby top by Karmme Apparel! I didn't use a shower curtain to make this one! I did use a lovely fabric. It is a rayon slub, near sheer,  leftover from a prior project. You can see more on the original project here. 


The bodice lining/collar were made of a really nice rib knit. 


 The bodice was topstitched pretty much everywhere and the lining was understitched with a triple zigzag up to the shoulder seams. I hand stitched the collar down with a hemstitch underneath. It just kept wanting to turn back. If I did it again I would interface the turnback area. There is no interfacing in here now. The Imby top is a lot of fabric and should be heavy but it looks best with a light fabric making up the skirt and bodice so is very comfortable to wear. I think it will be delightful this summer and great with white jeans. I need to get some of those! (that fit)


The Velvet Bomber Jacket is c'est finis! I am just hemming the lining area by hand. This was not difficult, just extremely bulky to work with. The ribbing was like working with a rubber tire. Add in the heavy lining and fashion fabric and it tried my patience at times but I got it done. It could be better and I think it was one of those patterns you had to work thru the first time and then get it right the second. I'll review as soon as done, hopefully in the next few days. Then it will be on to sewing for summer and my vacation at the end of June. Happy Sewing..............Bunny

Wednesday, January 10, 2024

2024, Bring it on!

2023 was not one of the easiest years I've experienced. I am determined that 2024 will be better. I have lots planned with my sewing  and look so forward to sharing it with all of you. I haven't been blogging as much this year and lately but I've had a lot of life's interesting challenges intervening. That will change. Through it all, sewing has been my Northern Star. It all started with my middle of the night incident where my diaphragm was injured far more than I knew. What proceeded was a cascade of health issues that continues to this day. Throw in some surgeries, concussion, post concossion business, etc etc etc.  And of course, as soon as we are all over our humps, covid rears its ugly head. There was also tragic loss to deal but I am blessed with an amazing family, truly blessed. I am ready to be well and 2024 will be doing all I can to get back to gardening, and moving more and being my usual energetic self. The one thing I truly enjoyed, thru all this time, was my sewing.  I have numerous posts planned and some exciting sewing as well.  I'll share some teases here with you first. 

Another Imby top! No eye makeup. Blepharitis strikes!

I've invested in a couple of great PDF patterns and am excited to share all about those. Lord, I hate taping! But for a good design, something unique, I'll endure it. So, more to come there,  The two pattern companies are "Love Notions" and "Notches".  You know I am a thrifty type of a woman, so my pattern choices have to provide me with lots of opportunity for many makes to justify the price. I am up to my seventh "Eureka" pattern as of last week.  I've made two or three recently. 

Lady McElroy rayon challis

From patterns I jump to fabric. I did do a lot, for me, of on line shopping.  It is, by far, just a small amount compared to most, but I watched a lot of youtube and when vloggers start showing you their makes or start draping their purchases over their shoulders, it sells me better than any thumbnail out there. I had only one "off" experience but it was really a miscommunication x misunderstanding on both sides and was worked out beautifully in the end. So my fabric purchases online have been quite positive. I can't say enough about Stone Mountain and Daughter and there were a couple more as well. At this stage I definitely shop far far less and far more discriminately. I'd rather sew slowly, with thought, and with awesome fabrics.  I've discovered Lady McElroy. 

Harvested from a thrift shop find!!!

Recycling was on the agenda as well and there will be a post to show you a few of those. What fun! I think one in particular is fabulous, if I may say so myself. I have been very inspired by Vlogger "Catherine Sews", a textile professor who does really worthwhile recycling. Her methods quite surprised me and are not the "stick two shirts together' you see everywhere. She has great vision and the sewing skills to pull great results from old clothes.  I harvested this fabric above from one thrift opp and was quite pleased with the results. 

There were great notions purchased as well and I can't wait to share those. I am using them a lot.  At this point I have really culled my fabrics to some fine pieces. Many are just casual, like my favorite Essex Linen. You can never have too much of that hanging around. It can be made into almost anything! But there are other pieces that defy the touch of my hands. I have had this gorgeous piece of velvet for about 6-7 years now. It is a beautiful print.  My social life is good but it is different. I don't need a velvet suit, dress or blazer. But, damn, I sure could use a velvet Bomber Jacket. That is what I am working on now and what a challenge! With it's welt pockets, heavy rib knit cuffs and collar, I am definitely doing some slow sewing here. I can't wait to share with you all.  I can see it with some dark jeans and black cami or such.  It's been intense sewing. That velvet, however, has found it's place. I think I will get a lot of use out of it. 

I'll sign off for now. More posts coming and it's good to be back and sharing my passion.  Happy Sewing and a Happy and Healthy New Year to all of you, dear friends............Bunny


Wednesday, September 8, 2021

Sewing with Odd Textiles

 I am not a fan of artist Thomas Kinkaid's work, at all. 


I do not care for his subject matter which poorly mimics Currier and Ives which I do admire. There is always  enough illumination coming from the windows in his work to light up Times Square. While he certainly had a an artistic gift, his vision is far too commercial, never mind artificial looking,  for me. But here I am, the buyer of this, dare I say, nasty throw. 


Gahh, it is so against my taste. Why did she buy it you ask? Is she really going to use it, never mind make clothing with it? Heck yeah! I bet now you are really scared. You see, there I was in this gift shop in North Conway, NH, good ole ski country, with about 200 other tourists and saw this thing. Peeking out was it's back side. Now that is what caught my eye. 


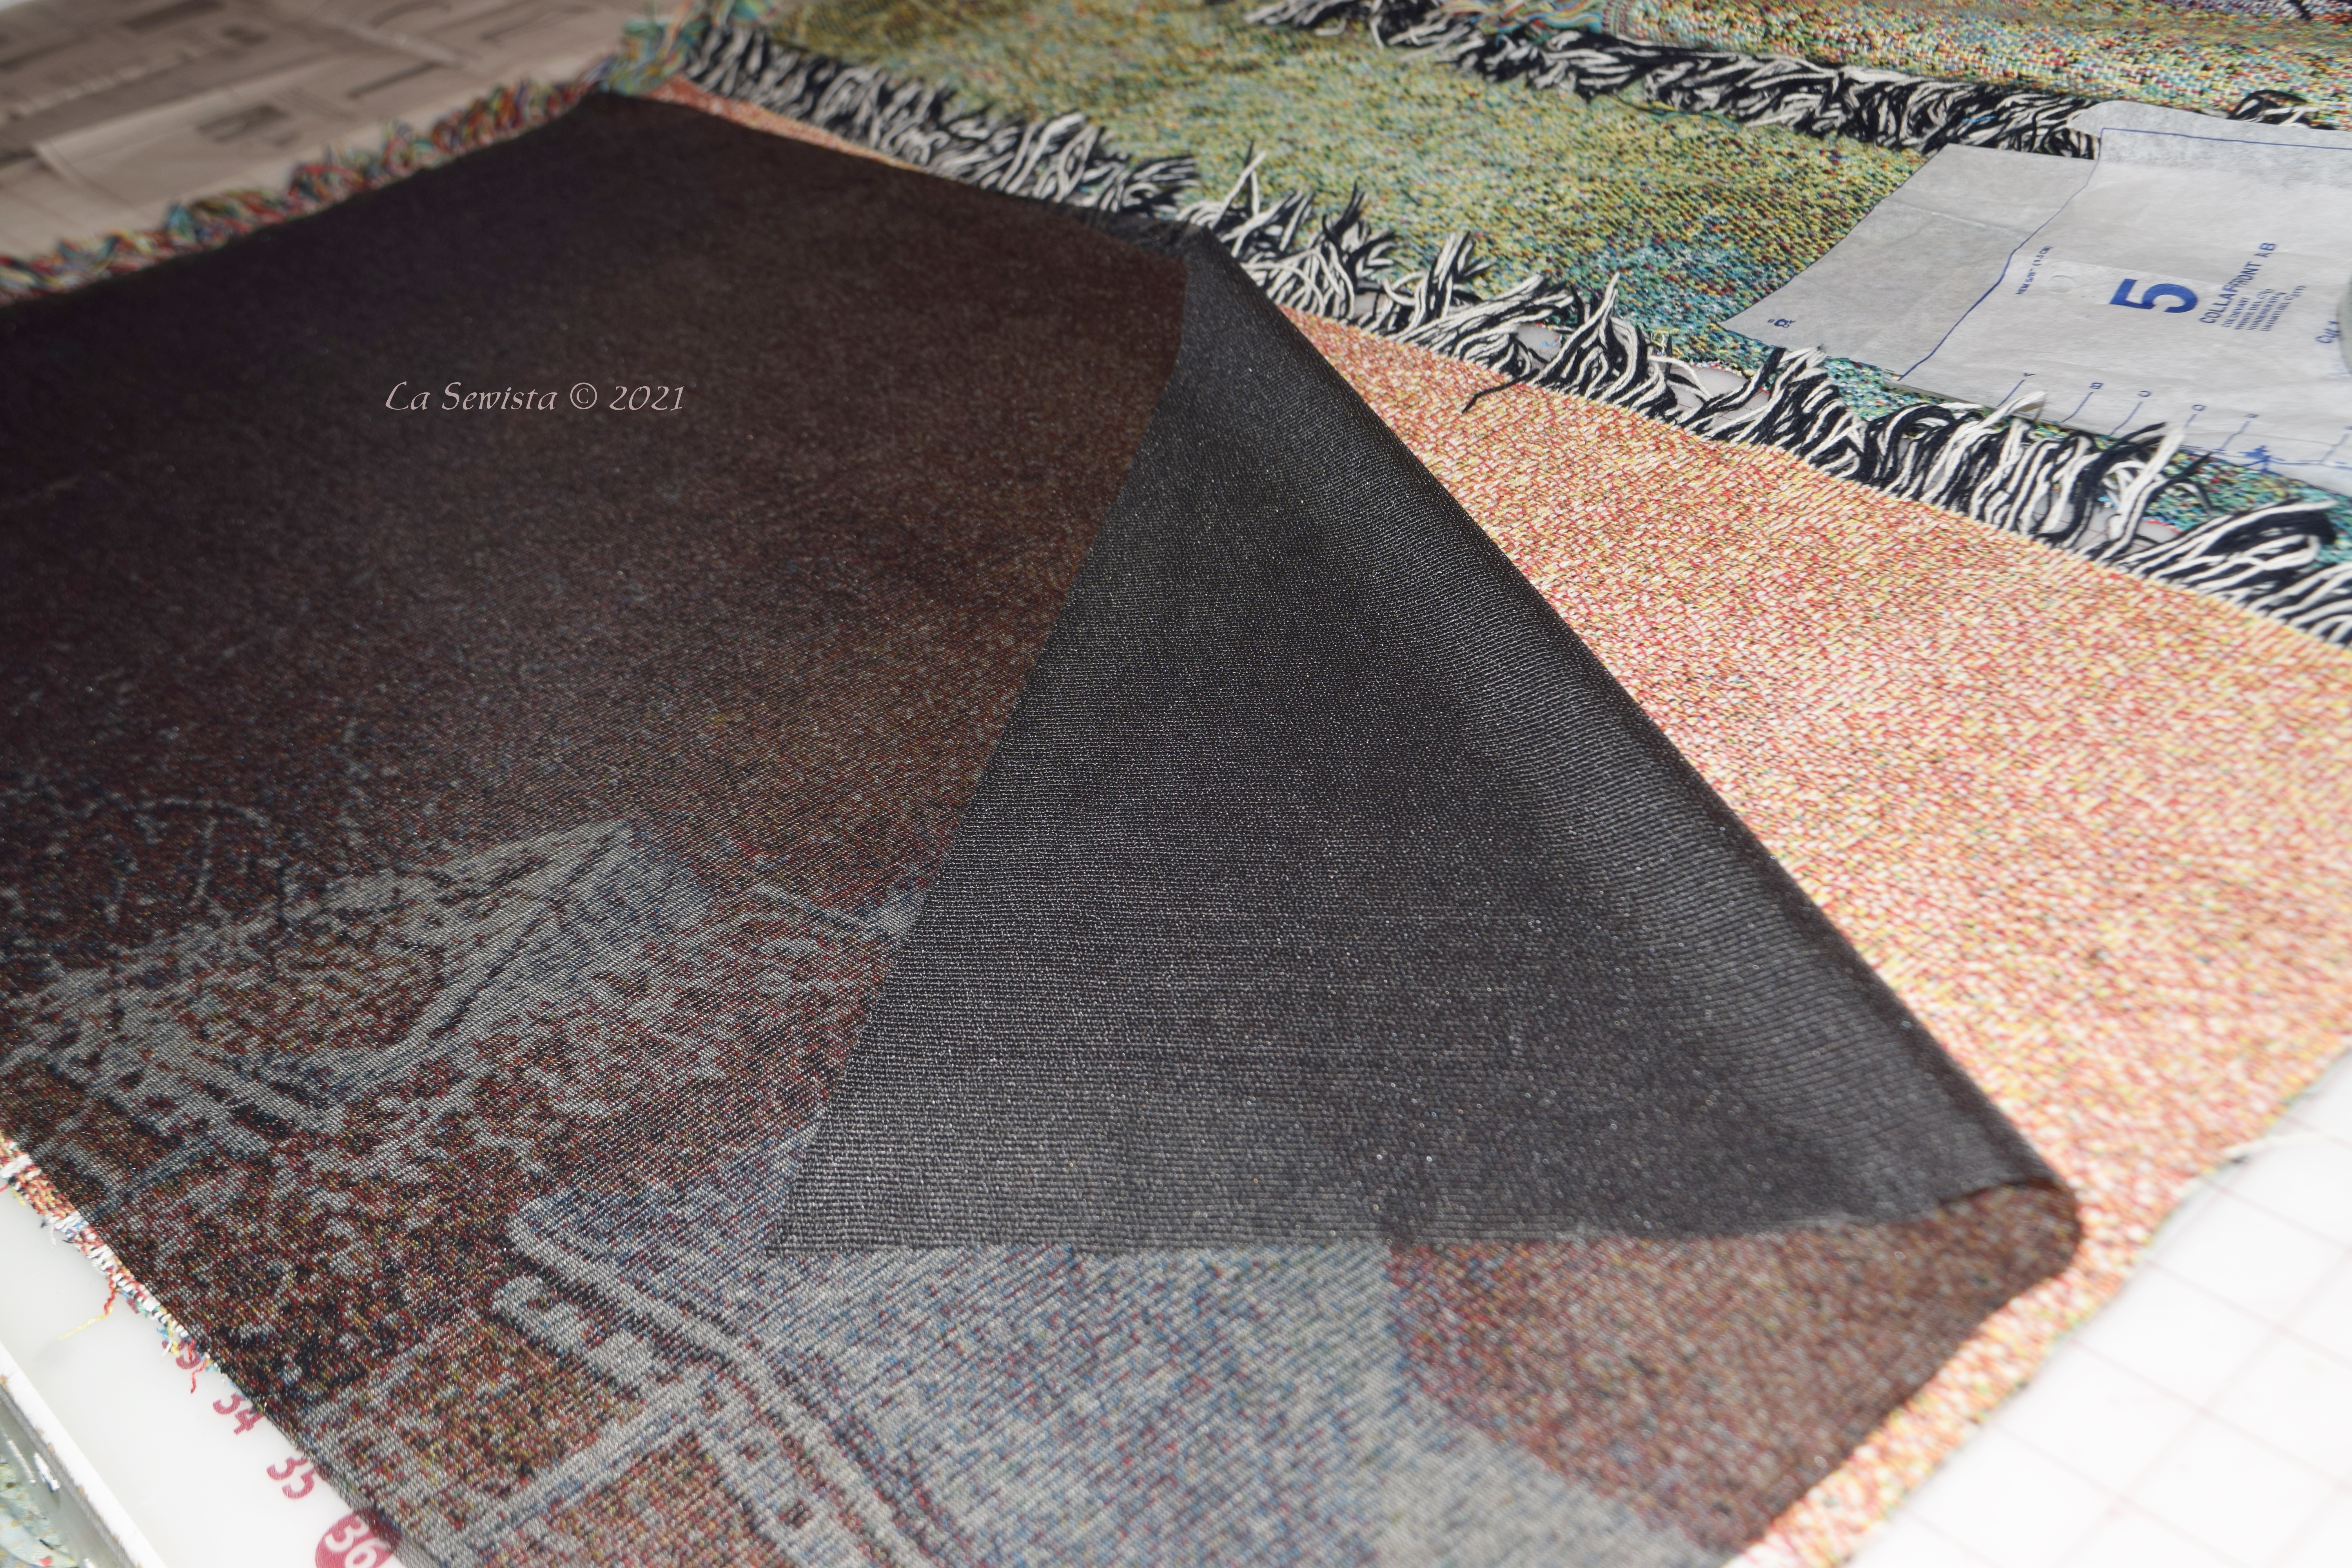
The  throw was large and the colors were beautiful . The shapes from the front side were pretty amorphous on the back and could be worked around. I would bet the farm it was acrylic and it was pretty tightly woven. I bought this beauty and tucked it away knowing one day I would make it work. It's day has come.  But first I had to make it garment worthy. That started with a wash and dry and it came out beautifully as you see it. Click the pic to see it up closer. 


I had the pattern picked out, something extremely simple but with a lot of style and a garment that I love to wear. More to come on that.


  I figured the best way to make this work would be to  block fuse a tricot interfacing to the back of my pattern pieces.  This would do a bunch of things. 

* It would secure the weave and prevent catching and snagging. 
* It would stabilize the fabric for the garment I was  making. In it's current state the fabric was thick but almost too soft and  drapey. 
* It would underline the fabric, not needed by the pattern but nice to have. 
* It would give a smooth surface to land against what I wore underneath, nothing loopy that could catch and snag.
* It let me fudge around with the grain which is working out beautifully due to the design as  you will see. 

I laid out my throw on the cutting table, fashion side up and carefully place my first piece where I wanted it to go. I put a lot of thought into where each pattern piece would be best cut.  I then allowed for at least another inch all around and cut my block. As luck would have it, the blocks needed were the width of the the interfacing. I carefully picked it all up and moved to my ironing area. 


I  laid out the interfacing on the back of the throw, my idea of the back, and then folded it so it would fit in the  "fold"  of the press. I find this the most efficient way to press large articles. I used a silk setting with the massive steam these put out but first I lowered the top of the press to within about a half inch of the fabric and then let it steam. I wanted to make sure I got all the shrinkage out of everything, interfacing and fashion fabric. Then I lifted the top again, took my hands and smoothed out the interfacing again as the last steaming caused it to move around. Once all  smoothed again, I did the actual steam and press to secure the interfacing to the fabric. Seven seconds and permanently bonded! 

You can certainly press this with the iron but it was far more efficient to do this job with a steam press if you have one, fast, smooth and permanent.


These blocks were for my front and back bodices, similar in size but just different enough to be a problem if mixed up. I made sure I marked which piece was which with some tape. 

I still wondered about keeping the weaving secure and started to make samples of overstitching on the fabric. The jury is still out on this and I will sleep on it. It may be overkill or it may not make any difference at all. We shall see.  I do have some contrasting fabric to cut out for the design but did manage to get a section completed. I think it will be quite nice!

ETA: For those who are fans of Kincaid's art, I respect that.  We all have developed our taste thru a lifetime in very many varied ways. For those who love his work, more power to you and may you enjoy it with all your heart. For myself, I prefer more of a Shaker aesthetic. Sorry if I offended anyone's sensibilities. That was not my intent. 


And for my final surprise, here is the pattern I will be making with this fabric. It is a TABARD from Sandra Betzina, Vogue 1569. I absolutely love long sweater vests and have literally worn a couple of woolen ones to death. I saw this pattern and it was instant love. I knew immediately what fabric I would use. ;)  I will be using some lovely black wool for the contrast. More to come! 

******************************

I finished my next Picasso pants and have a near complete blogpost on them. Hubs and I did a fashion shoot but could not get clear pictures. I tried everything which meant I ended up taking my DSLR to the camera shop. They knew the issue right away and I came home with a repaired camera and ready for another go at getting pics. The weather is now not cooperating but as soon as I can I will have that review up and running for you. I love my new PPants. In the meantime it's full steam ahead with my Kinkaid throw project! And I bet you thought is was a throw away!................Bunny

Saturday, August 1, 2020

Rayon Slubs and Stretch Mesh


All my youtubing found me falling in love with a pair of cropped pants made from drapey rayon in a very soft but assertive print. I went on the search. The youtuber, Linda Lee, no longer had it in stock and it was no longer available. Left to my own devices and disappointment, I went on the search and decided it would be ok to just be a soft and assertive light weight rayon to make my vision materialize. It took a while but I eventually found this Telio rayon from Fabric.com, aka, Amazon, and put in my order. 


Above you can see the fabric spread out. At the corner that is cut there are big starbursts. While I think the pants would be just as lovely if this  fabric was not matched at all, I was determined to match it. It was near impossible. I found that I could match the two largest elements, the cutout star and the large green kaleidoscope design you see above, one or the other.All the other  bits and blobs were randomly floating on the fabric and would never match, a really interesting design. Up close it is a lot like a Rorschach test. 


If you click on the photo and look closely you will see why  it is called "slub rayon". I remember this fabric from way, way back in the day, albeit a bit heavier weight. You can see that some of the threads are thicker and give a bit of texture to this already interesting fabric. I liked that. Those are the slubs.  I am in love with this fabric but you have to admit this definitely looks like an hallucinogenic experience. I guess I'm channeling the Sixties......sigh....

This fabric did not give me much grief to sew. Before I started cutting, I pulled threads to get the straight of grain. I then cut along the pull. Once the straight of grain was established I went to the ironing board and sprayed the crossgrain edges I just cut with Niagara spray starch. I sprayed, let it soak in for a few minutes, patted down the bubbles, and then pressed, up and down. Don't iron this back and forth while there is starch on it. It will pull and wrinkle. Just do and up and down motion.  Once my pieces were cut out I went back to the ironing board and did this starch treatment on every edge of the rayon, iron with a dry iron and organza press cloth. Now all my edges were ready to be sewn.  I went to the serger and serged every edge. Seams would simply be pressed open with serged edges. 


Back to Linda Lee, who really knows her sewing, she suggested lining these wispy rayons with stretch mesh. Now she called it "power mesh". She described it and I did some searching  before buying. This is not the mesh one uses for compression in lingerie and swimsuits. That is power mesh according to my research. What you see above is stretch mesh. It is used in bridal gowns, dance and skating costumes, etc, to give the illusion of skin where there really is this fine layer of fabric. It can make a bride or a ballerina look like lace appliques are glued to their perfect bodies. Stretch mesh to use for lining a thin rayon? What the heck - I'll try it. I'm always up for something new in my sewing. I knew I had seen this fabric at the chains  in the bridal department. THIS IS NOT NYLON TULLE. This is made of 100% polyester and stretches every which way possible. It has weight. It is not floaty. It is drapey, just like the rayon and doesn't pouf. It is decently priced for a lining, ending up at 5.99 a yard in the end. 

Got the rayon slub fabric. Got the lining, Good to go. For a pattern I used my Sure Fit sloper once again and did a straight leg pant with it that has a gathered waist and cropped length, easy peasy. Now when Linda suggested her lining she said to just make another pant out of the mesh and drop it in, no other info. Easy enough.............uh....no.


I did some reading on the fabric and went straight to the machine and uses a zigzag. I ended up with very lettuce crotch seams. I pressed out a lot of that but it was not good.I then walked away, came back and tried to maneuver that into a French seam, using paper underneath, This was a bit better and you can see the crotch seam to the left and inseam going horizontal above. It's full of paper.I was scared  to play with it too much. It could do but this just was not nice. 


I walked away again. Upon returning I decided to just takes some long scraps and serge them, no paper.  Above you can see perfection. There was no waviness and the seams were strong and pretty. I went with simply serging the seams. 


They look really nice from the right side, too.  Now I can "just drop in the lining" and attach the pants and the lining and proceed. 


These pants are near done.Once again, I've decided on a coordinated outfit.(Yes, that is paint on my thumb.) This will make three in a row. I am enjoying the concept of having coordinates. I still don't see myself doing a swap, however, and that's another story for another day. I will share both pieces of the ensemble with you when  they are complete.I am using a Mimi G pattern for the top and excited about that. It may be from one of these fabrics. The pants are lookin' good. I would like to add that I LOVE the lining.It feels divine and just floats with the pants so nicely. More to come............Bunny


Monday, June 23, 2014

Chanel and Jeans!


Just got in my samples from Banksville Fabrics. If you haven't used their swatching service and live far from really good fabric, it is for you! I called and requested samples for a Chanel cardigan. I told them what I had in mind and this is what they sent me. I swear, they  can read my mind! I love them all but want something I will wear a lot so the boucle on the right is the one. I am thinking that would look good with jeans.Hopefully that will get ordered today. Isn't that metallic on the left fabulous? Perfect for a summer wedding!


This black boucle is heavenly with it's patterned silk charmeuse linings. I so would love to make up a jacket in every sample they sent me! I asked for a silk lining and there are charmeuses and silk satins here. 


I will get my fabric ordered but this looks like it will be a winter project. The weather out is so incredibly perfectly summer right now but my sewing thoughts are starting to turn to winter!

******************************************

I am back to actually sewing, finally. My back won't take much more gardening. The yard looks good, guests are gone, vacations over and I am ready to go. I've started on what I hope is a pair of good fitting jeans! These have been a long time coming. I have been using the methods described in the Sure Fit Designs Jeans DVD.  Watch a little, try a little, a process that has been going on for a couple of days. At this point I think I have the sloper down with a tweak or two of my own.

I am a huge fan of Sandra Betzina's fly front zipper installation. If you haven't ever tried or seen her method, go to Threads and watch or click this. It's quick, easy and professional.  Using her method means I don't do the zip the way it is shown in the Sure Fit  DVD.

One thing that is shown in the DVD, that I love, is using a fabric stay across the tummy of the jeans. I will share how I do that at my next sit and sew. Why would you want a fabric stay across the tummy of the jeans? First, it will keep your pocket nice and neat. It will help it lay the way it should and prevent any peekaboo or popout of the underpocket. Next, according to Betzina, and I agree, it helps flatten the tummy. Some even do the stay in girdle type power net. I will be using a tightly woven something or other, hopefully a bit heavier than a muslin. Have you seen the jeans out there that "slim" your tummy area? This is the technique they use.

For the fabric, and because this is the first pair of jeans from this sloper, I will be using a dark print, not a denim, the better to hide any possible defects and still be wearable. The weight is the same so I think it will be a good bell weather of future jean efforts. I am putting in one inch side and inseams and will baste everything first to try the fit. But, once I get this down I should be able to whip out real jeans effortlessly (let's hope). On my first pair, I will have the rivets and jeans buttons. I need to think about pocket design, hmmm....How is your summer sewing coming along?.......Bunny


Wednesday, September 18, 2013

Assessment

I kept wanting to call this post "Re-assesment" but I never assessed to begin with so how can I "re" the assessing I never did? So instead  this will be an assessment of my current state of sewing affairs. Many bloggers will start the new year with a plan for the year and goals to be reached. My goal setting is usually by the day or week and a year ahead is a bit too nebulous for me. Of course in my mind there is a horde of designs with an even bigger horde of fabric to go with them. What is it about "the road to hell is paved with good intentions"? My intentions are good but I truly doubt that will show me the way to Hades. Instead they will either get made or they won't

That being said, this time of year does make me focus and assess. The holidays are looming. What festivities will I attend? The cold weather is licking at our ears right now with the serious white stuff just around the corner. That requires winter clothes. My grandchildren and other family members all have their birthdays in November and December. That needs gifts and the most appreciated are the ones I make. I am lucky like that. It is just a time frought with lots of sewing needs. And you know what? That's OK. I just have to decide what get's priority. Here are a few things  running around in my mind.

These are wolves howling at the moon. I just got this from E-Quilter and it is gorgeous heavy flannel like I get on the Native American Reservation near here but right now I don't have time to go visit. My little grandson asked me the other day, "Bunbun, what are you making for me now?" emphasis being on the "now". My heart went pitter pat as the answer was nothing. My reply to him was "what would you like me to make?"  Without hesitation he answered, "Jammies." I can do that. I'll use my tried and true OOP Simplicity 2771. It's been featured many times in the blog, the last being these jammie:
 And then there is Sophie. She told me she likes this jumper and would love it in pink so pink boucle it is. I did manage to get it cut out this weekend using Simp 1723. After the last project I have decided to flat line this so it should go together nicely. I just have to think of some waistline embellishment.

Then there is my little Carly. She desperately needs a double doll carrier for her American Girls dolls. Doesn't every little girl? Here are the fabric choices for that. Now to just find that pattern which always seems to disappear. It doesn't actually disappear. It gets misfiled as there are other items on the pattern besides the doll carrier and the carrier isn't real evident from the pattern picture. This will require some digging. I always make things for Carly that lean toward turquoise like her big beautiful eyes. These are my choices:
Are you seeing a trend here? But where is there something for Bunbun?  Oh, there is. Maybe not lots but more of Big projects like my winter coat. I won't show you that fabric as it is a black cashmere/wool blend and yummy but still just black. I will use the very simple Butterick 5960 after debating over many many patterns the past year. Once I saw this one it was final.
This pattern is just simple enough to give me a few seasons wear, with or without the belt. I'll do a Kasha lining and some other embellishment.
I also managed to recently score some really lovely rayon crepe for a blouse. It is yummy and has such a gorgeous drape. Not sure what the pattern will be but it will be "flowy". I'm still searching. It washed and dried beautifully.

And then there were these two yummy fabrics, both velvets. The first is a cotton velveteen and just gorgeous. It begs a simple design and I am still not sure what that is yet. By the way, any and all suggestions for garments or actual patterns will be taken seriously and appreciated. This first velvet is languishing since it's purchase last year. It just never got made into anything. My husband's health issues started last February and that put the kaboshky on a lot of the projects I planned for last winter/spring. He is doing very well now, thank you, after 7 months of treatment so now we can focus on other things which for me is back to sewing.
And the last piece of fabric here I think is utterly fabulous. Looks like moguls on a black diamond ski trail, right? It is a sculpted 100% rayon velvet and it just blows me away every time I look at it. I just know it would be great in one of those voluminous rounded shoulder jackets/coats you see on the runways right now. But on moi? I don't think so. Let's just say the word is "mushroom".  So I am asking you, dear readers for your ideas for this yummy fabric. What would you make? Remember, I am five feet tall so nothing too overwhelming. Part of me wants to line it and put it on my bed as a throw and the other part wants a really cool jacket. Here it is:

One thought I had was to do some sort of surface dyeing on it. Your ideas????

Isn't this beautiful? My first hibiscus ever is giving up it's last gasp of summer. So lovely.

Thanks to everyone for your wonderful thoughts and comments on the Crinkle Jacket. It was a really fun project to make. Kudos to my hubby for the great photos. Mine with the self timer were really sad. He is much easier to smile for than the side of the house. Again, your thoughts and encouragement are always treasured and appreciated.......Bunny

The Ray Pinafore, 2025's Epic Fail

  Happy New Year and welcome to my epic fail of 2026. I guess you have to have one, right? This is the Ray Pinafore from Paper Theory Patter...