Sewing Vloggers

Tuesday, November 19, 2013

Tunic #2, Vogue 8924

This is my second iteration of Vogue 8924, that tenty little tunic that is so comfortable to wear and looks great with leggings and boots. You can see the first here.  I have worn it numerous times to work. Between rushing in the morning and looking frazzled in a dark winter evening, a self modeled picture isn't coming any time soon. But Graciela, today's name for the form, will accommodate the modeling! One day the form will get a proper name. I am trying out several and leaning heavily toward Graciela.

Pattern:
Vogue 8924, a simple, widely cut tunic with a shaped hem and large pockets.


Fabric:
This is a polyester dotted blouse weight for lack of a better term. I keep buying gray lately, which does give me wardrobing advantages, but I always feel I have to add a spike of color. I did this here with  some yellow and white retro buttons and a bit of shibori stitching in yellow on the back above the pleat. This fabric is very drapery, different from the first iteration, so looks good with a belt and has more of a blouse look. 
Construction:
I did a few changes to the pattern this time. Because I was using a nasty synthetic and because somehow the stay stitched neckline stretched out getting the bodice to fit the collar was a bit of a challenge. Here you can see the nastiness.
A natural fiber would have eased in and pressed out nicely but petroleum based fabric just does not do that. What to do?  I fudged and fiddled and decided it looks great with the collar turned down, not my usual style. I found a good break point for the placket and added a button there and I think it worked out fine.

 I also  changed out the pockets to something a little more fun. Actually it was all about funning up the dour gray fabric. On the pockets I flipped a corner down and secured it with another retro button as you can see in the second picture above. 

This was all pretty much stitched and serged. Nothing fancy happening here. But I did get a good basic garment that has been perfect for  work with some leggings, shoebooties, and a long  sweater vest. Library ladies wear lots of sweaters.  I did get lots of positive feedback when I wore it. And I was comfortable, something oddly becoming more important with each day. I love how this looks from the back. 

While I think I may make more tunics, I think I will retire this pattern for now. I definitely can see it for the summer in some linen with slim white crops. Highly recommend. 
*********************************************
 My holiday sewing is all out of the way now and I will get going on my winter coat. Finally! I have cut and prepped the pattern and interfacing, a hair canvas sew in. To keep things nice until I get to work on them further I rolled up the tissues on cardboard tubes, one for lining, one for fashion fabric. Have my muslin fabric at the ready and just need to cut. I am thinking this could be a simple project. We'll see....Bunny

Sunday, November 17, 2013

American Girl Double Doll Carrier, McCalls 5019

 
This project was completed last night and this afternoon, quick and cute! It is a gift for my little granddaughter, Carly. Rumor has it that if she is a very good girl Santa may bring her a second American Girl doll for Christmas.  And this is a carrier for TWO American Girl dolls, perfect for girly overnights and friendly visits to Grandma's.

Pattern: 
This is McCall's 5019. The pattern features some cute jammies, a sleep fleece, a robe, a dolly sleeping bag, a "chair/pillow" and the double doll carrier. I don't think there is any other pattern out there like this, one that accomodates two dolls and all their paraphernalia at once. It is VERY easy and is ripe for additional embellishment. which I did. The heart design comes in the pattern. 

Fabric:
This is made from inexpensive 100% quilter's cotton from Joanns. You don't need anything fancier than that to make this wonderful, IMO. Whenever I make something for my granddaughters I try to make it in colors that will flatter them. Carly is platinum blond with turquoise eyes and a big tooth missing in front, therefore the turquoise fabrics. And because she loves animal prints I threw in a bit of zebra too. Anyone can do leopard, you know! ;)

The entire outer bag, other than the pocket is interfaced and I used Decor Bond here. The pocket is simple a large rectangle folded in half to make the top edge. I thought that edge was a bit weak so I added the black bias tape and some more calico to give it a little more heft. 

Construction:
This is easy peasy. I cut it out in short time last night. There is a big chunk of fusing to be done here and that took a bit of time. Then I basically made two tote bags, one being the lining. The lining has the pockets added to the sides to accommodate the dolls. Stitch lining to bag, turn, and done! Need a cute Christmas or Hanukkah gift? You can whip this out in no time. I did topstitch the top edge to keep it from turning out. 

Opinion: Easy, great gift, nothing complicated and fun! Highly recommend. It will make your little darling very happy!
****************************************
I want to sew. I want to blog about sewing. My attentions lately have not been on either. We have major company coming for Thanksgiving. Since we downsized to our little retirement home in the Adirondacks we have always gone to our daughters' homes for the holidays. They are much better equipped at this stage to do lots of entertaining. But this year, this year it's at our home, at their request, and we really are excited. I will have 8 adults and five children for dinner. Some will go to the lodge up the road, very nice, and others will be staying in our home. We are so looking forward to it. So the past two weeks we have been cleaning, moving furniture, finishing overdue decorating projects, etc You know how that works. I must say the house is looking pretty good. So if I am scarce for the next few weeks you will know why. We will have a repeat at Christmas! Prime rib, anyone?..................Bunny

Here's our new back foyer off the family room, all of which were ruined by last fall's flood. Finally done......


Thursday, November 7, 2013

Monday, November 4, 2013

The Wolves have howled! Simp 2771

Zackie's PJs got finished this morning. Took one hour to whip out the pants. Here's the lowdown:

Pattern:  Simplicity 2771 , "Unisex Pajama". There's a lot I love about this pattern and have used it many times. First it carries every size from little tyke to Big Daddy and is not gender specific. I would love a pair of these for myself. It is pretty easy and you can take it to the next level creatively by doing the piping but not necessary. The only caveat here is dealing with the neckline band. It is sort of counter intuitive. You put on the band AND THEN you face the band after. It looks like the band is the actual  facing but that is not the case and the first couple of times I made this it took me a bit to get my head wrapped around that.

Another thing I like about this pattern is the neck treatment. I've made classic notched collar pajamas. Forget that! With this neckline you don't have pjs coming out  of the washer/dryer with a skewed crumpled collar. I mean really, who is going to iron pjs? Not even moi, who irons everything. With this neckline it always looks neat, especially for those Christmas morning snapshots.

A bit of advice: if you would like to add this to your stash for sewing lots of different sized jammies, wait till a Joann sale and get all the sizes at 99 cents a pattern.All the sizes are in one envelope but by having several envelopes you can cut out each size needed. It will save all the tracing I have done.

Fabric: This is a 100% cotton flannel from EQuilter,com from the North Woods Collection. There are some exquisite flannels to be seen there. It is very heavy, washed and dried with nearly no shrinkage and came out holding its appearance. I've used this line of flannel before and it is a delight to sew with. Be aware that sewing pajamas takes a lot of fabric and this is not cheap. You have long sleeves, pants and bodice. I believe I used 4 yards at 11.95 so you can do the math. BUT, these are being passed through the family, wear like iron, wash beautifully and most of all, the kids love them and ask for them. I have bought cheapo flannel and you never know quite what you are going to get. I highly recommend if you can go the expense. When your grandchildren ask you to make these and it's unsolicited, you know it's worth every penny. 

The piping was also 100% cotton flannel. The bands are interfaced with Armo Weft. 
PIC

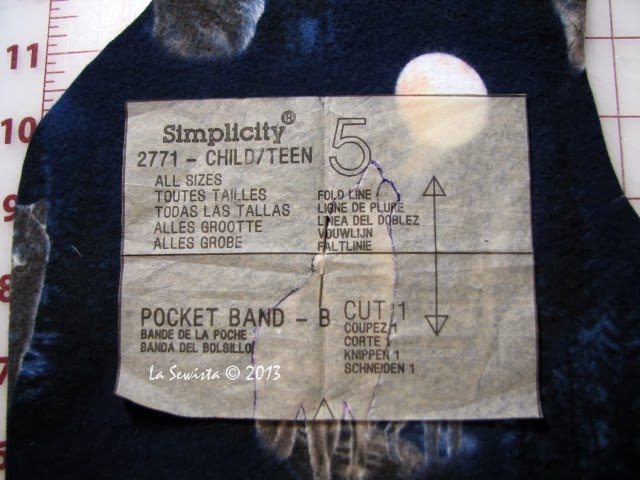
Construction: This is pretty straight forward and just take it slow figuring out how to put the band on. It is easy to attach the wrong side which I did the first time I made this. Other than that it is simple.  This would be a great pattern to learn/attempt piping as there are no sharp corners to turn. On my version the seams are all stitched then serged with some being topstitched. There is topstitching next to all the piping which brings out the 64,000.00 question. In my last post how did I get the moon on the pocket to not show the stitches? I did nothing. It is topstitched with the same navy thread but the flash bounced back off the moon and made it disappear. Pretty cool, huh? Now if time were nothing in my life I might have switched threads to a white for the moon but sorry, not this time!  Because of yardage limitations I also did not make an effort to match the band. That could be done but it would require additional yardage and I felt maxed out on the expense of this project already. But that pocket matches and I feel good knowing that.

In conclusion: This is a great pattern. The fabric was wonderful and it's going to a very appreciative young man. I will no doubt make this again and again. I am thinking a pair for me but a winter coat is coming first. Got my Kasha lining today!!!...Bunny


Sunday, October 27, 2013

The Super Fussy Piped Matching Pocket

Tunic #2 is done and I like it a lot. The weather has not been cooperating with my photography needs so pics may just end up on the dress form. But for now I have moved on to a pair of Jammies for my Zackie. He asked me for them with no solicitation. What could I say? Of course Bunbun will make you some winter jammies. I bought the wonderful flannel from the North Woods collection on Equllter.com.

This is my go to jammie pattern, simp 2771. Included are sizes from a 2 year old to Big Daddy, all the family. I have traced off  half of the sizes at this point and of course not the one Zackie needed. My slow brain has since decided the next time Joanns has a Simplicity sale I will just buy one for  each size, duh. No brainer. In the meantime I traced away.

This is a simple pattern, one of the reasons I love it. I've reviewed it here numerous times. This time, however, I am using a very strong print fabric. If I put a pocket on that did not match it would scream tacky and incompetent and I wanted that pocket. I needed to make a pocket with a band and piping in between that perfectly matched the bodice. It took a bit of effort that I will share with you.
I marked the pocket location with a horizontal line on the bodice. I matched the fold line of the band to that location line. Then I drew an outline of the big wolf on to the pattern piece. I matched to a scrap of fabric and cut out the band. I did the same for the pocket. Then I folded them on the seam allowance to see if they would match once stitched together.
I actually cut the pieces larger than needed to make sure I had a bit of fudge factor for matching. I didn't trim them to the proper size until the piping was installed.

I made my piping with a "moon colored" flannel, the cheap stuff so I washed it several times. I attached it to the lower pocket section. I am using half inch SAs here.

There was going to be a lot of bulk and 4 SAs of flannel so grading was inportant. I opened up the piping and cut the inner SA waaaayyyy back. Now it was time to attach the pocket band. I made sure my wolves matched up and stitched on the same seam line. There is a tute on the right sidebar all about how I do my piping if you are interested.
The band SA was graded back as well. Then I pinked what remained.
Success so far!

Now it was time to trim the pocket to the correct size and once again being careful to match to the bodice. I pressed the band on the fold line and trimmed the edge with the pinkers in an effort to keep the bulk down. I folded back the band, pinned it, and topstitched two rows above the piping.
Then I folded back the SAs, mitering and trimming the bottom corners. Too much bulk to do that at the top!

Now here comes the most important information I can give you today. DO NOT TOPSTITCH OVER YOUR PIPING. You will topstitch the bottom pocket first and as a separate process topstitch the band after. At no time will you cross the piping. Also, if you haven't already, take the cording out of the SAs, again, gotta get that bulk down!

I like to stitch a triangle at the tops of my pockets on just about everything. Then I usually follow with a zigzag at the very top but that would have been too bulky so I didn't. I used 1/4 inch masking tape to line up my triangles and stitched starting and ending at the piping.

All of this fiddliness took about an hour but I think it was time well spent. 

 It would have driven me to madness if it didn't and I would be howling at the moon along with these wolves!.....Bunny


Tuesday, October 22, 2013

It's official. Threads has announced the winner of the Fall Jacket Challenge for Sew Stylish magazine. I made it to the finish line and came up a winner. I really really want to thank each and every one of you who voted for me. I also want to say I understand if you voted for one of the other entrants as that was some damn stiff competition! Not sure who I would have voted for if I weren't an entrant. All of the jackets were unique and beautifully made. They really make the case for the art of sewing and how it allows your creative expression to be shown to the world. So satisfying!

Contests like this show the possibilities. We can't all be Van Gogh but we can all paint if we so desire and love doing so. That's what it's really about, knowing the capabilities and working through the challenges to come out with our own artistic expression. You all amaze me every day with your works of art and with your challenges met. Thank you again for your support and encouragement and continue with striving to sew better with each garment. You are the next winner!....Bunny

Sunday, October 13, 2013

Tunic Time, Vogue 8924

Love this design. Generally most tunic proportions are really bad on me as I am so short. They seem to end at my exact middle, not a good look. But this one I made just a bit above knee length so a little better proportions. My hubby LOVES this outfit. He's always looking out for what I call "cute comfort".  He likes it when I am his idea of cute and my idea of comfortable. Works for me, too!  Here's all the deets;

Pattern: Vogue 8924, a Very Easy  Very Vogue and it is. The design went together really quickly and the way I made it used three pieces: a front, a back, and a pocket. Simple, simple, simple. I did view B.


 Fabric: This is some sort of jacquard from the local JAs that I picked up on clearance last year. It appears to be a cotton/poly blend and is a suiting weight, nothing particularly special but with this pattern it's day in the light had finally arrived. It is a bit "springy" but that's OK. I like that this will be worn with a turtleneck or crisp white shirt and leggings or tights.It is PERFECT for my work. I plan to make another really soon.  It is a definite positive/negative coloration between the front and back side. I used the more gray side for the tunic and the more black side for the pockets.

  
Construction:  This was so easy to make and would have been done long ago save my handwork on the back. All the edges were serged prior to construction, definitely worth the effort. This was quite ravel-y. I also chose to line the pockets. I just liked line pockets but once topstitched a teeny bit of the lining showed despite favoring the fashion fabric to the lining side. I think next one will just be turned and stitched, no lining. This has no zippers, no facings, and no set in sleeves, wahoo!

Once completed I thought it was likeable but rather dour. It also gave off a Japanese apron type of vibe to me so I decided to embellish the upper pleat area in the back with some pickstitching and a bullion and french knot motif. Rising sun? Aster? Mum? you decide but it took it from being too serious and I love the embellishment. Up until that point it was just another VEVVogue simple pattern.

 Bottom line: I highly recommend this pattern. It is a nearly instant gratification project with no fit issues. I used the size 4-6, extra small. The bust and hips on this pattern are about 50 inches in that size so keep that in mind particularly if you are smaller than me. I will cut the above fabric, for another much more drapey version. It is a poly blouse weight. I will also use the version with the sleeves and collar, I think. Back to the studio.
*****************************

The voting closes tomorrow at midnight for the Sew Stylish jacket contest. Whether I win or not I would just like to thank all of you who voted for me. I so appreciate your kindness and effort...........Bunny

Tuesday, October 8, 2013

I Need your help!!!

 My Plea:

I have had the good fortune to be chosen as one of five finalists in the Sew Stylish/Threads Fall Jacket Challenge. Whew! Now I am asking for your vote. Here is a link to the voting site:

Sew Stylish Fall Jacket Challenge

My jacket is the Crinkled Taffeta Jacket which is shown inside out. I'm hoping it's because they were impressed with the workmanship.

Each candidate had to put up photos and some text regarding her/his project and there is a link next to each photo to see more. After you click on those, please click back  to vote for me. You don't know how much I appreciate all of you doing this. My fingers are crossed. I sure could use that new Juki serger.

Thanks again to my  many cyber friends. You don't know how much you make my day special. Double crossing those fingers now!.....Bunny

Sunday, October 6, 2013

A little bit of Windows in My Life...

I love the Outcasts so I hope you picked up on that bit of musicality in the title

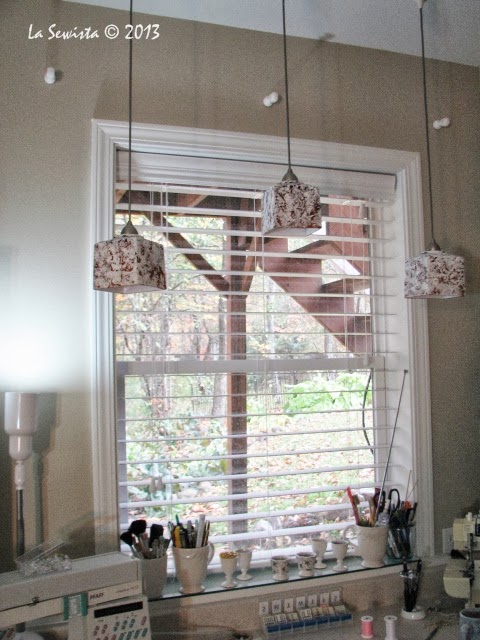
Busy weekend but I did manage to complete a project. I've wanted something soft and simple for my sewing room window for a long time. I only recently got the blinds and they emphasized that need. I was inspired by a window I saw on Pinterest and this weekend was spent replicating. The Pinterest version had a stenciled monogram which I thought was really cool but with the monogram on my chair I thought that would be a bit much. I decided to complete the treatment and decide after if I wanted the stencil or not. Don't want it.
       
You can see the imposing underbelly of my back porch and I was hoping to hide that a bit but still maintain the lovely view of the garden and wandering wildlife. Here's the window after:


The treatment is basically two big long tabs. A piece of fabric is railroaded across with a box pleat underneath each strap that you see. I did use a couple of tricks to get to this point.

 
First is the broken wooden spoon trick. This poor spoon had just stirred too many pots and almost got chucked. It occured to me it would make a great pressing tool. I hate it when making straps and you are trying to press them flat and the seams need major fiddling to lay flat on their edge, usually a finger burning moment. With the spoon I just pushed the right side out strap all onto the handle. Then I pull out a few inches at a time to the end of the handle. I can iron the seams of the strap flat with the iron. Keep pulling and keep ironing till the whole strap has had its seams pressed flat on the right side. Now when I go to line up the strap's edges  to press they come out beautifully sharp with minimal fuss.


This is the curtain getting a clean finish on the giant tabs. I did this exactly as I did the yoke on the Crinkle jacket. The curtain is sewn to the tabs. The curtain is then rolled up and the unsewn side of the big tabs is wrapped around and sewn to the other tab/curtain seam, that "burrito" thing again. Then the curtain is pulled through after stitching and it is a clean finish inside and from the outside of the window as well. This window gets  foot traffic going by so it needs to look finished on the outside of the house as well. Do you think about how your window treatments look from the outside of the house? I always do. I think it's a New England thing. Window layouts on homes in New England are so symmetrical and they often sport all the same treatment which looks really lovely. Grow up with things like that and they stick in your subconscious forever. I so remember pulling all the shades so they were exactly even all over the house. Everyone did that where I lived.
************************************

 Today I also cut out and nearly finished a Vogue Easy pattern. It's a longish tunic that I plan to wear with leggings and a turtleneck or crisp white shirt. Pics coming. Just have to do the hems and button.....Bunny


Monday, September 30, 2013

Chanel Jumper??? Simp 1723


Sophie's jumper, Simplicity  1723, is a done deal! I put a bit of extra effort into this child's garment but that boucle made me do it!

Pattern: Simplicity 1723, jumper, jacket, skirt and headband, all with a slight nod to Coco Chanel. Amazing how her classic designs filter down to children even all these years later. It was not difficult.It does not require a lining but I did one. I recommend. My grandaughter loves any sort of jumper or long top to wear with her tees and leggings. 

Fabric:   It is made with an acrylic and cotton boucle and I pray it doesn't pill. It hasn't yet so that bodes well. I have machine washed and dried all fabrics used so expect no probs other than a lack of desire to press clothing on the part of my daughter. She will  more than likely send it to the cleaners. That's her MO for anything not knit. 

The lining fabric is a 100% poly, a charmeuse wannabe. It was "springy" as many older polies are. It was given to me by a friend when she cleaned out her stash. 

I used a poly grosgrain ribbon for the belt and some little lace flowers picked up at Fabric Place in Mass. I found the garment a bit too serious for an eight year old and had to fun it up a bit. Sophie loves polka dots.

Construction: After my last positive experience I decided to flatline the jumper much as I did my crinkle jacket.  It took a lot of "pre-sewing" but once done the process of putting the jumper together whipped right along. The facings, hem, and waistline are bound with the same lining fabric. The boucle really needed the structure of the lining and bound seams to keep it from unravelling, something it wanted to do with a vengeance.

If I had to do it again I would not face the jumper with self fabric. I would use a thin lining instead. It is far too bulky in the button area for my taste but I will just move on from that observation. It won't bug anyone but me. I did not make real buttonholes and just stitched the straps shut with the buttons. The zipper is plenty long so I don't think Sophie will have a problem getting it on. I used an invisible zip and machined stitched the facing ends into the zip, no handwork.
Facings were understitched as much as possible and the edges bound with bias lining fabric. I used my clapper and tons of steam to get those edges as flat as I could.

As far as fit, I did have to alter the pattern. Sophie is very tall and slender so this was made in a size 8 with an inch added to the bodice and another to the skirt. I think dresses look cutest on little girls when the waistline is a bit elevated and this does that  on her. Her back waist measurement is 2 inches longer than the pattern measurements and I only added that one. 

All in all, this pattern is simple, cute and could be whipped right out if you don't  flatline, line or bind those seams. This would be great for the serger. But my fabric required the additional fuss. I must admit, it does feel lush and yummy in the way a Chanel jacket does. Maybe next time I would do an edge to edge lining as she did. I hope Sophie likes it. She did pick out the pattern and pink fabric.

********************************************************************************
I just have to comment that we have had the most incredible Indian Summer weather. It has been in the high seventies for days with clear blue skies and leaves on the trees flaming with color. Will winter want payback?......Bunny

ETA: Why does my text publish in different sizes when I don't change the size?I've notice this on only certain computers, not all. Are you seeing my text in different sizes, other than the headings? Thanks...Bunny

The Ray Pinafore, 2025's Epic Fail

  Happy New Year and welcome to my epic fail of 2026. I guess you have to have one, right? This is the Ray Pinafore from Paper Theory Patter...