Sewing Vloggers

Wednesday, October 10, 2018

The Wedding Skirt


My next project has begun. Actually is is probably about at the half way mark and I have a week and a half to finish it. The first pic is a satin print that is turning into another box pleated skirt. I am using the same style as the Cuba skirt with a few higher end touches. The skirt is flat lined which lines the garment and  automatically finishes the seam allowance with a Hong Kong finish. It's a sort of two for the price of one technique which worked well here. It was the method that appeared to provide the least amount of bulk in lining this very full skirt. I have decided on the length, too. It will be a tea length with my ankles showing, no calves.  I've used the same elastic interfacing waistband technique along with a hand picked zipper. With it I will wear a black top. I will try to get a simple tee done in the above fabric. It is a spandex knit, black, matte and full of the teensiest bit of sparkle. In the pic  above, that sparkle, aka the white dots, is exaggerated from the light of the flash. It is quite subtle in real life. These are two fairly simple garments that I hope to have done shortly. The skirt just needs its hem and the top needs to be cut out. We're getting there!

**********************************

Here is some drone footage of the beautiful Fall Foliage in New Hampshire this week. It is lovely. 


Enjoy!

Friday, October 5, 2018

That hand dyed scarf I made...........


I'm drained. It took a lot out of me.

There I was, walking into the supermarket and looking rather put together, if I may say so. It was that fall time of year with a nip in the air and a crystal blue sky, the perfect compliment to my olive greenish digital print curved hem knit skirt, Aran sweater, brown leather boots and a hand dyed velvet scarf. That scarf...............

Back in the eighties my sewing took a serious turn with surface embellishment which  lasts to this day. The scarf was a luscious well washed black rayon velvet that gave up it's ghost with some discharge dyeing. The resulting surprise of autumn shades of golds and pumpkins made it a permanent visitor to my wardrobe every  fall. Today was the perfect day to wear it. It cuddled my now crepey neck with its incredible softness and reminded me why I never sent it along to the thrift.

The supermarket, which will remain nameless, is one of note, being successful enough to have made the national evening news more than once. It's dedicated employees, incredible prices and quality and its immigrant family history have won the hearts of many in New England and I was no different. That means that I walked into a store  with over twenty registers, 5-10 people deep at each one and all happy to be there. I only needed a few things and headed down the first aisle. I grabbed the milk then went for my target destination, the fish deli. See, they have their own fleet of fishing boats and lobstermen and it is hard to beat the freshness. Husband and I earlier agreed on a fish dinner, haddock. As I rounded the corner toward my fishmonger, I heard a child screaming, really really SCREAMING.

It got more intense by the minute. Shoppers squirmed with discomfort, and commented about it. The nice man next to me at the deli said "I've been there. It happens" as he waited for his haddock. I said the same back. The very young fishmonger mentioned that he could never handle this and he would probably never have children, evah, evah.

The screams grew louder and could now be heard in every inch of the large, busy store. As I headed toward some salad dressing, our little screamer appeared around the corner. She was incredibly cute, identical to Shirley Temple with all of her ringlets and chubby cheeks. She clearly was in prime two year old terror mode. Her screaming had not let up one moment from when I entered the store and continued. She had added "Mommy" to her repertoire, screaming in a way that actually scared me.  Clearly, this kid wanted everyone in the store to think that "Mommy" was the worst creature on earth. She was succeeding.

Dad was in charge of the carriage. She was in it.  I wondered how she could breath as she never let up one second. Shoppers down every aisle were getting more distressed  by the moment. Then I saw Mom. She looked tired, so tired, so frazzled and she and Dad clearly had a program down to deal with their charge and get the groceries done. Dad said little but never once lost his kind face as he looked at his darling daughter. He'd wait at the end of the aisle while Mom ran from item to item then back to the carriage, clearly thinking it was probably the fastest way to get their weekly food needs purchased and out the grocery store door. Daughter screamed. She screamed like her leg was being cut off without medication, like her mom was drowning and she couldn't reach her, like it was the only defense she had left in a life and death battle for survival with the Boogie Monster. Mom kept running. Dad kept calm and Daughter  kept screaming. They rounded the produce aisle.

Now when I saw Mom over by the lemons, the tears welled in my eyes like they hadn't in a long time. My throat thickened and trembled all at the same time. I made eye contact with her and it recalled the feeling of all the moments I ever had with my own children and how convinced I was that I was a total embarrassing failure as a parent. It was written all over her face and it broke my heart. Mom ran to get another item. I caught her face again and my stomach literally went int spasm, one of compassion and sorrow for this mom. What could I do? I saw another older woman look at her with the same understanding. Been there, done that.

As I lost sight of them around another aisle my discomfort had me clutch at my scarf, wanting its softness to soften the pain I felt for this Mom. I knew what she was feeling. I knew her kid was driving her insane. I knew her Dad was trying his best. My gut churned and told me these things.

Rounding another aisle and seeing Dad, still the strong one, with his little girl in a full vocal siren that would challenge an ambulance, I walked up to them and kindly looked the little girl in the eye, pulled off my scarf and rubbed it's washed velvet lushness on her tiny hand. I said with a smile and my best and kindest Good Witch Glenda voice,"it's really soft isn't it?" She stopped. My God, SHE STOPPED. The relief in Dad's face gave me all the approval I needed to continue. I wrapped it around her shoulders and rubbed it on her cheek. "It's pretty, isn't it? Doesn't it feel soft?" Her eyes widened more.  "It's for you. You can share it with Mommy.  OK?"  She melted. Her eyes lost their prior  manic glow and gained a tenderness her Dad could see. He relaxed.  A young head covered woman stocking fruit drinks looked up from the floor and smiled at me. I didn't know where Mom was.  I did know one thing. Her baby stopped crying. I know that Mom suddenly felt relief in that silence. I left them and got in line at the other end of the store with the horde. A good ten minutes passed and I never heard the child again or saw her parents. I wondered if she would rub that soft velvet on her cheek on the ride home like my daughter did with the satin edges of her own special blanket. It's tough being a Mom.

Like I said, I'm drained.

******************

Many of you know that I occasionally tell a true tale on this sewing blog that bares only the slightest relationship to my creativity, but there is always some thread of connection. I hope you enjoyed this one. I hope that Mom gets a healthy glass of wine and a good nap courtesy of  Dad. She has more than earned it. We've all been there. My heart goes out to all who have been there. 

Tuesday, September 25, 2018

Sharing a Tip


Sometimes you reach the end of a project and just want to get it over with. Let's say just the buttonholes or closures are left. I've used this technique numerous times and I think it is pretty satisfactory.

Imagine you have to put in the buttonholes in the above fabric but you still have in your machine the white thread from attaching the white lining. You are at the end of the project and just want to A: be done  with it; B: are tired of changing thread colors; or C: you are just a fussy little pill like me.  Enter Inktense Pencils, (NAYY).


These are pencils you can draw with, dab a bit of water on and they become paints. You can then heat set them for permanency. 


You'll need the pencils, which come in metallic as well as regular colors. They are a bit pricey  but have really earned their keep in my studio. For this technique you will need a fine little paintbrush and some clean water.


You simply draw on the white threads, dab with a tiny bit of water on the paint brush, then iron. You can see how bright the original white is on the stitching I ignored, but the other lines of stitching blend in rather well and from a galloping horse, who'd know? That upper right yellow flower had that black spot on it so I did it with a black pencil to be true to the fabric. I used the gold metallic on the line in the upper left corner and while not perfect, it hides the white thread well enough.

The downside to these pencils is the colors they come in. I got the middle size box and the metallics but there was no turquoise blue, so I used instead a greenish color from the metallic box and it was not half bad.  If you are going to use this technique, definitely play a bit with a scrap to get the right pencil colors for your print. The tips of the pencils are not always representative and the goal with these originally is watercolor painting so keep that in mind. Colors are not saturated so a healthy application of the pencil is needed. When all done coloring and painting, iron the piece dry with a press cloth on as high a heat as the fabric will take for about ten seconds. Should be good to go!

******************************************


Got all my lines marked on this one shouldered top and realized I don't need bust points marked on the back! Wrong piece! Happens to all, right?..................Bunny

Tuesday, September 18, 2018

The "Viva Cuba" Skirt is completo!


Viva Cuba! While this skirt has been done for a while, the fashion pics have been fighting with what has become a rather active social life lately. Sewing continues but I am now working and weekends are spent sharing with family. Life is good....

Sewing with these digital print panels definitely presents specific challenges, the biggest being the limited shape and size of the fabric and how best to utilize the designs.Luckily in my favor was the fact that I am short but I am sure with thought any print panels could be worked up for any height person to enjoy.


Pattern:

There really was no pattern used here, just my own evolving design. I knew I wanted a flowing skirt with a waistband to best show off the print and it's lovely colors, which really are magnificent and even more so off the computer. I used a lapped zipper on the side, a waistband interfaced with wide elastic and a hem machine top stitched on the edge and further up as well. I needed to get all of the width into the waistline and that was the biggest challenge but I think I pulled it off comfortably and with no crazy bulk. 


Fabric:

courtesy emmaonesock


This is "Viva Cuba" from Emma One Sock.It is a digital print panel designed and manufactured in the Netherlands and one of several they offer.  The panel is 31 inches long so that is what I would have to use for the length and hems of my skirt and the width is 60 but there are 2 1/4 inch selvedges on each side. These wide selvedges came in VERY handy as you will see. . In the end,  the length of the finished hem  of my skirt was 120 inches.  Emmaonesock says the fabric is a " cotton/lycra blend with 40% stretch in both directions."  It is a very thin but totally opaque fabric, really nice quality and perfect for this skirt as bulk was a worry. Think very high quality white tee shirt fabric. When I first received it I was a bit put off by the feel of the public side as the photo process seemed to make it a tiny  bit "plastic-y". I swear, as I worked with it, it seemed to soften up and lose that feeling, particularly once it was ironed a couple of times. In the end I am really happy with it and the way it feels. I think it is too thin for a body con type of garment but any design that moves away from the body would be perfect. While this digital photo of what appears to be Old Havana is beautiful, my goal was a garment that let the print and its lovely colors flow together and not let me look like a tourist billboard, pretty as it was. I wanted to just show the amazing colors as they moved around the skirt in a rather diagonal fashion.   ETA: I just checked the EOS site and this fabric is no longer available bu there are other great Dutch digital prints and they can be found under "conversational prints". Go figure. Another ETA: the print panel is back in stock. Yay!


(Please forgive the shadow on the left edges of everything in several pics. Life is just too short for me to change into everything again and visually lose 15 pounds by retaking the pics. Thx for your understanding.)

Construction:

I'm going to break this down into the different stages it took to complete this design. 

The first challenge was cutting out the skirt. The fabric was a  31 x 60 inch rectangle panel with additional very wide  white selvedges. I purchased two panels. The challenge was to design a skirt, utilizing every inch of the panels, that would be feminine and would accentuate the colors and drape, not so much the subject. This meant there would be no shape to the pattern pieces as in  curved hems or angled side seams. That would have been a waste of my fabric dollars and frankly the fabric was pricey. In the end the challenge was met.


 I cut the waistband from a length of one panel's selvedge  and it included an inch and a half of panel that would become the public side of the waistband.


 The white selvedge side of this strip would become the back of the waistband. It would eventually be folded to the back and ditch stitched on the front as in Nancy and Debbie's technique (more later). The strip, minus seam allowances, was fused with fusible tricot. (green arrows). Normally with the process I used to interface the waistband this isn't done but this fabric was quite thin and would need to carry a lot of weight. 

To the zipper! I did a classic lapped zip on the side. This allowed my panels to be sewn uninterrupted with only a seam at each side. I installed the zip with one side seam sewn and the other left open, all to make the pleating easier and as you can see below. That final seam wasn't closed until all pleating and gathering were completed. I always use zips longer than needed and extend them beyond their end in the garment. I then catch the zip in the waistband seam allowances, no lumps, no bumps.


Here you can see that one side of the zip is sewn with yellow  thread and the other with salmon-y color, all the better to match in the end. I was constantly changing thread colors with this project.


The next challenge was figuring  out how to fit 120 inches of fabric into 26.5 inch waistband. Yikes! I loved the look of box pleats and really hoped I could make that work. Well, math was never my strong suit and after a bit of frustration, what I decided to do was to make 3 inch box pleats and then do a slight gather to fit them into the waistband. This avoided all those math issues and the fabric is thin enough to pull this off without signs of bulk. The panels were marked every 3 inches and the fabric was brought from the marking to the center back of each pleat with lots of pins to hold it there. Behind each 3 inch box pleat on the wrong side are two pleats kissing each other. They are the edges of 3 inch box pleats on the wrong side of the skirt. After all was pinned in place hand basting was used to keep it there and the pins removed. I am doing more and more hand basting all the time. I find it really saves time in the end.


I am really pleased with how the gathered pleating worked out and for those whose math is more fuzzy than accurate, it's a great way to fit a lot of fabric into a small waistband. Three inch box pleats and then gather it all in! I only fudged one pleat and you would never know which one! The pleats were hand basted a 1/4 inch and  a  3/4 inch away from the top edge of the panels. They were then gathered to fit the waistband and were ready to install.  See how smooth that waistband is? It is slightly gathered when off the wearer from the interior elastic used for interfacing.


 I wanted to use a wide non roll waistband elastic as the interfacing. I learned this technique from Nancy Zieman back in the eighties and honor her by using it in this garment today. I've used this technique many times but with my sewing hiatus of nearly a year I thought it would be wise to refresh my memory with a bit of Googling.  While I couldn't find a video from Nancy, I did find Debbie Cook's fantastic version of this technique. Forgive me Nancy, but I am preferring Debbie's. Nancy has the elastic included in the "laps", the short ending seam allowances  of the waistband.  It can give a pulled effect.  Debbie's version has the elastic hanging freely in the end of the waistband and the laps are filled with regular interfacing, a big improvement. No unsightly pulls and easier to install buttons, snaps and such! I highly recommend you check out her tutorial for a clear description of how I did my waistband on this skirt. It's an awesome tute. Thank you very much, Debbie. (Oh, laps are the over and underlaps where the zipper closure is.)

Pleats and gathers done. Waistband is all interfaced, elasticized, connected to the skirt  and then ditch stitched on the front to secure.  Yay! I did have to do some futzing on the over and underlaps to get it all even and matched. For some reason the elastic wanted to flare out at it's open cut ends so I used my pinking shears to shave it back a bit and that worked fine. All is now equal in shape and size. I can't stress enough how important it is to match and rematch like areas of garments while you are sewing. Don't just cut a collar out and sew it. Cut the top and bottom out and then match the two sides as well. Recut them if they are not perfectly matched before you sew them for that final time. Things stretch. I am now in the habit of doing this for anything that has a mirror image of itself.


The final stage and I think what gave me the greatest satisfaction with this no pattern project was the hem. I did samples first and they taught me that it really didn't make much difference which choice of interfacing I used. I used my final choice simply because I had plenty of it. Remember also,  I am trying to keep as much length to my skirt as possible. I don't want to lose any of the digital image  in a turned up hem and I don't want my skirt too short. Early on I decided on a faced hem. The lower edge of the print is in various shades of gray, being the street the car is on. I found a great, similarly thin rayon knit in gray that I would use to face the hem and then top stitch it down. But then I had one of my middle of the night Eureka Sewing Moments. You all get those, right? It's when I bolt out of my sleep with a solution or better solution to a sewing challenge, in this case the lifeless, thin knit hem of 120 inches!

(If you look closely in the middle of the facing you can see where I overlapped the cut edges of the facing strip. It is cut with pinking shears to prevent transfer through.)
I made samples with various interfacings and in the end did my hem by stitching a one and a 1/4 inch strip of 100% cotton woven fusible interfacing to the hem edge. Right side of interfacing (no glue) to right side of skirt. I used a fat 1/8th inch seam allowance. I pinked the short edges of the interfacing and lapped them as need to make the full width of the skirt hem. When that was all stitched on I went to the iron and wrong side of skirt up, turned the interfacing to the wrong side leaving about an 1/8th of an inch of the panel showing on the inside of the skirt. I fused this down. My interfacing became the hem facing. The edge appeared to be corded on the inside and it gave a beautiful finish. This was then top stitched a fat 1/16th of an inch from the hem edge and again one whole inch from the hem edge. Then it was pressed and hung.

I was amazed at how well it came out and the pretty folds the hem makes. I say that because a couple years back I did a full knit skirt on a dress and used a one inch horsehair braid to get this same effect. It was awful, just too bouncy and sticking out. I donated it after wearing it once. The hem on this skirt of panels came out the way I wanted that first knit hem to look, with just a beautiful curve and movement, nothing trying to hard to look vintage. I hope you agree. So facing the hem with a fusible woven interfacing, cut on the cross grain and then turned and topstitched was a success and I will definitely do that again!


In conclusion:

I will be wearing this with black tights, black flats and a black tee to an upcoming "casual" restaurant get together of old friends. We will be enjoying a meal and drinks so it's a good thing that waistband stretches! All in all I am happy with my fabric, my skirt and most of all the pleasure the challenge the digital print and no pattern provided. Sure, I made little dirndl type skirts for my Barbie eons ago and could probably still do so in my sleep but the challenge of this skirt along with the width of all that fabric, making the wonderful print design work with my vision and utilizing modern techniques really made this a most fun project. I hope you have enjoyed this journey as much as I have..........Bunny


***********************

courtesy fabric.com


Fabic.com also has some digital print panels, too. These panels are out there but each vendor gives them a different name so it's a tough search. If anyone out there has further search suggestions please let us know your  terms. Oh, I/we am not looking for quilting cotton panels here but thank you, anyway. At Fabric.com they have what are called "photorealism wall decor panels". They could be great in a Jean jacket or a bag. Marcy Tilton has some as well that are "digital print panels" and of French origin. Have fun searching and make sure you know which way the print lays out in regard to the measurements! ....Bunny


Saturday, August 18, 2018

Viva Cuba!


Now, now, don't be afraid. I know this fabric is over the top. I recently showed it to someone and their eyes nearly popped out of their head. Their response was "you're not going to wear that, are you?". Well, yes, maam, I am.

This is Viva Cuba from emmaonesock and I was  smitten. What can I say? The colors are incredible.  I have two panels, the other laying on top of my work table. I have ideas and as of this afternoon, construction is in motion.


The selvedges are really deep, almost 3 inches on each side but it is still about 52 inches wide. I will make use of them as you will see. Let's hope that old car isn't in for a bumpy ride.......Bunny

Thursday, August 16, 2018

The Queen of Soul


I was raised in Lafayette, Louisiana, Cajun Country and center of the oil industry at that time. I knew what discrimination was. I knew I had to use certain water fountains if I was thirsty and others had to use their's. I knew of the existence of the Klan first hand and could tell you true stories of such that you probably would find hard to believe.  But, some way, some how a seed was planted in me about the injustice of it all in an Atticus Finch sort of way. Part of that seed was planted and nourished by my Mom.  This is about my Mom teaching me to love music, all music. Music does not discriminate.

My mom was an opera singer before she had eight kids, singing with the New Orleans Opera Company as a contralto in the chorus. She had a syndicated radio program on opera each week that went all over the South. She had a glorious voice. She sang solos in the choir at the massive St. John's Cathedral in Lafayette, booming her voice unaided from the balcony on the second floor with me in my  finest Sunday gloves, dress  and hat by her side. At home it was all music all the time.  We eight kids had a childhood with background music around the clock. It was La Boheme, La Traviata, Carmen, Madame Butterfly but also Flower Drum Song, Oklahoma, Chet Atkins on his steel guitar and Gospel Music. My mom taught me to love Gospel music, really love it. On Sundays we would watch a tent revival live program on TV, just she and I. It was a special time that none of the other members of the brood shared with her. It was all about the music for us.   That is where I learned to love and appreciate Mahalia Jackson. My mom would teach me why and how Mahalia was truly the greatest voice to ever grace God's earth and I agree to this day. But Ms. Mahalia up there in heaven has a very very close runner up.

It was only to be expected that in my teens the arrival on the music scene of Aretha Franklin filled a void that I hadn't heard in years. I could hear those gospel rhythms in her voice and loved every sound. I became a huge fan and over the years an even bigger one.

I happened to be on vacation and visiting my sister and family in Washington DC when Bill Clinton's inauguration took place. Sis wanted me to experience an inauguration. She had been to Bush's and said it was really something. Well after twelve years of Republicans, Clinton's was a way bigger something. There were performers in tent after tent performing live and for free, fabulous jazz,  great food, and on and on, a huge celebration like I had never seen. I did not know they did this and wow, they did it in a big way! But what I really was waiting for was the arrival of Aretha. I huddled with my sister out in the weather watching her kids and enjoying the scene right where she was rumored to arrive. Suddenly a shiny black stretch limo sidled up to the curb. It had to be her. I couldn't even get close. The story of my life---five feet tall kept me from seeing over the heads of others and what was going on. Exiting from another limo and rushing on ahead were numerous HUGE gentlemen in pink tee shirts that surely were former NFL linebackers. They were pushing the crowd back to make way for the Queen. I figured out if I ducked down to the ground I could see more between peoples legs and I was able to get pretty close up to these guys. Another bevy of pink shirted giants came around the side of the first limo to the door, opened it and another stretched out his hand. A fuzzy flurry of mink peeked from the car and it moved forward with it's wearer stepping out with the aid of her security. She stood up. She was perfectly coiffed, made up and gorgeous. Lord, she had gorgeous skin. She wore a full length mink coat which,  on cue, after sizing up the crowd. she  WHIPPED open as if to say "I am here." I will never forget it. All of the pink shirts pulled in closer to her and all my five feet followed right behind them with my little Kodak camera. Right when Ms. Franklin came  by me, I was so short and they were so big and tall that I was able to slip right between them and get a picture of her beautiful face, up close and personal. Those pink shirts never saw little ole me coming.  I immediately backed out and ran away in fear of those pink shirted guys. Somewhere in my still untouched piles of moving bric a brac is that photo in a tiny album of my DC trip some years back. I have pulled it out often over the years and it is one of my most treasured items.

Aretha Franklin is one of the greatest voices of our time. Her gift has the ability to move one from joy to tears whether it be R&B or Gospel. I will leave you with my favorite song of hers, although there are so many. This one never fails to make me sob. It is  Never Grow Old    ...May she rest in peace...Bunny


Wednesday, August 15, 2018

The Three Faces of Vogue 1515

Black Handkerchief Linen, Size B


Two prints, one cotton batik, and Nicole Miller poly print, Size A, smaller


Blue Oxford Cloth, a frankenpattern, collar changes


I could say I loved this pattern but I really loved the collar. My long, skinny neck has always made me a bit partial toward face framing types of necklines. This one was really fun to work with, the sizing, not so much. I will try to run through each of these and what I did to hopefully improve each one. You are seeing these in the order in which I made them, all within a few days. Pardon the baggy white pants. They will be taken in as soon as I am done here. I knew they were big but not that big!


Pattern:

The two sleeveless versions are Vogue 1515, a Sandra Betzina design. Her fit is for a more mature figure and I love that she is filling that void, much needed. And while I am definitely mature, I am shorter than her fit sloper and on the petite side so there are always challenges for me with her patterns. Eventually I got it all sorted out. I discussed my corrections in a previous post here and you can really see the differences above. . For the blue top I used 
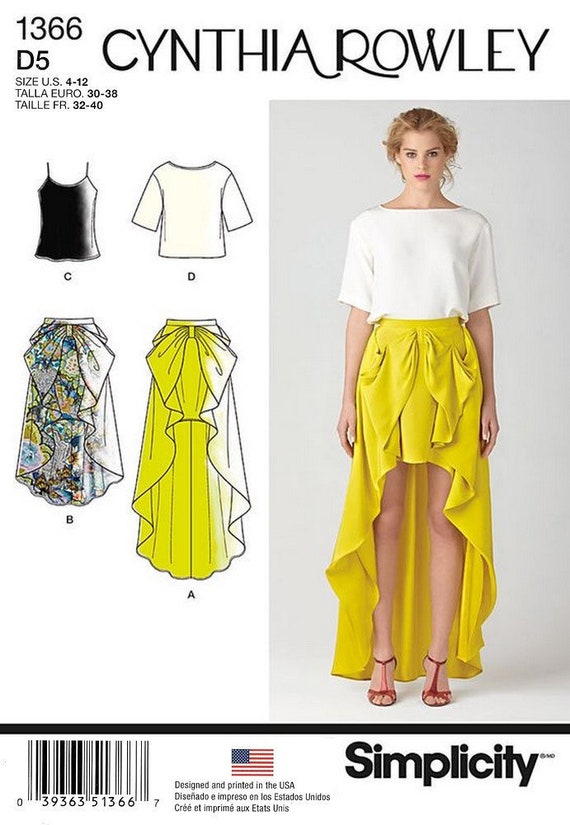
Simplicity 1366 by Cynthia Rowley, my favorite designer. I like her simple, feminine take on clothing, youthful yet ladylike and pretty. This is a simple,  oversized,  dropped shoulder tee shirt. I made changes to the Betzina collar and imposed them onto the Rowley shirt. So comfortable and would be great in a knit for warmer weather. 


Issues with the pattern design? I thought it had, to me anyway, a "mushroom" effect around the neckline and it would have looked better with a smoother transition from the bodice to the gathering. This is all my personal taste, mind you, so just bear with me. I am sure others feel differently and certainly does Betzina. I liked the way the original black linen stayed "puffy" on the collar. The oxford cloth refused to do that so I just ironed it. I would have preferred it to have been softer. Originally I did not care for the slightly extended shoulder line but I was using the wrong size. Once it was made into the proper size for me it was fine and probably a bit more flattering to an older arm/shoulder. I like the hi-lo hem, not my usual opinion, and like it even better with the facing on the outside. 


Fabrics:


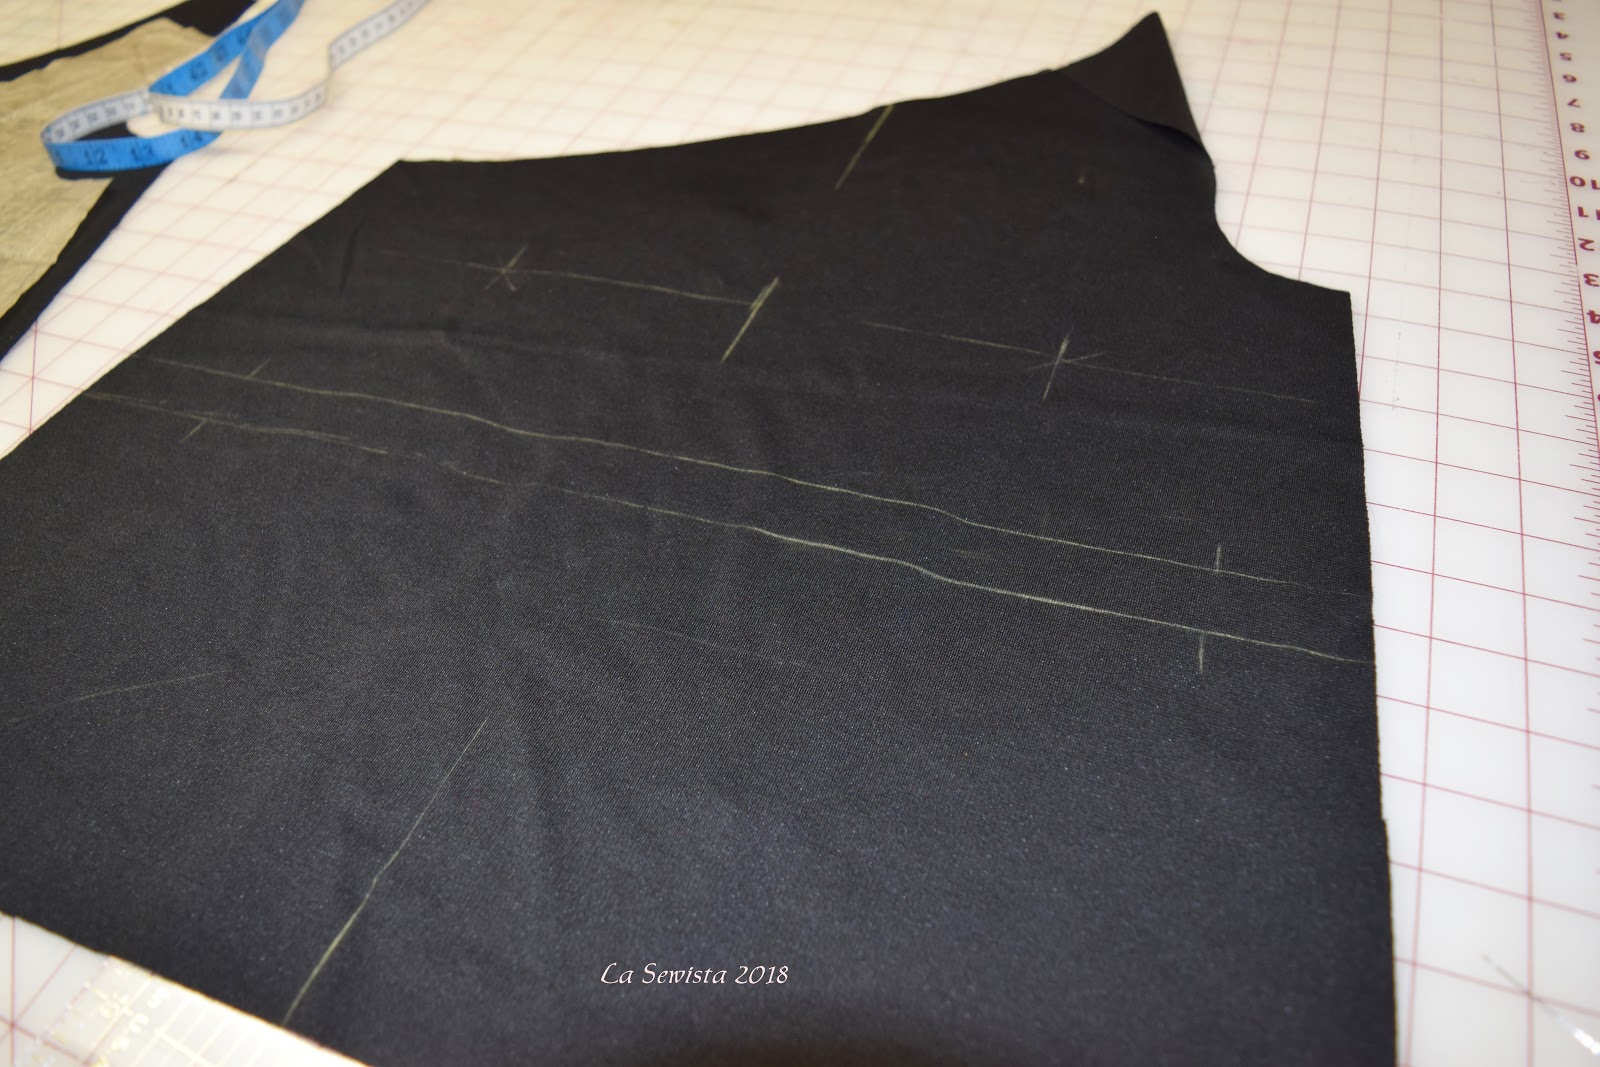
My first poorly fitting effort was in a really nice black handkerchief linen. I love how it glows. It has been in the stash so long I have no idea where it came from.  Here you can see the french seams that I used on the linen first version.


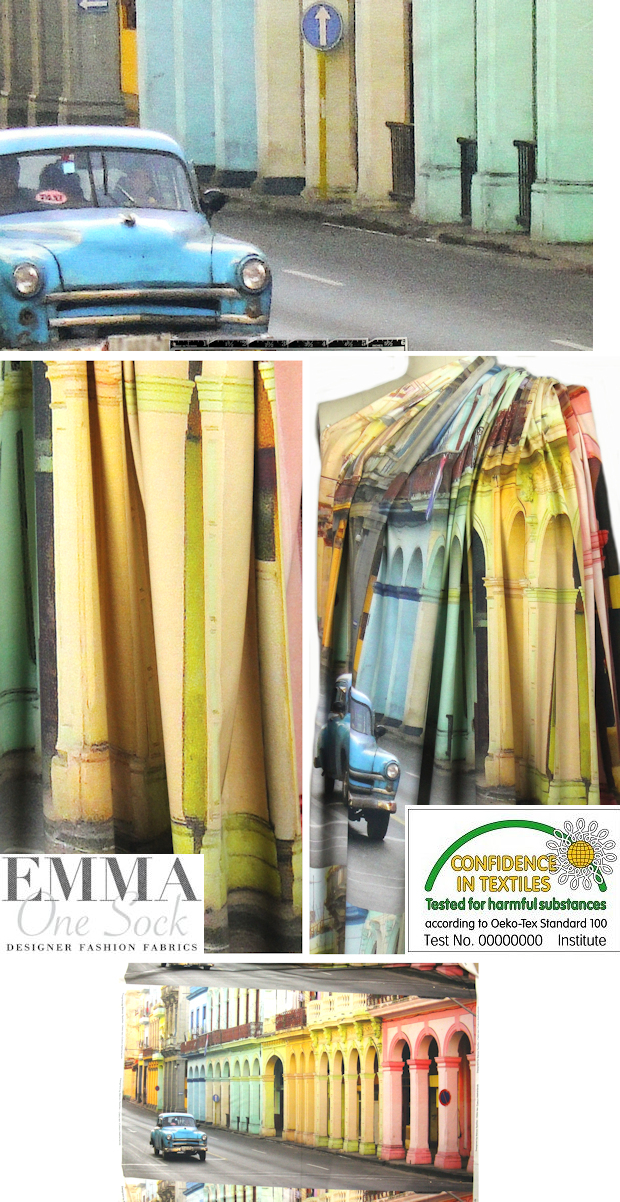
The next version was made with a cotton batik from Joanns and for the facings, which I turned to the outside, I used a Nicole Miller poly print they featured last year. I really like the two together. It's a bit gaudy but it's me. You know I have no fear of color. This batik made realize that this pattern design really works up best in something with a bit of body, not a softer drape. I like the way the extra body makes the shape, if finally and properly fitted, it stands nicely away from the body. 


The third version is a blue oxford cloth, again something in the resources forever. It is just kind of a limp fabric but that's OK on a 90 plus degree day like today.  This collar actually looks pretty good and quite different turned down as well and more on that in a bit. The label is serving a function. More on that, too!

I think all these fabric choices work well. I can see this with the Rowley pattern working well in a knit and I can see the original sleeveless version being quite nice and cozy in a warm boiled wool or minky for the winter. 


Construction:


Many of the construction issues on the black linen version were discussed in a previous post. I pinked and stitched the facing edges and did French seams. The pinking treatment help keep the bulk from transferring through when ironing. I hate it when that happens on linen and this worked well. I am liking this vintage technique more and more lately. 


Here you can see a bit of what I mean about the mushroom effect from the seamline to the gathering. It's fine in the front but on the bodice back it looks a bit oddly puffy to my tastes, and again, that's just my taste. 


Hems and facings on the linen were just stitched in and edgestitched. 


Facings on the two print version were interfaced by stitching right side of interfacing to right side of facing and then turning, making sure I rolled the edge a bit. The interfacing, a fusible, was then pressed into place and the unit treated as one. This gave a nice finished edge to the facing which was then stitched in and turned to the public side of the garment and topstitched. 


On the blue blouse, I superimposed the bodice from Vogue 1515 matching the shoulder seams over the Rowley pattern. I then placed a piece of Saral tracing paper under the two and drew in the Vogue neckline onto the Rowley fabric. That is where I cut. 

Now to have some fun with the collar. I wanted to try a deeper collar and made it 12 and a half inches wide in the blue version. That would then be folded in half. 


I changed the stitching line for the gathering elastic to 2 5/8ths from the cut edge of the folded collar. I had figured out a much easier way to put this collar in than the way spec'd in the pattern, much closer to the edge.  I marked that  2/ 5/8ths line all around and you can see it in the yellow. 

*fold the collar in half. 
*Match cut edges.
*Mark at 2 5/8ths.
*Right below the mark stitch a line. I used a triple zigzag stitch just for fun. 
*Stitch another about 3/8ths inch above the previous stitching.

Now it gets a bit gnarly. I cut two tiney slits either side of the back collar seam on the inside of the collar and then ran through 1/8th inch elastic. I tried on the top and figured out where I wanted the elastic to be tied off. I knotted it with a tight square knot and snipped the excess off. Then I sealed the slits with Fray Bloc. This later got covered  with my label which you can see in one of the above pictures. So now, instead of having a collar sewn and then turned to the inside and sewn again and then having to stretch them out and topstitch, yikes..... I have both side of the collar being attached at the same time. I stitched them on the machine and finished them off with the serger. far, far easier method. So basically, fold  you collar in half and use both edges to sew the collar onto the bodice and call it a day! 


I did a lot of topstitching on these tops that was not specified in the patterns but I think gave it a bit more finesse. On the blue the hems were topstitched in as well but not edgestitched. 


In Conclusion:

I had a ball facing the challenges this design presented and I think I did a pretty good job of overcoming them. I highly recommend this pattern. I would recommend placing the gathering line closer to the bodice seam and ditch stitching from the shoulder to the gathering  and at the collar center back to eliminate the mushroom effect. I would also try this in fabrics with a bit of body for the sleeveless versions for a better fit/hang. If you decide on trying the frankenpattern, I would suggest a knit for a really nice sweater version. All in all, this was fun and I have some great wearable results. I hope you agree and thanks for bearing with me through this long detailed post. I hope you enjoyed.........Bunny

Monday, August 13, 2018

Is it just too Simple - icity?


I have two  evening weddings to attend this fall. I am considering something along these lines.

Here is another version I like:


What I really like about these two outfits are the tops. I cannot find anything in patterns with the extended scooped out neckline like the red one above. Simplicity has a wonderful possibility in  Simp 8380 which could easily be worked up into a top with the scarf effect. I love the forgiving value of that scarf on the shoulder!


There are lots of versions online of this look. I think it is so feminine and very "Amal" and of the moment. These skirts have been a favorite of mine for many years, featuring my waist and hiding those wide hipbones and booty. I think I can work this. Here's another:


What I really want to talk about here is Simplicity Patterns. Ah, the name, Simplicity, Simple, right? I really don't think so. In my very young sewing days, when I was far more observant than skilled, I decided I didn't like them. Just     too   simple.     I really think they were back then. I can remembert my mom saying "We'll start you off with Simplicity patterns" and it sort of stuck. By fifteen I was knocking out the Vogues and criticizing the Simps. My biggest complaint which some may remember and which I thought at the time was just horrible, is that every pattern had two darts at the back shoulder seam. I would see those darts on the backs of people I knew and tell myself, "that's a Simplicty. Look at those two darts." Rarely did the Vogues have them. What impresses us in our teens, who can explain and what little did I know about shaping?

Fast forward and today I feel totally differently. I know we all have our favorite pattern companies and I would probably still say Vogue for numerous reasons. But, time and time again when I am searching for a design still nascent in my head, I start my search with Vogue, then McC, then Butt, and lastly Simp. Every stinkin' time exactly what I am look for pops up quickly in Simplicity. And the really interesting thing is that it is almost always a Cynthia Rowley design, my favorite designer.


This will easily make my envisioned top with the scarf on the shoulder. I will lower the darts obviously, and probably build a bra into the lining. I hate strapless bras, but we will work it all out. Funny how I still can't get over my dart issues with this company but keep finding just the right styles for five foot tall me and in my favorite designer. I wonder if   Rowley is petite?...Bunny


Had to Refurbish This One!

    About  6 or 7 years ago , during the dawn of the Zipper Trend,  I bought one of my rare retail items. It was a blush pink and black bord...