Sewing Vloggers

Tuesday, July 31, 2018

Lany's Dress Complete, McCalls 3063


Our little knock off is complete. It has been very hectic here, lots of company and we went back to New York state to tie up some loose ends for a few days as well. I finished Lany's dress the minute I got home. This is the first child's garment I've done in some time. My piping skills were rusty. I threw out the first collar then reviewed my own tutorial to brush up on my skills. The second one came out fine and if there is a soon third, that one will hopefully  be even better.

This was an easy sew. I tried to honor the details of the original but wanted to finesse it up a bit. I think I have done that. Rusty skills or not, this is much nicer quality than the treasured original which I posted about here. I know it will be greatly appreciated by Mom and her tiny new daughter to be.

Pattern:

I used the bodice and sleeves from McCalls 3063, a Christening gown pattern. It is a size "small" and the way the Big Four run in children's sizing, I would say a size one. The original dress was a three. The skirt is simply gathered. and connects to the bodice with a classic fold over placket. ( I really need to do a tute on those.) The sleeves on the pattern are VERY full, too full and too long in my opinion. I cut back the sleeves by reducing the top and bottom edges  a 1/4 inch, so a total of half an inch out of the height.  I didn't want to take a full half inch off one edge out of such a tiny garment and by balancing it out I think it gave me the results I envisioned. 

This pattern has lots of different Christening gowns including a cute one I have used in the past for a boy. Other than the too large sleeves, which I think is a sign of the time of the pattern, ca 2007, it is fine. 

Fabric:

This fabric was gifted to me by Kristine Balinski of Couture by Kristine. She has a great blog, BTW.  Some time  back when she saw a post about the original dress she let me know that she had leftover fabric from a project for her daughter that was almost the same and would I like it. Her generosity is so appreciated and without it I could not have pulled off this very special project. It is a near perfect match.  Thanks so much Kristine. You just never know how what we do affects people. It is one of those shoulder taps that reminds what waves we make with just a little kindness. 

The fabric is a 100% cotton. It is a white and very soft blue floral, so quite traditional. I may have a fuzzy memory but I think back when the original dress reigned, so did chintz. My own daughter's first prom gown at the time was chintz.

Construction:


I did make a few changes particularly on the sleeves. The pattern shows long lace attached to the bottom of the sleeves giving a 3/4 length effect to the dress. Perhaps that is why the sleeve was so long. Whatever the reason, I cut back 1/4 inch on the top edge and 1/4 inch on the bottom edge of the sleeve where it hits the cuff. I also cut the cuff width by half. The pattern specs 4 cuffs be cut, two being facings. This would give you a cuff twice the width of what you see above, too much. Instead I threw out the facings and  interfaced the remaining cuffs completely. The piping was then attached in a 3/8th inch seam and the cuff and piping were stitched to the gathered sleeve bottom. The bottom half of the cuff was folded to the inside and handstitched  to the sleeve, encasing the bottom edge of the sleeve and giving a clean finish. 

The most important thing I did to alter the appearance of the sleeve was to cut them on the true bias. There is nothing fluffing up the inside of the sleeves. I think because of the bias they fall in much softer gathers and truly doubt that I will cut one of these types of sleeves ever again on the straight. They have not been ironed either. The bias just lets them curve so sweetly. This was a lemonade out of lemons situation as I just did not have enough to cut the sleeves on the straight of grain but could accommodate the true bias, Yay!

The collar was changed. I struggled with the piping on the corners until I finally threw that out, too! I got out my trusty small Gutterman spool of thread and used it to trace a curve around the corners of the collar, much prettier than sharp corners. The original dress had a foofy little pink flower in the middle. My knock off has a pompom made of cherry colored silk charmeuse. 


Back to the original---being from the eighties, the era of all things logo, the dress's tag was on the front of the skirt. I did the same with my Bunny tag. Normally  on this type of garment it would have gone inside but again, just trying to mimic the original. 


I am really pleased with the back placket as it falls perfectly and was made with no grief. The bodice is lined. The skirt gets a simple bound placket. If you've made these you know they are prone to puckers at the bottom or not lying flat and being hidden. Seems this was one of the skills my fingers didn't forget, unlike the collar. I think I may do a tute on that in the near future. ( I haven't forgotten the knit hem tute, either. )

I cut the hem extra long and actually did not need all the length. I removed about six inches and that still gave me enough to have a double turned 3 inch hem which I catchstitched in. I love those deep and heavy hems as they make the skirt stand away a bit yet hang nicely with all the weight. In other words, they don't look cheap like a 3/4 inch machine stitched hem would have. None of that for this sweet little girl!

The seams were French seams. 


Conclusion:

I hope you have read two posts back to the original "Lany's Dress" post. If not, there you can find the story behind this cutie and why it is so special. Mom is two days overdue and we are all waiting. Once she is settled in with her new daughter, I will visit and bring her both dresses. I have really enjoyed making a garment that has been in my thoughts for years. Thank you for letting me share it's story with you all......Bunny

Wednesday, July 18, 2018

The Walk in the Woods skirt


The Walk in the Woods skirt is done and I love it. It is very comfy, cool and I like the look. Here's the deets:

Pattern:

There is none. I worked up the design myself which utilized the fact that I had two digitally printed panels to work with. One panel made the front and the second panel was split in half to make a back that would accommodate a zipper. Luckily the print is nebulous enough to not require precise matching.  I wanted a curved bottom edge and slits up the side. The waistband is elastic. 


Fabric:

This is a rayon knit. It is thick enough to be decent and is digitally printed with the design of a forest with blurred out details, rather pointillistic.  The colors are warm. Actually "warm and fuzzy" would be a good description. It is yummy to wear. I THINK it came from Emma One Sock but it is not on their site now. They do have some exceptional digital prints on their site. I can see this fabric working in the winter with boots and a sweater yet it is very comfy to wear today which is brutally hot and humid. Love skirts in the hot weather!


Construction:


This was a no brainer for the most part. I put an invisible zip up the back using Kenneth King's method which is one of those things that once you try there is no  going back. It is so simple and the results are great. For the waistband I used an 1 1/4 wide waistband elastic. I needed it to be fairly wide to cover my tumtum with short tops like the one I'm wearing. The panels were not shaped in any way but the fabric was thin enough to gather up on the elastic really nicely and fairly bulk free. After putting in the zip I had several inches of fabric to turn over the waistband elastic as you would a facing on the zip but I stitched the elastic into that seam as well. It snugs up really nicely on the waist. The elastic is secured at the zip, as mentioned, and ditch stitched into the side seams as well. No twisting! 


I wanted the curved hem and that was easy enough to draw out with a French Curve. As I did each of the four sides I matched the same numbers on the ruler to the fabric edges. The small hem was then interfaced with tricot and turned once. No ravelling with this knit so I wasn't about to add the bulk of a double turn, just no need to. Then I did my favorite knit hem technique, sewing on the very edge and then sewing a bit away, in this case about 3/8 of an inch. At the curve the interfaced hem was clipped and that handled the curve just fine. I used a 3.0 stitch length but the nature of this knit just sucked in the stitches and they look smaller. 


You can see how smoothly the back hangs with the zip. My hip to waist ratio is such that it really works better to add a zip rather than have a full pull on type of elastic waistband. The length was really determined by the most flattering layout of the digital print. I brought the darker stripe up to the waist area instead of the hips which  a longer version would have done.

In Conclusion:

This is simple, basic skirt construction, wide enough to not fret over fit other than length and the waistband elastic. I have actually ordered another digital print panel design that was so much an impulse buy and can't wait to make that up in a fuller, more classic version with a flat waistband. It was an impulse buy but I think it will be one of those things I will wear for years. I won't be using a pattern for that one either. Hey, maybe there's a future in becoming an Indie designer of rectangle pieces of fabric.............just kidding...........Bunny
ETA 08/01/18: Just want to say this has turned out to be a big thumbs up garment. It is so comfortable in this heat and so easy to wear. I've garnered compliments every time I put it on and look forward to wearing it in the winter with maybe a black turtleneck or sweater. I would make another pictorial digital print in a rayon knit in a heartbeat. ...Bunny


Monday, July 16, 2018

Lany's Dress


Grab a cup of your preferred beverage and bear with me as I tell this story of my next project, one in the making for over twenty years.


Let's first check out this little dress.  I didn't make it. It has been put away in a special place for a long time, however. Now it's time for it to come back out. The fabric is a basic soft cotton.


Do you see the proportion of the sleeve compared to the narrow bodice yoke? Huge and puffy was the way back in the day. . Notice how the collar doesn't meet at center front but that is quickly remedied with the addition of the pink satin rosette. I suspect the manufacturer uses pre made eyelet collars that got put on garments no matter the size. There's no top stitching and yes, it is sorely in need of a good press but I pretty much just unpacked it.


This pic give s better view of the "interesting" proportion. Huge buttons can often be cute on a more whimsical child's garment but here, with the delicate blue and white print, they are just too heavy.  Ugh. Again, notice how the collar doesn't meet at center back either.


In the logo conscious early 1980s, this label was put on the front skirt of the dress, but of course!

Now go back and look at the picture with the buttons down the back. Right about center, to the right of the dress, you will see on the wall a blurry picture of a lovely, smiling brunette. This was my sister in law, Terry. That's right, was. Terry is no longer with us, having suffered instant death from an aneurysm at the age of 32 in front of her young daughter and husband, my brother. I love this smiling picture of her as she smiled a lot and laughed a lot. We miss her tremendously. Life went on. My brother added an apartment to his home so my parents could care for his little daughter now that her mother had passed. It was a really happy arrangement but choices were made fueled by grief and wife number two came on the scene far too quickly. She removed any reminders of Terry and my mom found them in the trash. She pulled out the framed portraits from a big trash can and also this dress. Terry, loved this dress. It was sweet, feminine and the colors went beautifully with her daughter's dark hair and eyes. She had her daughter's portrait taken in it. It was her favorite picture of Lany and she never failed to mention that. My mom remembered that as she pulled the framed image from the trash. My  mom knew where the dress had been kept and was afraid that it would be tossed as well. She went into the home while they were out and took it out of the closet and brought it to her apartment. She packed the picture and the dress away. My mom and Terry were extremely  close and my Mom missed her terribly. The marriage to wife number two lasted six months, as one would expect in these grief driven situations.

Life went on. I never knew my mom had the dress or the picture. As my mom's health declined she called me in one day to her bedroom and went into her closet and pulled out the dress and the picture. She gave me the dress. My mom asked me to promise to give it to Lany when and if she ever had her own  little girl. I told her I would. I took the dress and packed it way carefully with my best sewing fabric. It hung with velvets and hand smocked Christening gowns for years, moving through three homes.  I took it out this week. Lany is due any minute for her second child, a girl. I will give her the dress......... But  more.........

This is where the incredible community of sewing bloggers steps in. Some of you may remember a blog by Kristine  B. from the Chicago area, husband firefighter, made gorgeous garments, particularly gowns. She no longer blogs but we still keep in touch. She now has a terrific business making formal wear and SHE IS GOOOOOD. Back when she was blogging something came up and I told her the story of the dress and even showed her a picture. Out of the heavens, Kristine told me she was pretty sure she had the same fabric or at least something very close to it. She had made her own daughter a dress out of it and would gladly send me what was left if I was interested. Her generosity will tell you what a lovely person she is.  She sent the fabric. It was extremely close to the dress fabric and I decided I had enough to make something work that could be worn by Lany's  own daughter, should she ever have one. For Kristine B.'s generosity, I will always be grateful and so appreciative.

Today I pulled the fabric out and dug for patterns. I will do a similar back opening yoked dress. It will have puffy sleeves but hopefully more in proportion. I will do a plain white linen collar and sleeve bands.  The bodice will be lined. The skirt will be fuller. If I can find the right color, there will be piping on the dress as well. The back will have buttons but a much smaller scale.I will make a size one. My plan is to give it to Lany for her new baby girl as soon as she arrives. My mom took care of Lany through my brother's tribulations and grief and the two were always very close until my Mom's passing. I know she will love to have this.

*********************

Back to the picture of the back of  the  dress... It kept twisting around and I took tons of pics. I never noticed that her mom's photo, on the wall of my sewing room, was also in the photo,  directly looking at the dress. I sure pray my hands pull this off and it goes well......Bunny


Sunday, July 15, 2018

Can this space be prettified?


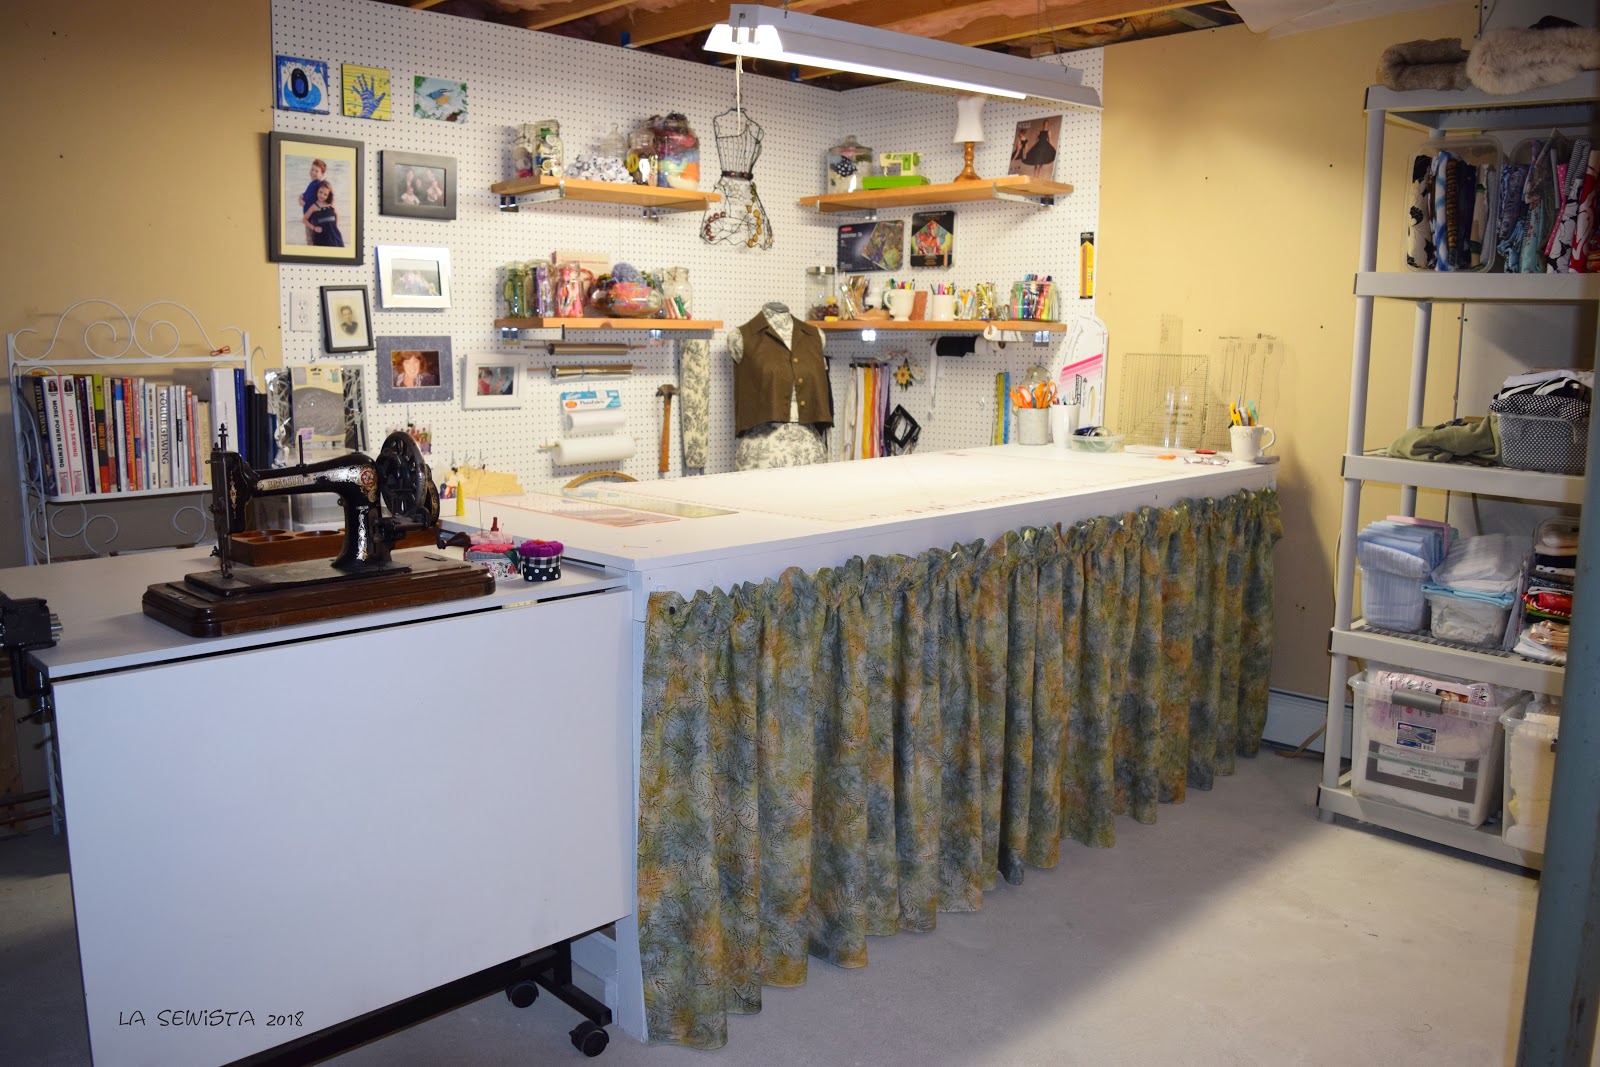
Ever read the recurring magazine article in I think Good Housekeeping called " Can this marriage be saved?" It was pretty fascinating stuff. It came to mind as I thought about my sewing space "being saved" . By this time you all know my new space is clean, big, heated, dry and all I could want minus a window. It is a bit rough around the edges but the bones are great, much of what we said when we looked at the home we bought recently and are currently in. What you see above is my best attempt one week post moving to get an organized situation to work in. In the home we did a Chip and Joanna style total redo and those bones are looking great now. Down in my cave, not so much. I don't expect to put any money into this for now, if ever, and those bones really make it work but, hey, it's got to get better than this. After making a couple of garments I was so frustrated  with not having what I needed at my fingertips and worse, not knowing where a lot was. I took a break from stitching and totally reorganized  what you see above and more.

I touched every single piece of fabric that I own and refolded them all, putting them in better categories that work for me, much like my last sewing space. I went through every single pattern I own and did the same. Last, and most important, I organized every notion into being right where I would remember it and in a logical fashion. No it didn't get prettier, but it is far more functional now and I am not walking in circles looking for a Frixion Pen.

What you see above is a built in eight foot Electrician/Former Owner Guy's work table and pegboard back drop. The pegboard and the table are all now painted white, clean  and very neatly organized underneath with paints, dyes, laces, etc. I still did not like the distraction of all those carts and containers under the table. As I went through my fabrics I found 6 yards of batik that I planned on making into curtains for the little apartment we lived in last winter. Never bothered, but, geez, it was enough to.............


I love my clean white  work table. Ergonomically it is at the right height for me. I know the Former Owner guy is taller than me and has major back problems. Maybe this table was too low for him. It is just right for me and I love it. The back side is open and all sorts of goodies underneath are awaiting my efforts. My husband loves this and I thank him for recycling Former Owner Guy's foofy drapery rods so we could use them on the table.  It took a jigsaw!

Maybe this winter, in a fit of cabin fever, we will get the sheet rock taped. Hubs would like to seal the floors first which is a really good idea. All I know is I am getting happier in our new home with each passing day.

One more new item in my creative space, one I love and use more than you would think:


My new little vice!  A real vise! Yesterday I used it to hold a hook of a hook and eye duo so I could bend back the "tongue." This enabled me to put the hook under my presser foot and machine stitch it. Then back in the vise and I bent it back into shape. One favorite bra back to wearability! These are great for smashing those heavy seams on jeans and acting as a third hand when needed. I know there will be lots of uses for this new tool and 19.00 at the Big Orange Box store!
*************************
Sewing is happening. My table curtain was a one day wonder. I have finished my knit panel skirt and can't wait to show you. Not sure what will be next in the queue............maybe some heirloom sewing. Lata'..........Bunny

Tuesday, July 10, 2018

The Walk in the Woods skirt

I've started working on an interesting fabric from Emma One Sock. It is a luscious rayon knit with soft shades of greens and beiges, not my usual color choice. I knew I wanted to make a skirt and spent a lot of Eureka midnight moments waking to how I would go about this. I knew I wanted a slender soft look, not a big full gather,  and a curved hem. The big challenge was how to deal with the waistline. This skirt would go with the olive linen top I just made. I will review when done but here are a couple of points I am dealing with now.


I decided to drape the front panel on my form to see what I thought would be the right layout. It wasn't.  The print is horizontal and you can see that having that wide swath of beige and the print above at the waist is just not working. Luckily, I have enough fabric length to move this up and have the beige at the waist line. I draped that and it looked so much better. I am so glad I did this draping before putting in the Inviz Zip. This change will alter  the skirt from a ground hugging maxi to a more ankle showing look, which I think in the end will look better on my five feet. The volume in those super long skirts can sometimes just swallow a shorter babe right up. Hey, I'm thinking positively here!

Because the fabric is lightweight and tends to curl a tad,  I had to give a little extra attention to keeping the seams in line.


I pinned them parallel to the edge far back enough to let the presser foot not be bothered but also did pins on the vertical to further secure the edge from curling. I will stitch the back seam in and proceed to do Kenneth King's Invisible Zip method, love that and thank you Professsor King. Then it will be proceed to the waistline and get it done quick. My inspiration, BTW, was the Style Arc Indigo Maxi but I did not want any pockets. We'll see how this ends up. I am winging it and not using a pattern.

**********************************


I have begun making my own Greek yogurt in my Instant Pot. I never knew yogurt could taste this good. It is unlike ANYTHING you can get retail, so very easy and thick and rich as can be.  I've done two batches so far and make a batch weekly. To die for. I use the recipe from This Old Gal (who is not old at all.) Her directions are so very clear.....................Bunny

Thursday, June 28, 2018

A Little Linen Shirt!


This is Simplicity 8090. I like it. Last winter, in what I now call my creative drought, I bought fabrics for the future. One was a digitally printed viscose knit panel. I bought enough panels to make a simple skirt but since the colorway was out of my usual and because I wanted to wear this outfit in the summer I was on the search for fabric and pattern for simple sleeveless top. While reorganizing the past few days, I found this perfectly colored bit of linen. It was just enough to pull off this top. When the skirt is done I will model everything for you. In the meantime let's have a review!

Pattern:

Simplicity 8090 is six tops. Two are sleeveless longer hi-lo hem tunics with the classic tunic neckline. Two others have short sleeves, one sporting a front bottom ruffle. There are also two much shorter tops, one sleeveless  and plain and one a short tunic effect with 3/4 sleeves. I landed on View C, the simple sleeveless button front with collar. 

The pattern also has French darts which really take it away from the loving hands at home look. Even the short tops are a bit hi-lo on the hem, just enough to make me happy. I'm not a big hi-lo fan. It is an American Sewing Guild pattern. I am not quite sure what that indicates but it is on the front of the envelope.


I did a size 6 with no FBA. There is a lot of ease built into this garment at the bustline and hem which I found out from flat pattern measuring. I suggest you measure first before you decide on your usual FBA. This baby was right out of the envelope and fits quite well. I did notice on PR that others had the same thoughts regarding FBAs and ease. 

Fabric:

I used a leftover piece of handkerchief linen in a bronzey green, perfect weight for a summer top. It's been well washed to bring down the wrinkle factor. Interfacing was the only black I had on hand, a fusible tricot and it worked fine. I did not have enough fabrics for facing but the pattern specified bias bindings anyway. I found the closest I could in Wright's tapes and called it a day.


Construction:

This was pretty easy. Three things: I put the tab on the center back seam where it was indicated for the long tunic. I left it that way. I didn't pick up on that until too late in the process and wasn't going to start taking apart this lightweight linen. The other issue is the top stitching. You can see here I used the garment thread but with a triple stitch. When I do that I adjust the tension so the bobbin thread is tight and doesn't show on top. That looks great but as I had most of it top stitched around the collar and now going down the facing edges, I realized the turn of the lapel. Yikes. it looked nasty and I ripped most of that out and did the top stitching so that it was facing in the right direction once it hit the turn of the lapel. Does that make sense? Anyway. if you top stitch this, keep that in mind. Like I said, I was in a creative drought and these skills need to be brushed up a bit. I do like the look and heaviness of the triple stitch that you can see above. 


The bias binding was sewn to the armscye and then graded, trimmed and turned to the inside completely. To secure it was top stitched with the triple stitch. 

Now for the third faux pas: all my own fault. The only alteration I did here was what I do to everything right out of the envelope. I "petite" the bodice. I took out my usual half inch of length between the apex and the shoulder seam. OK, fits fine, works, what's the problem? The problem is this is a very short top to begin with. I just reduced the length by half an inch. On a five foot tall person a half inch can be critical and here it showed way too much waistline skin. Yikes! I think when I make the skirt it will have a waistband and hopefully that will take care of everything. Fingers crossed. 

I did not follow the recommendation for spacing the buttons that the pattern gave. It just seemed that there were too many. I kept it simple with no collar button and the first of only three starting just above mid-bust. 

All vertical seams were sewn, serged, pressed to the side and top stitched. 


In Conclusion:

I would definitely make this pattern again. I hope the skirt comes out as I envision and that it makes a nice casual outfit. Since I have moved, I have found that  this is not jeans and tee shirt territory and I need a bit better casual clothing, not necessarily work clothing. I am not saying people are dressed up, just that other options than leggings and jeans seem to be worn by many of all ages  and that's great, IMO. Hey, any excuse to sew more works for me. 

I would recommend this pattern but with a note to pay attention to the little details mentioned. It's a good basic and easy to fit as there is plenty of ease in the bust and waist areas. it's all about the shoulders and neck with this one and those French darts are awesome. I can see this made up in a Madras plaid, very preppy and beach worthy. 

We have another wave of house guests this weekend but next in the queue will be the skirt. Wait till you see that fabric.....................Bunny


Sunday, June 24, 2018

The Burnside Bibs


I am loving my Burnside Bibs. They are comfy and more comfy! There are lots of details in this pattern. I really like that they are a great alternative to jeans and such fun, oh my! Yes, this is a grandma wearing these "coveralls" but hey, I've earned my priveleges!


Pattern:

This is the  pattern Burnside Bibs from Sew House Seven Sewing Patterns. I have really been entranced by her designs and plan on trying more. This was a paper pattern  but PDF options are available. I really like her aesthetic, comfy, wearable and youthful. And her youthful seems to be wearable by all ages. The designer, Peggy, no last name that I can find, has been "designing and making patterns in the apparel industry for many years." Her experience shows. The paper pattern comes with a detailed booklet that really left nothing to chance. It was clear, well illustrated and easy to follow. I think a motivated beginner could work through it with Peggy's clear instructions. Options include making the bib in a curve or a squared shape, making cropped or full length pants, and making a more fitted design with darts and a zipper or one that pulls on and simply ties. I chose Version #1, sort of. I did the fitted pant, full length and the curved bib. If you are considering this pattern look at the different versions on the site to see what you might like. 


My one and only beef with the pattern was the serious nesting going on. You can  see above what I mean. I got around this by marking my pattern size markings with a colored sharpie, the better to see! I must admit here....I am working on a big four pattern now that the bibs are done and  that has the sizes split with 6 and 12 on one piece and 8, 10 and 14 on another pattern piece. It is all very clear. But other than the nesting issue this pattern is wonderful all around. 

Sizing is unique to Seven House Seven and runs from 00 (34 hips) to size 20 (50 hips). These are all on one paper pattern so you can see why all the nesting. For my version I used size 2, the 36 inch hips. I think you will agree it fit rather nicely. I did consider this a semi toile as I really did not care for the fabric initially. I did no fitting tweaks at all to Size 2. One thing to keep in mind is that the rise of the pant can be controlled by the straps. When I first put them on I was not happy with the length of the rear rise. It seemed too long. But, after fiddling with the straps and hiking it up, the crotch set into place much better. Version #1 has darts in the back and an invisible zip for a better, closer fit. Version #2 has a large unfitted waist and no zip.  That waist is required  to get the pants over the hips without a zip. #2 therefore has a fuller back and a more ruffled effect to the back waistline. I think I may go back and add the leather belt loops to the front so I can keep the straps in line with my natural waistline. They seem to stretch and drop, more a property of the fabric I think, certainly not the pattern. 


Fabric:

This was one of those end of summer linen bargains that I tried to take advantage of. The weight of the linen is "mid" to heavy and makes a nice pant. It has been washed several times which removes the need of future heavy ironing and makes the linen less "stiff" looking, more organic. This fabric comes out of the wash needing no ironing other than the hem edges. Linen is so comfortable to wear and such a delight to sew. There is lots of topstitching on this garment. It doesn't really show as the thread matches so closely and sinks right in, but the design needs it in many areas as in the pockets and waistband. Next time I might do a complimentary accent color for the topstitching. 

This is not a flattering color on me at all and that is why it has been in my stash a very long time. I just kept washing it and the more I washed it the more I liked it. I decided that if I were able to wear it with some white  and away from my face I might be able to get it to work. I think it wasn't to bad in the end for a color that does not work on me. 


For the rear belt loops I used a faux leather. Why? Well, by the time the loop strip was made of this heavy course linen, then folded  under, then attached to the back waist , its facing and interfacing, there were just too many layers to get through and still look good. I needed an alternative and the faux leather came to the rescue and it is washable, unlike real leather. In the end I really like the look. The pic above is a perfect rendition of the actual fabric colors, kind of an orangey brown. 

Construction:

I really followed the pattern booklet provided to the letter. I didn't make any fit changes either other than hem length. I wanted to see how it fit me with none and how it would look on my hips with all those pockets. I did cut down the front pocket about a half inch. Just my petite habit. I think the next time I make these I will cut the back pockets a bit smaller all around as well. I also think that loops on the sides of the front would make the straps work more in line with my natural waist.

For actual construction I did my usual linen routine: sew the seam, serge the seam, press to the side, topstitch . This makes a sturdy garment that will survive lots of washings.  There are lots of areas in the pattern directions that you are directed to topstitch so make some samples to get it the way you want before starting. I used regular thread. The next time I think I would use  heavier thread or triple stitch.

For the invisible zip, I used Kenneth King's method, new to me, and I liked it a lot. It involves using  a hemostat to pull the zipper pull through. It's rather quick, too, and I had no lumps at the bottom of the zip.

Making the belt loop of faux leather was easy. The pattern has you fold the fabric strip to the center and then fold in half, fold under the ends and then topstitch. That's a lot of  bulk with eight layers before even stitching to the pants. I cut a strip of faux leather the finished width of the belt loop. The length was double the finished size stated in the pattern. I used a rotary cutter for a nice clean edge. Then I got out a black fabric marker and ran it on all the cut edges. The strip was then folded in half with a tiny bit of double stick tape helping out. The short edges of the strip will not be folded under like denim belt loops. Your strip is the finished size with no folding under. Make sure when you place the loops that the folded edge of the strip is all matching, in other words all at the top or all at the bottom. Topstitch the long edges of the strips about an 1/8th of an inch in. Locate where you want to put your belt loops and sew the strips down, a bit over an eighth of an inch from the edge. I went back and forth three times being careful to get the needle in the same holes so I wouldn't cut the leather. Threads were drawn to the back and tied off. I did samples first with the same layers of fabric as the pants. I yanked and these loops held up fine. You can see from this ruffly picture that the stress really isn't on the belt loops. Pardon the lighting on this one. I wanted you to see the ruffle effect up close.


This is an easy to construct design. An edge stitching foot will help greatly as you do the topstitching. An enthusiastic beginner would enjoy this pattern. Can a grandma wear bibs? You be the judge for yourself. I am wearing this to a folk festival on the Cape in two weeks. This grandma's gone festival!

***************************

New house notes:

 The pics above with me in the bibs were taken in our challenging back yard. There are tons of trees which we cannot cut down. The gnarly one next to me is my favorite. It has so much character. I am standing in the new bed I planted. It seems to be surviving. Fingers crossed as this back yard needs help. I love this pic of the tree alone.


I LOVE our black stainless fridge. If you haven't seen black stainless, it is stainless with a mirror like finish, slightly darker than regular stainless and IT DOES NOT MAKE FINGERPRINTS. I can rub my butter and floured hands across it and it just wipes right off, easy peasy. The color and finish is such that you really can't pick it up on the internet. Check it out in the stores if you are in the need for new appliances. Happy Stitching!..........................Bunny


Wednesday, June 20, 2018

Tuesday, June 19, 2018

Vogue 9305, an asymmetrical delight!


I am really pleased with this top from Vogue 9305. It is basically four pieces with turned up hems and edges. Doesn't get much easier! It goes together quickly and is great for a bit of instant gratification.


First, let's get a bit of housekeeping out of the way. I wore this with flowing white linen pants, perfect combo, this past weekend. They are in the wash and I didn't want to hold up the review so used this white cotton twill number. This flow-y top definitely styles better with the softer, wider legged, slightly cropped white linen pants. Next, as we start anew here, you will  my find my photos have me with no makeup other than lipstick, just warning  you. I have  recently developed excema in my eyes. It is responding well to treatment but makeup, even foundation or concealer around the eyes is out Thank heavens lipstick is fine! So you may find my face not quite so dressed up. I do miss my makeup as I love that girly stuff!

I had to lighten the pics a lot to give you a better grasp of the detail and fabric.

Housekeeping  done so let's move on to this top!

Pattern:

Vogue 9305 is described by Vogue as a "fitted tunic with sleeve variations and shaped hemlines."  Vogue warns that the wrong side of the fabric will show and it does so keep that in mind when purchasing fabric for this design.


You will notice in the photos that the junction of the left and right side is at the left hipbone. I felt this wouldn't be that flattering for me and chose to make that intersection closer to my natural waist and thereby elongating the leg, that petite thing!  Aside from vanity, I also felt raising that slit would help me cut this pattern down to my petite frame. It seemed to be a better proportion for me. On the last post there was discussion about this pattern possibly not working for those of shorter stature. I disagree. With the right adjustment I think I got it to work.

Above you can see I removed 3/4 of an inch from the upper chest. I knew these sleeves would be too low, as they always are for me, so didn't hesitate to just tuck out some length strait across the upper chest and into the sleeves.  The next length reduction was from the lengthen/shorten line on the pattern near the waist. I took out 2 inches there. The last reduction was  a bit above the half way mark  for the curved right front hem. I took another two inches out there. The same amount was taken from the right front flounce piece as well as across the back in the same three places. This got the longest part of the tunic about 6 inches above the floor which felt right for my five foot frame. Removing all this length meant the side seams had to be trued before cutting and that is the white paper you see on the sides of the pattern pieces. I simply used ironed on freezer paper. You can see the 4 or so inches where the flounce connects to the right bodice with a serrated line above.

I did more altering to the pattern as well. Based on reviews I lowered the center front collar two inches and removed a half inch from the rest of the collar. I recommend this. It may enable you to make this dress without a center back seam or closure, further insuring this design to be a quickie construction. I am able to easily get it over my head now.

No FBA was done this time but I have lost a bit of weight so no need.

Fabric:


You can really get a good idea of the fabric in this photo of the rear on my form. It is a rayon crepe in a navy and grayish tie dye colorway.  It prewashed beautifully with no shrinkage. Hard to believe, right? The tie dye pattern runs along the grain for the most part. The fabric is VERY flow-y which I think this design warrants. You will also see here that I didn't have enough fabric to make this tunic or at least to make it so the design ran on grain. By deciding to add a waistline seam to the back of the garment and cutting  the upper back bodice on the cross grain the amount of yardage worked . The back skirt was on the length. From the get go I did not want a back seam or  closure but unfortunately laid my new back bodice out without the benefit of clear thinking and put the fold 5/8 of an inch out, thinking it was a seam. I did not have enough fabric to recut and just moving it over did not work with the sleeve design. To solve this the back bodice gained a center back seam, which actually was a 5/8 inch tuck. This put everything into the proper place and life went on. Here is a closeup of the neckline to give you a better idea of the crepe finish to the rayon. All of the pictures have been lightened substantially so you can  better see the detail and fabric.

Construction Detail:

Easy peasy!!!

I serged all edges before construction to eliminate the raveling this fabric could provide. Hem edges were simply serged and turned. The underside of the hem is visible with the flounce but it blends in and works. For the neckline I did a French binding, aka, double fold bias binding, that I understitched and turned to the inside. I really didn't want topstitching here. There is a lot of weight hanging from the neckline edge and shoulder seams. To secure it I took some light grey DMC floss and embroidered French knots all around the neckline. Shoulder seams were stabilized with selvedges. Do you cut off all your selvedges and keep them in a jar for these moments? Comes in handy! 


The center back seam was eliminated by cutting the back skirt on the fold. The back bodice also would have been cut on the fold if I hadn't mucked up but the tuck came to the rescue. 

I suggest cutting the neckline larger as it is quite close for a summery look and probably not that comfortable or flattering. Doing that, along with cutting on the fold eliminated any need for a closure, making this quick pattern even quicker. 

In the end:

I would definitely make Vogue 9305 again and recommend it highly. It CAN work for petites with the right length alterations which are easy to do. Make sure you use a fabric that is not stiff. A well washed linen would be lovely. Stabilize those shoulder seams as they carry a lot of weight and it wouldn't be a bad idea to stabilize the neckline too with a light tricot fusible in the binding or on the neckline seam, extending a tiny bit into the bodice. I really hope to see some of you try this pattern. I think it could be quite flattering on the large, the small, the short and the tall. I can see it being made in a chiffon and going over a strapless or tank-ish jumpsuit. Highly recommend! Vogue, you hit  a home run with this one!

Next up....................the Burnside Bibs. Can this grandma carry off  Rosy the Riveter meets Mr.Greenjeans?..........Bunny


Monday, June 11, 2018

Sewing has begun!


It has been a whole year since I have put my foot on the foot pedal of my trusty Pfaff. I feel like I just got back on a bicycle. It was a very frustrating day as I just could not find things that I needed. I winged it here and there but was determined to get this top done before our weekend guests arrived and I did! By the second afternoon of sewing it was all feeling better. Here is what I am working on:

When I saw this reviewed on PR It was love at first sight. Check out this fabulous version by Ann of Sew Baby News. Isn't she gorgeous in her dip-dyed version? This top seemed to have it all, feminine, flow-y, comfy looking for the summer heat and easy peasy cut on sleeves! I'm in! 


The fabric you can see above, a VERY drapey rayon crepe. It is from our favorite chain and it sewed up really nicely, no issues with quality. I did prewash it and nothing changed. My usual alterations were done out of the envelope and I will provide modeled pics and an in depth review in the next post. I love this pattern. 

************************************

The previous owner of our new home had a "workroom" in the basement. Lucky for me! He hung pegboard as guys do, all brown and ugly,  and his  eight foot work table was just waiting to meet my rotary cutters and mats. When we chose this home the decision was made that my husband would have ownership of the garage (large, heated and sheet rocked) and a small barn outside. I get the entire basement to do as I please. We are both happy. You can see it is open, very will lit with tons of outlets, dry as a bone and not an inkling of eau de basement. It was one of the reasons we bought this property. 


This will be the cutting and ironing side. I painted the pegboard and will paint the worktable as well, but all in good time. Those will be winter projects. For now stitching and creating have priority. The other side of the basement , to the right, will be my machine area. Fabrics will be stored between. This is not a pretty room and I doubt it ever will be. But it is spacious, well lit, and mine. Over time I will get more organized. In the meantime it feels so good to be sewing again. Ooo, did I say that already? Maybe five times? ...................................Bunny

Monday, May 28, 2018

New life, new look!

Hi, everyone! You have all been sorely missed as we made our way through this way too long journey. It started with making the decision to move back 350  miles to New Hampshire and family ties. Today I am  still unloading totes and setting up my sewing room. I feel with this return to sewing and to all of you through blogging, a new blog look was deserved. It is still being tweaked much so no judgie-ness, yet, anyway.

In the meantime I have so many thoughts spinning in my head that I want to share with you all that I am going to just stream the old consciousness and let it rip:

* Moving sucks, bigtime.
* Living close to family, in a totally rehabbed home on a lake in Central New Hampshire is divine.
* We are really happy here and having lots of fun and together time setting things up.
* I have a huge sewing space.
* Half the moving  truck, according to my eldest, was all my sewing stuff (embarrassed mom).
* I am almost done emptying totes.
* I have donated lots and lots.
* Yard sales are huge amounts of work.
* Moving is a huge amount of work.
* Hubs and I have watched way too may Chip and Joanna episodes as we lived in our tiny temporary apartment.
* We decided we could be Chip and Joanna, just not as cute.
* We had barn doors built and installed! Whadda I tell ya?
* Doing a whole house over really lets you give it a nice cohesiveness.
* May flies in NH are the spawn of Satan.
* I don't garden without my bug suit on.
* A few months back the neurologist suggested a new treatment plan for all my "stuff".
* I have been almost completely pain free for the first time in 12 years, allelhuiah!
* Did I say I loved Dr. M?
* Finding new docs when you  move sucks, too. Oy,,,,,,
* No opioids or narcotics. Won't touch that stuff.
* I do have too much fabric but I am mentally stable.
* I have become a member of a cult---Do you Instant Pot? No, you don't smoke it.
* I can't wait to sew.
* I am loving gardening again, even in my bug suit.
* Apartment living is not for us. Condos either.
* Hubs and I need our dirt.
* How do we always end up on the water when we have never, in our entire marriage, looked for water property?
* This summer Camp Poppaerniebunbunrunamuck will be open for all grandchildren. Bookings are being made now.
* I want to make cheese in my Instant Pot,,,,and jams, and meals, and cheesecake.
* What to do with all the velvets I have?
* Do you know what it's like to have opened your last tote/box and there are no sergers anywhere? ANYWHERE?
* Hubs found an unopened tote, two sergers inside. Hey, those totes all look alike.
* Serious sewing can take up a lot of space, if you let it.
* I REALLY miss my good friends in NY, REALLY LOTS..
* I am introverted, per my family.  None of my family is, just me.
* New home has a red metal roof. We are thinking dark gray paint.
* Have you ever fought over paint color? Worse than money.
* So many blogs have bit the dust since I started. I feel a blogpost coming re: that
* Love me some instant sew joy from instagram.
* Blogs have depth, can teach, and are work.
* I enjoy blog work.
*It feels good to be home.


The Ray Pinafore, 2025's Epic Fail

  Happy New Year and welcome to my epic fail of 2026. I guess you have to have one, right? This is the Ray Pinafore from Paper Theory Patter...